Quick Answer
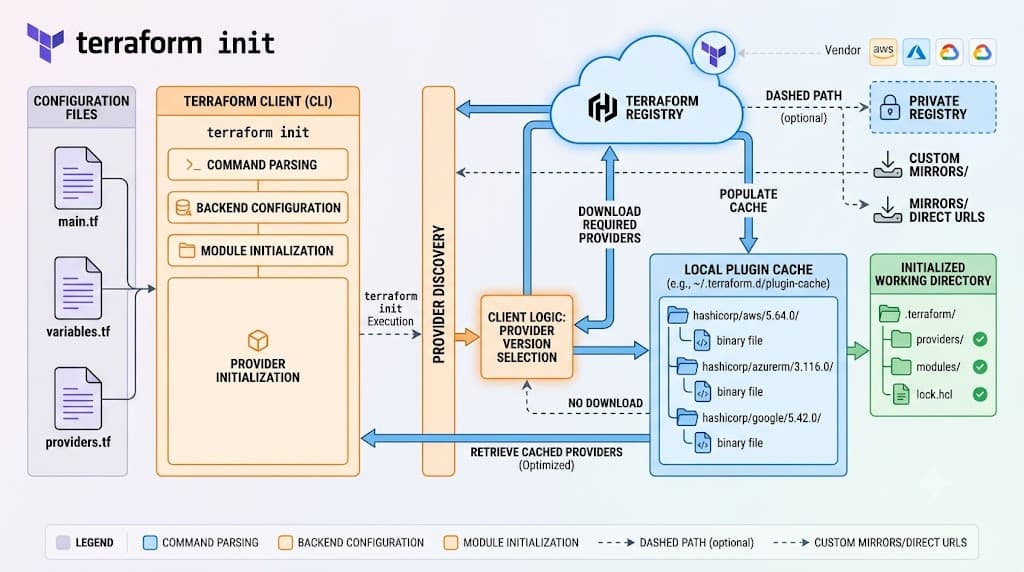
Running terraform init is the mandatory first step whenever you begin working with a new Terraform configuration, clone an existing repository, or add new provider plugins and modules to your Infrastructure as Code (IaC) workspace. This command inspects your HashiCorp Configuration Language (HCL) files, downloads the necessary provider binaries from the public registry or a private mirror, initializes your backend state storage, and prepares your local directory so that subsequent operations like plan and apply can execute successfully.
To see this in action, consider a directory containing a basic configuration file. Running the terminal command initializes the workspace instantly:
terraform init
Once the output confirms that Terraform has successfully initialized, you can verify the results by checking for the creation of the hidden .terraform directory and the terraform.lock.hcl file in your project root. This guarantees that your environment is fully synchronized with your declared provider requirements and ready for safe infrastructure provisioning.
Quick Answer
What is terraform init? It is the foundational Terraform CLI command used to initialize a working directory containing Terraform configuration files. Why is it used? It downloads required provider plugins, sets up backend state configuration, and caches external modules so that the CLI can parse your HCL code and execute plans.
When you run the terraform init command in a fresh project directory, Terraform scans all .tf files in that directory to identify required providers, backend settings, and module calls. It then connects to the configured registries, fetches the appropriate provider binaries matching your operating system and architecture, and stores them locally inside a hidden .terraform directory. It also generates a dependency lock file named terraform.lock.hcl to guarantee consistent provider versions across team members and automation pipelines.
To verify that your initialization completed successfully, you can inspect your working directory for the lock file and run a harmless execution check:
terraform validate
If the validation passes without errors, your directory is fully prepared for executing a detailed infrastructure plan.
Understanding the Concept
Infrastructure as Code has transformed how engineering teams manage cloud resources across AWS, Kubernetes, and other platforms. In traditional software development, compiling code often requires downloading libraries or dependencies before building the application. Similarly, Terraform configuration files written in HCL do not bundle heavy provider binaries within version control repositories. Storing multi-gigabyte provider binaries in Git would bloat repositories and introduce platform-specific compatibility issues.
Instead, Terraform relies on a lightweight declaration model. Your source code specifies what providers and resources you want, but leaves the how of fetching those tools to the initialization phase. When multiple engineers collaborate on a GitHub repository or when an automated CI/CD pipeline picks up the latest commit, the codebase remains pristine and agnostic of local operating system architectures.
This separation of concerns brings immense stability to modern DevOps workflows. The initialization process acts as the bridge between declarative human-readable intent and the imperative API calls executed against cloud providers. It establishes the local runtime environment, configures the state backend where infrastructure metadata will be securely stored, and locks provider versions to prevent unexpected breaking changes when someone else runs an update months later.
How It Works
Behind the scenes, the initialization engine executes a multi-step bootstrap sequence whenever you invoke it in your terminal. Understanding this internal mechanics helps demystify errors and ensures you know how to safely handle complex enterprise environments.
First, Terraform parses all HCL files in the current working directory. It aggregates every provider block, module source declaration, and the root terraform settings block. This scan builds an internal dependency graph of every external component required to parse and apply your infrastructure.
Second, it checks the local cache and the configured provider registry to locate matching versions. If you have specified version constraints—such as requiring AWS provider version 5.0 or higher—Terraform evaluates those constraints against available releases. Once a matching version is identified, it downloads the compiled binary package for your specific system architecture into the hidden .terraform/plugins/ directory.
Third, it evaluates backend configuration blocks. If you are configuring a remote backend like Amazon S3 with state locking via DynamoDB, the initialization sequence contacts that backend service, verifies your credentials, and either downloads existing state metadata or prepares the remote bucket to store state once changes are applied.
Finally, any remote or local child modules referenced in your configuration are fetched and unpacked into the local cache so they can be evaluated alongside your root configuration files.
Syntax and configuration
The initialization command accepts several flags and arguments designed to modify its behavior for automated pipelines or troubleshooting scenarios. While a basic execution requires no arguments, understanding the available syntax empowers engineers to manage complex deployment strategies.
Common CLI options include -upgrade, which forces Terraform to check for newer provider versions that match your version constraints and update the lock file accordingly. Another essential flag is -backend=false, which skips backend initialization, useful when you are running syntax checks or writing unit tests where state persistence is unnecessary.
In your HCL configuration files, initialization behavior is primarily governed by the terraform block and individual provider blocks. Here is how a standard configuration structure is defined:
terraform {
  required_version = ">= 1.6.0"
  required_providers {
    aws = {
      source  = "hashicorp/aws"
      version = "~> 5.30.0"
    }
  }
  backend "s3" {
    bucket = "my-company-terraform-state"
    key    = "prod/state.tfstate"
    region = "us-east-1"
  }
}

provider "aws" {
  region = "us-east-1"
}
Each of these blocks directly influences how the initialization command behaves. The required_version halts execution if your local Terraform CLI binary is out of date. The required_providers block ensures the correct plugin source and version are fetched. The backend block dictates where state synchronization occurs.
CLI workflow
Moving from an empty directory to a fully initialized workspace follows a strict sequential workflow in the terminal. Whether you are working locally on a Linux workstation or orchestrating deployments within a containerized CI/CD environment, the operational lifecycle remains identical.
First, you clone your project repository or create a new directory containing your .tf files. At this stage, running a plan or apply command will immediately fail because no providers exist in the workspace.
Second, you execute the initialization command. You will observe streaming output in your terminal as Terraform reads your configuration, contacts the public registry, and downloads provider plugins. For instance, when setting up an AWS provider, you will see output confirming the download of the HashiCorp AWS plugin zip file and its extraction into the local plugin directory.
Third, once the command exits with a success status, your CLI workflow transitions from bootstrap setup to operational validation. You can now execute syntax checks, generate execution plans, and apply configuration changes against your target cloud environment with full confidence that your local runtime is properly configured.
Practical Terraform Example
To see how initialization fits into a real-world infrastructure workflow, let us walk through a complete example targeting a cloud provider. In enterprise environments, teams frequently provision foundational resources such as virtual private clouds, security groups, or compute instances using structured HCL code.
Example
Imagine you are building a simple cloud infrastructure stack. You begin by creating a working directory and writing your configuration files. Below is a complete, working HCL configuration that defines a required provider and a simple local resource block for demonstration.
terraform {
  required_version = ">= 1.5.0"
  required_providers {
    aws = {
      source  = "hashicorp/aws"
      version = "~> 5.0"
    }
  }
}

provider "aws" {
  region = "us-west-2"
}

resource "aws_vpc" "main" {
  cidr_block           = "10.0.0.0/16"
  enable_dns_hostnames = true

  tags = {
    Environment = "production"
    ManagedBy   = "terraform"
  }
}
To set up this environment, open your terminal inside the directory containing the above code and run the initialization command:
terraform init
During execution, Terraform reads the configuration, recognizes the requirement for the hashicorp/aws provider, downloads the matching version from the official registry, and creates the local lock file. Once the command completes, your environment is fully prepared for planning and applying changes to your AWS account.
Verification
After running the initialization command, verifying that everything completed correctly is a critical habit for any DevOps or platform engineer. Skipping verification can lead to silent failures when you eventually attempt to run an apply operation.
First, check your project directory for the newly created artifacts. You should see a hidden .terraform directory and a file named terraform.lock.hcl. Opening the lock file reveals the exact cryptographic hashes of the downloaded provider plugins, ensuring reproducible deployments across different machines and CI/CD runners.
Second, run the validation command to confirm that your HCL syntax is correct and that the providers initialized without semantic errors:
terraform validate
Third, run a safe planning operation. Remember that terraform plan is a read-only operation that does not create, modify, or destroy real infrastructure; it simply compares your desired state against your current state or empty baseline and outputs an execution preview:
terraform plan
If the plan executes successfully and displays the expected resource additions, your initialization was entirely successful.
Common Mistakes
Even experienced engineers occasionally encounter pitfalls during the initialization phase. Recognizing these common errors helps you avoid wasted troubleshooting time and potential deployment outages.
One frequent mistake is skipping the initialization step when pulling fresh code in a CI/CD pipeline. Because the .terraform directory and provider binaries are typically excluded from Git via .gitignore, every new clone or container spin-up requires a fresh initialization before any other command can run.
Another dangerous practice is hard-coding cloud credentials or secrets directly into your provider blocks or configuration files. Storing API keys or secret access keys in plain text within version control exposes your cloud environment to severe security risks. Always rely on environment variables, shared credential files, or secure IAM roles instead.
Misunderstanding state implications is also common. Attempting to re-initialize an existing project with a different backend configuration without using migration flags can orphan your existing state or result in state locking conflicts. Always review backend migration prompts carefully before confirming changes.
Finally, failing to commit the terraform.lock.hcl file to version control breaks team consistency. Without the lock file, different engineers might download slightly different patch versions of the same provider, leading to unexpected plan drift and hard-to-debug failures.
Best Practices
Production environments demand rigorous standards for security, repeatability, and state management. When managing initialization in shared or enterprise settings, adhere to established best practices to keep your infrastructure stable.
Always store your Terraform state remotely in a managed storage service—such as an AWS S3 bucket with encryption enabled—rather than keeping state files on local developer machines. Pair your remote storage with a state-locking mechanism, such as a DynamoDB table, to prevent concurrent runs from corrupting your state data.
In automated CI/CD pipelines, always run initialization in a non-interactive mode by passing the -input=false flag. This prevents the CLI from hanging indefinitely if it encounters an unconfigured variable or missing backend parameter while waiting for human input.
Maintain strict version constraints in your required_providers blocks. Use pessimistic operator constraints (~>) to allow minor security and bug-fix updates while blocking major breaking version upgrades from entering your pipeline unexpectedly.
Finally, ensure your .gitignore file correctly ignores the .terraform/ directory, crash log files, and local override files, while explicitly including your terraform.lock.hcl file.
Troubleshooting
When initialization fails, error messages can sometimes appear opaque or intimidating. Having a systematic troubleshooting approach helps you diagnose and resolve issues quickly.
Failure modes
Network blocks and corporate firewalls are among the most common causes of initialization failures. If your build server or local machine sits behind a strict proxy or corporate filter, Terraform may be unable to reach the public provider registry, resulting in connection timeout errors. To resolve this, configure your environment variables for HTTP proxies (HTTP_PROXY and HTTPS_PROXY) or set up a private provider mirror within your enterprise network.
Another frequent issue is incompatible provider versions. If you update your Terraform CLI binary to a newer major version, older provider plugins cached locally may become incompatible. You can resolve version mismatch errors by running the initialization command with the upgrade flag to fetch compatible plugin binaries:
terraform init -upgrade
Backend locking errors occur when a previous Terraform run was interrupted while holding a state lock. If you encounter an error stating that the state is locked by another process, verify that no other engineer or CI/CD job is actively running a deployment. Once confirmed safe, you can manually release the lock using the appropriate backend force-unlock command with the locking operation ID provided in the error message.
By following these diagnostic steps and adhering to production-grade initialization workflows, you ensure your Infrastructure as Code pipeline remains robust, secure, and repeatable across every environment.
📌 Recommended Next Guides & References
  <li>
    <a href="/article/docker-and-kubernetes-how-they-work-together-2" class="text-primary hover:underline font-semibold flex items-center gap-2">
      <span>→</span> <span>Docker and Kubernetes: How They Work Together</span>
    </a>
  </li>

  <li>
    <a href="/article/kubernetes-ingress-explained" class="text-primary hover:underline font-semibold flex items-center gap-2">
      <span>→</span> <span>Kubernetes Ingress Explained: Routing, Controllers, and TLS</span>
    </a>
  </li>

  <li>
    <a href="/article/kubernetes-ingress-controller-explained" class="text-primary hover:underline font-semibold flex items-center gap-2">
      <span>→</span> <span>Kubernetes Ingress Controller Explained: Architecture, Routing, and Implementation</span>
    </a>
  </li>