Quick Answer
Terraform resources are the fundamental building blocks of any Infrastructure as Code (IaC) configuration managed through HashiCorp Configuration Language (HCL). When engineers declare a terraform resource, they are instructing the tool to provision, update, or destroy specific infrastructure components—ranging from virtual machines and storage buckets to networking rules and database clusters across various cloud providers like AWS, Azure, or Google Cloud. Understanding how these blocks operate, how the Terraform CLI executes them, and how state files track their lifecycle is essential for building reliable, repeatable, and secure cloud environments.
At its core, a terraform resource declaration maps directly to a specific API object managed by a provider. Unlike modules, which act as containers for multiple resources, or variables, which parameterize inputs, an individual terraform resource represents a concrete, actionable infrastructure entity. Every resource block establishes a contract between your desired configuration state and the actual remote API endpoints, orchestrating complex creation dependencies and handling atomic updates safely without requiring manual intervention in a web console.
Quick Answer
A terraform resource is an individual HCL block that defines a piece of infrastructure, such as a cloud server, virtual network, or database instance. Each resource block specifies a provider-defined resource type and a local name, followed by configuration arguments that dictate the attributes of the target infrastructure object. When you execute commands like terraform apply, Terraform reads these blocks, compares them against the stored state file and the remote cloud provider APIs, and executes the necessary API calls to create, modify, or destroy the resources. You verify the outcome by running terraform plan to inspect proposed changes or terraform show to inspect current active state attributes.
Understanding the Concept
To master Infrastructure as Code, you must grasp how declarative syntax differs from traditional imperative scripting. In imperative workflows, you write scripts that execute step-by-step instructions: create a server, then attach a disk, then configure a firewall. If any step fails halfway through, the script often leaves the environment in an unpredictable, partially configured state. Declarative frameworks like Terraform eliminate this anxiety by focusing on the desired end state. You describe what the infrastructure should look like using HCL resource blocks, and Terraform's core engine figures out the exact sequence of API operations required to reach that state.
Within this declarative model, the state file acts as the single source of truth. Terraform records the mappings between your declared HCL resource blocks and the real-world resource identifiers assigned by the cloud provider. For example, when you declare an AWS EC2 instance, Terraform records its instance ID, private IP, and security group attachments in the state file. On subsequent runs, Terraform evaluates your configuration files against this recorded state. If you change an argument in your resource block, Terraform calculates a diff and determines whether the change requires an in-place update or a complete destruction and recreation of the target object.
How It Works
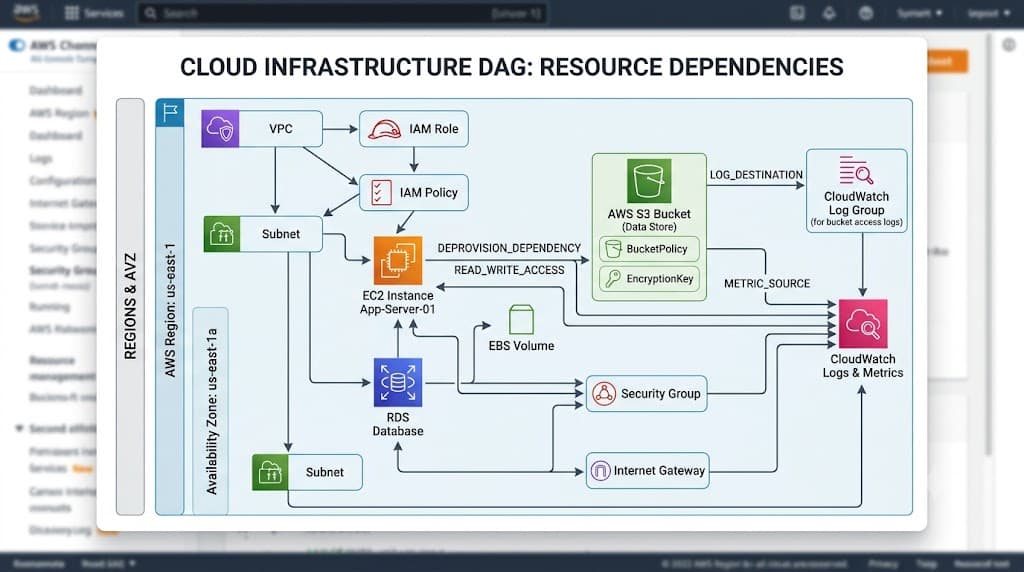
Behind the scenes, the Terraform workflow relies on a tight integration between the core binary, designated provider plugins, and the remote provider APIs. When you initialize a project, Terraform downloads the appropriate provider binaries specified in your configuration. These provider plugins contain the explicit schemas, validation rules, and API translation logic for every supported resource type. The core engine uses these schemas to validate your syntax, resolve inter-resource dependencies, build a directed acyclic graph (DAG) of execution order, and manage state synchronization.
State management is arguably the most critical mechanism governing how terraform resources behave. Because cloud APIs do not inherently know about your configuration files, Terraform must maintain a local or remote JSON-based state database. This file tracks metadata, dependency graphs, and attribute values. When you execute operations, Terraform locks the state to prevent concurrent modifications, refreshes the state by querying live APIs, plans the delta, and applies changes. Understanding this loop prevents common race conditions, state drift, and unexpected infrastructure replacement during routine maintenance operations.
Syntax and configuration
Every HCL resource block follows a strict, predictable structural anatomy that consists of a resource keyword, a provider-defined resource type, a local name, and a body containing configuration arguments. Consider the following structural breakdown:
resource "aws_instance" "web_server" {
  ami           = "ami-0c55b159cbfafe1f0"
  instance_type = "t2.micro"

  tags = {
    Name        = "ProductionWebServer"
    Environment = "Production"
  }
}
In this example, the keyword resource signals the start of the block. The string "aws_instance" defines the exact resource type provided by the AWS provider plugin. The second string, "web_server", is the local name. This local name is used exclusively within your configuration files to reference attributes of this resource from other blocks, such as security groups or output definitions. The inner arguments—such as ami, instance_type, and tags—are dictated by the provider schema and control the configuration parameters of the underlying cloud object. Argument values can be static strings, numeric values, booleans, lists, maps, or dynamic expressions derived from data sources and other resource attributes.
CLI workflow
The Terraform CLI provides the command-line interface necessary to drive the resource lifecycle through distinct operational stages. Mastering this workflow is essential for maintaining safe, predictable infrastructure deployments across local development environments and automated CI/CD pipelines.
The standard operational sequence begins with terraform init. This command initializes the working directory, downloads required provider plugins, configures backend state storage, and sets up module sources. Without running init, Terraform cannot parse provider-specific resource schemas. Once initialized, engineers run terraform plan. This crucial diagnostic command reads the configuration, queries the target APIs, compares the desired state against the current state, and prints a detailed execution plan outlining what resources will be created (+), modified (~), or destroyed (-).
Following a thorough review of the plan, the next step is terraform apply. This command prompts for confirmation (unless auto-approved via flags) and executes the planned changes against the cloud provider APIs. Conversely, when infrastructure is no longer needed, terraform destroy tears down all resources managed by the current configuration in reverse dependency order. It is vital to distinguish between terraform plan and terraform apply: plan is entirely read-only and safe to run in any environment, whereas apply makes permanent, billable modifications to your live cloud infrastructure. Always review plan output carefully before confirming an apply or destroy operation.
Practical Terraform Example
Implementing terraform resources correctly requires combining multiple dependent blocks to build a functional architecture. In real-world scenarios, resources rarely exist in isolation; they depend on networks, security boundaries, and storage attachments. By connecting resources via interpolation expressions, you establish explicit and implicit dependencies that allow Terraform to compute the correct creation order automatically.
Example
Below is a complete, working HCL configuration example that provisions a basic networking and compute setup on AWS, demonstrating how resource attributes are referenced across blocks:
terraform {
  required_version = ">= 1.0.0"
  required_providers {
    aws = {
      source  = "hashicorp/aws"
      version = "~> 5.0"
    }
  }
}

provider "aws" {
  region = "us-east-1"
}

resource "aws_vpc" "main" {
  cidr_block           = "10.0.0.0/16"
  enable_dns_hostnames = true

  tags = {
    Name = "main-vpc"
  }
}

resource "aws_subnet" "public" {
  vpc_id                  = aws_vpc.main.id
  cidr_block              = "10.0.1.0/24"
  map_public_ip_on_launch = true

  tags = {
    Name = "public-subnet"
  }
}

resource "aws_instance" "app_server" {
  ami           = "ami-0c55b159cbfafe1f0"
  instance_type = "t2.micro"
  subnet_id     = aws_subnet.public.id

  tags = {
    Name = "app-server"
  }
}
When you execute <a href="/article/terraform-apply-create-and-update-infrastructure-2" class="text-primary font-semibold hover:underline">terraform apply</a> on this configuration, Terraform analyzes the dependency graph. It recognizes that aws_subnet.public requires the id attribute from aws_vpc.main, and that aws_instance.app_server requires the id from aws_subnet.public. Consequently, Terraform creates the VPC first, retrieves its generated ID, provisions the subnet second using that ID, and finally launches the EC2 instance inside that specific subnet. The CLI output displays these ordered creation steps clearly before asking for final confirmation.
Verification
Validating that your terraform resources were successfully provisioned and match your intended configuration is a critical step in any deployment pipeline. Relying solely on a successful exit code from terraform apply is insufficient for mission-critical production environments; engineers must verify both state alignment and live cloud state.
The primary command for inspecting your current infrastructure state is terraform show. This command parses the active state file and outputs a human-readable representation of all managed resources and their current attribute values. For more targeted queries, you can use <a href="/article/terraform-state-explained-2" class="text-primary font-semibold hover:underline">terraform state</a> list to view every resource address managed in the state, followed by terraform state show aws_instance.app_server to inspect the exact attributes of a single resource.
Beyond Terraform's internal state introspection, safe verification extends to querying the cloud provider directly. For AWS deployments, you can use the AWS CLI to confirm that the physical resource exists and matches your expectations:
aws ec2 describe-instances --filters "Name=tag:Name,Values=app-server"
Similarly, when managing containerized infrastructure or Kubernetes clusters, verification involves checking pod statuses or cluster endpoints to ensure the declared resources are healthy and responsive. Combining internal state checks with external API verification ensures absolute confidence before routing production traffic to newly provisioned infrastructure.
Common Mistakes
Even experienced engineers occasionally fall into common traps when managing terraform resources. Recognizing and avoiding these pitfalls prevents accidental outages, security breaches, and corrupted state files.
The most hazardous mistake is skipping terraform plan or blindly executing terraform apply -auto-approve in production environments. Without inspecting the plan, you risk overlooking destructive attribute changes that force resource recreation, leading to unexpected downtime. Another severe error is hard-coding sensitive credentials, access keys, or database passwords directly inside HCL configuration files or version control repositories. Credentials should always be injected securely via environment variables, secret management systems, or IAM roles.
Misunderstanding state files is another frequent source of failure. Manually editing state JSON files or deleting state files without a backup often results in orphaned infrastructure and broken dependency mappings. Finally, using outdated provider arguments or pinning provider versions too loosely can cause unexpected breaking changes when providers release major updates. Always lock provider versions using semantic version constraints in your configuration.
Best Practices
Adopting industry best practices ensures that your terraform resources remain maintainable, secure, and scalable as your organization grows. Start by implementing remote state storage with state locking enabled—such as using an S3 bucket with DynamoDB locking in AWS—to prevent multiple engineers or CI/CD runners from concurrent state modifications that corrupt data.
Structure your configurations modularly. Break large monolithic configuration files into reusable modules categorized by function, such as networking, compute, and storage. Utilize input variables and output values cleanly to pass data between modules without hard-coding values. Furthermore, integrate automated formatting and linting tools like terraform fmt and terraform validate into your version control hooks and CI/CD pipelines to catch syntax errors and formatting inconsistencies early.
Troubleshooting
Inevitably, engineers encounter errors during resource provisioning due to API rate limits, permission denials, or state locks. A common troubleshooting scenario involves encountering a state lock error when an interrupted apply leaves a lock file active in the backend storage.
When a state lock error occurs, Terraform halts execution to prevent corruption and outputs a message containing the specific Lock ID. To resolve this safely without risking race conditions, first verify that no other CI/CD pipeline or engineer is actively running an apply command. Once confirmed, you can release the lock manually using the force-unlock command:
terraform force-unlock <LOCK_ID>
Another frequent troubleshooting scenario involves provider conflict errors or resource drift, where someone modified cloud infrastructure manually outside of Terraform. When manual drift occurs, Terraform's plan will attempt to revert changes to match HCL. If you want to adopt the manual changes into your configuration, update your HCL code accordingly. If you need to import existing unmanaged cloud resources into your Terraform state without recreating them, use the <a href="/article/terraform-import-bring-existing-infrastructure-under-management" class="text-primary font-semibold hover:underline">terraform import</a> command followed by the resource address and the provider-specific resource ID:
terraform import aws_instance.app_server i-1234567890abcdef0
By systematically analyzing error messages, leveraging state inspection commands, and understanding provider error responses, platform engineers can quickly diagnose and resolve deployment failures.
📌 Recommended Next Guides & References
  <li>
    <a href="/article/docker-and-kubernetes-how-they-work-together-2" class="text-primary hover:underline font-semibold flex items-center gap-2">
      <span>→</span> <span>Docker and Kubernetes: How They Work Together</span>
    </a>
  </li>

  <li>
    <a href="/article/kubernetes-ingress-explained" class="text-primary hover:underline font-semibold flex items-center gap-2">
      <span>→</span> <span>Kubernetes Ingress Explained: Routing, Controllers, and TLS</span>
    </a>
  </li>

  <li>
    <a href="/article/kubernetes-ingress-controller-explained" class="text-primary hover:underline font-semibold flex items-center gap-2">
      <span>→</span> <span>Kubernetes Ingress Controller Explained: Architecture, Routing, and Implementation</span>
    </a>
  </li>