Quick Answer
Terraform state is a fundamental concept in Infrastructure as Code (IaC) that serves as the single source of truth mapping your real-world cloud resources to your HCL configuration files. When you execute provisioning commands, the tool uses this record to determine what infrastructure already exists, what changes need to be applied, and how to update managed resources efficiently. Without this metadata layer, managing cloud infrastructure at scale would be practically impossible, as the provisioning engine would have no persistent memory of previously deployed resources.
Understanding how this file operates is critical for any DevOps engineer, platform engineer, or system administrator working with cloud providers such as AWS. In collaborative environments, managing this data safely requires understanding remote backends, state locking, and secure storage mechanisms to prevent race conditions, configuration drift, and accidental resource deletion. This comprehensive guide explores the architecture of resource tracking, command-line interfaces, practical configuration patterns, and production-grade troubleshooting strategies.
Quick Answer
Terraform state is a specialized database or JSON-formatted record—frequently named terraform.tfstate—that Terraform uses to store metadata about your managed infrastructure and dependencies. It maps your declarative HCL configuration files to real-world resources deployed in cloud providers, tracking attributes, IDs, and dependency graphs. When you run execution plans, Terraform compares your configuration against this local or remote record to calculate necessary create, update, or destroy actions. Because it contains sensitive resource attributes and acts as the central authority for your infrastructure deployments, storing, securing, and locking this record properly is essential for production stability and team collaboration.
Understanding the Concept
At its core, Infrastructure as Code is declarative: you write configuration files describing the desired state of your architecture, and the provisioning engine figures out how to reach that state. However, declarative tools require a mechanism to remember what they created during previous runs. Cloud Application Programming Interfaces rarely provide an instantaneous, reliable way to query every resource by name across multiple providers without incurring heavy latency and pagination overheads. Furthermore, cloud providers frequently assign random identifiers, internal IP addresses, and opaque Amazon Resource Names only after a resource has been successfully provisioned.
The tracking file bridges this gap by persisting those cloud-assigned identifiers and attributes locally or remotely. When you define a resource block in your HCL code, Terraform initially has no knowledge of its real-world counterpart. Once applied, the resulting resource ID and associated metadata are written directly into the state record. Subsequent execution plans read this record to evaluate whether your configuration has drifted or if any updates are required. Maintaining this separation between your declarative configuration and the live resource metadata allows Terraform to execute targeted, atomic updates rather than rebuilding your entire infrastructure stack every time a single line of code changes.
Syntax and configuration
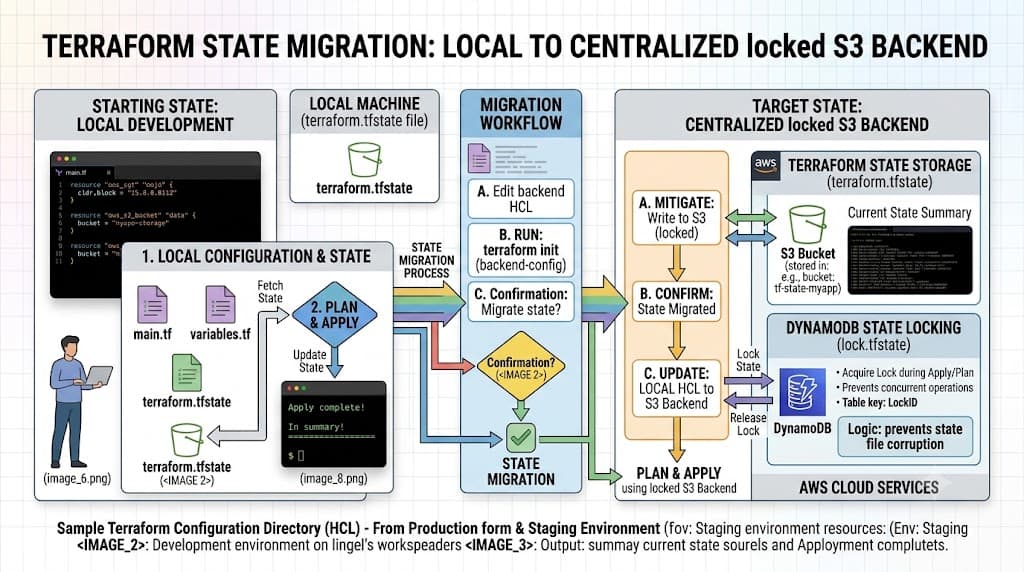
Configuring how state is stored and retrieved involves defining a terraform block with a nested backend configuration within your HCL files. By default, Terraform uses a local backend, writing metadata to a file named terraform.tfstate directly in your working directory. While suitable for local experimentation and single-developer environments, local storage introduces severe risks for team collaboration, including accidental overwrites, missing updates, and a lack of state locking.
To configure a remote backend—such as an Amazon S3 bucket equipped with DynamoDB locking—you define explicit block arguments within your root module. Below is an example of an S3 remote backend configuration block:
terraform {
  required_version = ">= 1.5.0"
  required_providers {
    aws = {
      source  = "hashicorp/aws"
      version = "~> 5.0"
    }
  }
  backend "s3" {
    bucket         = "my-company-terraform-state-bucket"
    key            = "prod/networking/terraform.tfstate"
    region         = "us-east-1"
    dynamodb_table = "terraform-state-locks"
    encrypt        = true
  }
}

provider "aws" {
  region = "us-east-1"
}

resource "aws_vpc" "main" {
  cidr_block           = "10.0.0.0/16"
  enable_dns_hostnames = true
  enable_dns_support   = true

  tags = {
    Name        = "production-vpc"
    Environment = "production"
  }
}
In this configuration, the backend "s3" block instructs Terraform to store the state file within a secure AWS S3 bucket under a specific key path. The dynamodb_table argument enables state locking, preventing concurrent execution runs from corrupting the record by ensuring only one process can acquire the lock at a time. The encrypt = true parameter ensures that the stored file is encrypted at rest using server-side encryption. Understanding this syntax is vital because misconfiguring backend parameters can lead to split-brain scenarios or inaccessible deployment records.
How It Works
When you execute provisioning commands, the internal engine initiates a multi-phase lifecycle to evaluate and reconcile differences between your local code, the persistent state record, and the actual cloud infrastructure. First, Terraform refreshes the record by querying the target cloud provider's APIs to gather current metadata for all managed resources. This refresh phase ensures that any out-of-band modifications made directly in the cloud console are captured before calculations begin.
Once refreshed, Terraform constructs a dependency graph based on references between your HCL resource blocks. It then compares your declarative configuration against the refreshed state record. If a resource exists in your code but not in the record, Terraform flags it for creation. If it exists in both but attributes differ, it flags an update. If a resource exists in the record but has been removed from your code, it flags the resource for destruction. This entire calculation happens locally within your execution environment before any changes are transmitted to the cloud provider.
State locking is another crucial mechanism governing how multi-user and CI/CD pipelines interact with the backend. When an execution starts against a remote backend supporting locking, the client attempts to acquire an exclusive lock using an identifier or locking table. If another process holds the lock, execution halts with an error message, protecting the underlying data structure from concurrent corruption. Once the operation completes, the lock is automatically released.
CLI workflow
The Terraform command-line interface provides the primary mechanism for interacting with your infrastructure and managing state transitions. Understanding the distinction between individual CLI commands is essential for maintaining a reliable deployment workflow and avoiding unintended disruptions to production environments.
The standard CLI workflow follows a deliberate sequence of initialization, planning, review, and application:
terraform init: Initializes your working directory by downloading required provider plugins and configuring the backend storage block defined in your HCL files.terraform validate: Parses your configuration files to check for syntactic validity and internal consistency without connecting to remote APIs.terraform plan: Generates and displays an execution plan by comparing your configuration against the current state record and querying provider APIs. This command is non-destructive and lets you preview proposed changes.<a href="/article/terraform-apply-create-and-update-infrastructure-2" class="text-primary font-semibold hover:underline">terraform apply</a>: Executes the actions proposed by the execution plan against your cloud provider, creating, updating, or destroying resources as necessary and updating the state file upon completion.<a href="/article/terraform-destroy-safely-remove-managed-infrastructure-4" class="text-primary font-semibold hover:underline">terraform destroy</a>: A highly destructive command that removes all resources managed by your configuration and clears the corresponding entries from the state file.
Distinguishing terraform plan from terraform apply is a fundamental operational discipline. The plan phase is strictly read-only regarding infrastructure creation or modification, although it may refresh state metadata. The apply phase modifies live cloud resources and writes the resulting updates back to storage. Running terraform apply without first reviewing a detailed plan in production environments introduces severe operational risks.
Practical Terraform Example
To observe how state tracking operates in practice, consider a complete, self-contained example deploying a basic virtual private cloud network. Writing the configuration, initializing the workspace, and observing the execution workflow demonstrates how metadata transitions from empty initialization to active tracking.
When you execute your first apply command, the engine creates the physical cloud resource and populates the tracking file with attributes such as the unique VPC identifier, Route Table associations, and DHCP options. Subsequent runs inspect these attributes to verify whether any modifications are required.
Example
Consider the following configuration defining an AWS subnet within a custom Virtual Private Cloud. This example illustrates how resource references create internal dependencies within the tracking metadata.
provider "aws" {
  region = "us-west-2"
}

resource "aws_vpc" "lab" {
  cidr_block           = "172.16.0.0/16"
  enable_dns_hostnames = true

  tags = {
    Name = "lab-vpc"
  }
}

resource "aws_subnet" "subnet_public" {
  vpc_id                  = aws_vpc.lab.id
  cidr_block              = "172.16.1.0/24"
  map_public_ip_on_launch = true

  tags = {
    Name = "lab-public-subnet"
  }
}
To execute this configuration and generate the tracking metadata, run the following CLI sequence in your terminal:
terraform init
terraform plan -out=tfplan.binary
terraform apply tfplan.binary
In this sequence, terraform init prepares the workspace. The terraform plan -out=tfplan.binary command computes the necessary actions and saves the execution plan to a binary file, ensuring that the exact changes reviewed are the ones applied. Finally, terraform apply tfplan.binary provisions the VPC and subnet in AWS and writes their attributes into the local or remote state file.
Verification
Inspecting your deployment metadata safely without risking modifications to live infrastructure is a critical operational skill. Terraform provides specialized CLI subcommands designed exclusively for examining and querying the state file without triggering API calls to cloud providers or altering resource configurations.
The primary command for inspecting managed resources is terraform state. This subcommand includes several utility flags allowing engineers to list resources, inspect specific attributes, and manage tracking entries safely. For instance, running terraform state list outputs a complete inventory of every resource tracked in your current environment.
To view detailed attributes of a specific resource—such as the unique ID or IP configuration of the subnet created in the previous example—you execute:
terraform state show aws_subnet.subnet_public
This command reads directly from the local or remote storage record, displaying all attributes stored by the provider without contacting AWS. Another extremely useful verification technique is running terraform refresh. This command queries the cloud provider APIs and updates your state file with any current real-world metadata changes, ensuring your local record matches live cloud reality without modifying the actual infrastructure.
Common Mistakes
Working with deployment metadata introduces several frequent pitfalls that can lead to corrupted environments, resource drift, or accidental downtime. Recognizing these mistakes helps engineering teams establish robust operational guardrails and automated workflows.
One of the most dangerous mistakes is skipping the terraform plan phase and executing terraform apply directly against production environments. Without reviewing the proposed changes, operators often fail to notice destructive replacements, such as forcing a database instance to be destroyed and recreated due to an immutable attribute change.
Another prevalent error is hard-coding sensitive credentials—such as AWS secret access keys, database passwords, or API tokens—directly into your HCL configuration files or committing local state files containing sensitive outputs into public or private Git repositories. State files store resource attributes in plain text, meaning hard-coded passwords or sensitive outputs will be exposed in version control.
Manually editing the state file using external text editors to resolve dependency conflicts is also strongly discouraged. While advanced scenarios occasionally require state manipulation commands like terraform state mv or terraform state rm, direct manual edits bypass internal checksum validation, frequently resulting in permanent state corruption and orphaned cloud resources.
Best Practices
Implementing robust state management practices ensures stability, security, and smooth collaboration across engineering teams. Production environments demand strict adherence to architectural patterns that protect metadata integrity and prevent unauthorized access.
Always utilize a remote backend equipped with native state locking, such as AWS S3 with DynamoDB, Google Cloud Storage, or Terraform Cloud. Remote backends eliminate the risk of developers overwriting each other's changes and ensure a single, consistent source of truth accessible across your CI/CD pipelines.
Enforce strict access control lists and encryption standards on your state storage buckets. Because state files frequently contain sensitive information—including database connection strings, private keys, and initial administrator credentials—they must be encrypted at rest and in transit, with access restricted strictly to authorized automation roles and administrative personnel.
Integrate automated planning and validation into your CI/CD pipelines using pull request checks. Engineers should review automated plan outputs before merging code changes, ensuring that every infrastructure modification is audited and approved prior to applying updates in staging or production environments.
Troubleshooting
Even with rigorous operational standards, engineers occasionally encounter state-related anomalies, synchronization errors, or locking conflicts. Having a structured troubleshooting methodology ensures rapid recovery when issues arise.
One common failure mode is a persistent state lock error, where an aborted CLI run leaves an active lock in the remote backend table. When this occurs, running subsequent commands fails with an error indicating the lock cannot be acquired. To resolve this safely, first verify that no other CI/CD pipeline or engineer is actively running an apply. Once confirmed, you can force-unlock the state using the lock ID provided in the error message:
terraform force-unlock <LOCK_ID>
Another frequent issue is resource drift or state mismatch, where a resource was modified or deleted outside of Terraform. If Terraform reports that a resource expected in the state no longer exists in the cloud provider, you can use terraform state rm to remove the stale entry from the tracking file without destroying anything else, allowing you to re-import or recreate the resource cleanly.
If you need to bring an existing, manually created cloud resource under management without destroying it, use the import command:
<a href="/article/terraform-import-bring-existing-infrastructure-under-management" class="text-primary font-semibold hover:underline">terraform import</a> aws_vpc.lab vpc-0123456789abcdef0
This command queries the resource from the cloud provider using its unique identifier and writes a new entry into your state file, aligning your infrastructure with your HCL configuration without incurring downtime.
📌 Recommended Next Guides & References
  <li>
    <a href="/article/docker-and-kubernetes-how-they-work-together-2" class="text-primary hover:underline font-semibold flex items-center gap-2">
      <span>→</span> <span>Docker and Kubernetes: How They Work Together</span>
    </a>
  </li>

  <li>
    <a href="/article/kubernetes-ingress-explained" class="text-primary hover:underline font-semibold flex items-center gap-2">
      <span>→</span> <span>Kubernetes Ingress Explained: Routing, Controllers, and TLS</span>
    </a>
  </li>

  <li>
    <a href="/article/kubernetes-ingress-controller-explained" class="text-primary hover:underline font-semibold flex items-center gap-2">
      <span>→</span> <span>Kubernetes Ingress Controller Explained: Architecture, Routing, and Implementation</span>
    </a>
  </li>