Quick Answer
Infrastructure as Code has transformed how engineering teams build, scale, and maintain cloud environments. By defining compute, storage, and networking through human-readable configuration files rather than manual clicking through a web console, teams achieve consistency, auditability, and speed. For anyone starting out, a solid terraform tutorial provides the foundational blueprint needed to understand how declarative automation operates in real-world engineering environments. This guide walks you through every essential phase of setting up your first project, writing HashiCorp Configuration Language, mastering the command-line workflow, avoiding typical operational pitfalls, and verifying your infrastructure safely.
Quick Answer
A terraform tutorial teaches you how to provision and manage cloud infrastructure safely using HashiCorp Configuration Language and the Terraform command-line interface. Terraform works by taking your declarative configuration files, generating an execution plan of necessary cloud changes, and applying those changes against your targeted provider while keeping track of existing resource states in a designated state file.
Understanding the Concept
Infrastructure as Code replaces manual provisioning scripts and point-and-click console configuration with version-controlled code files. In traditional environments, setting up a virtual machine, a database, or a secure network requires dozens of manual interactions with a graphical user interface. This manual approach introduces configuration drift, where two environments that are supposed to be identical slowly diverge due to undocumented manual changes.
Terraform solves this challenge by adopting a declarative model. Instead of writing imperative step-by-step shell scripts that tell the cloud API exactly how to build a server, you write declarative configuration files that describe what the final infrastructure should look like. Terraform's engine inspects your desired state, compares it against the real-world infrastructure tracked in its state file, and calculates the precise sequence of creation, modification, or destruction actions required to bring the cloud environment into alignment.
This approach brings the rigorous engineering practices typically reserved for software development—such as code reviews, automated testing, branching strategies, and continuous integration pipelines—directly to cloud infrastructure management. Whether you are deploying a simple static website bucket or a complex multi-region Kubernetes cluster, understanding how Terraform orchestrates resources is a critical skill for modern developers, platform engineers, and system administrators alike.
How It Works
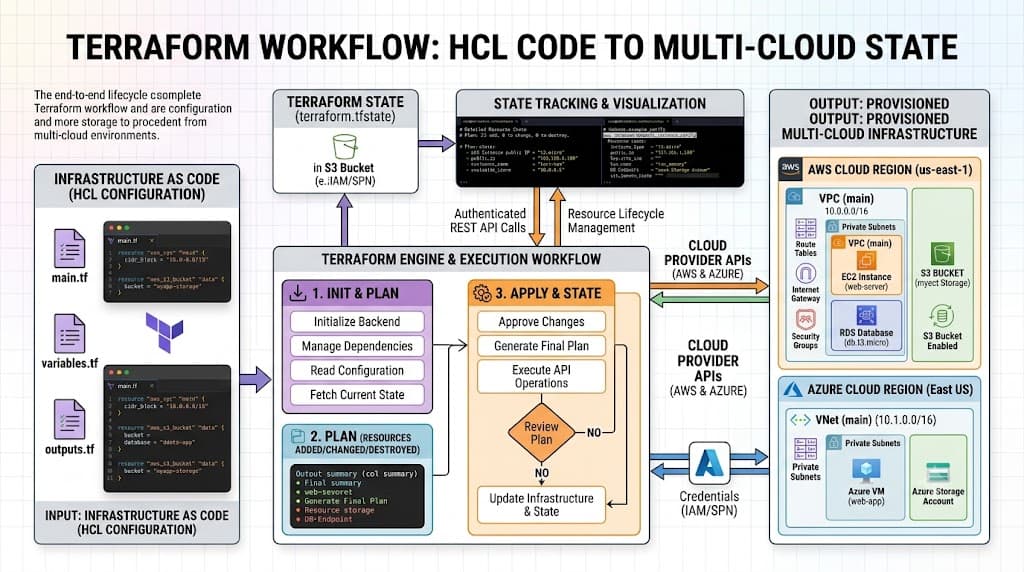
The Terraform lifecycle revolves around three core phases: initialization, planning, and execution. When you start a new project, you begin by writing configuration files that declare the provider plugins you need—such as AWS, Google Cloud, Azure, GitHub, or Docker—alongside the specific resources you want to create.
When you run initialization commands, Terraform downloads the necessary provider plugins and prepares your local working directory. During the planning phase, Terraform queries the target cloud provider API to inspect current resource states and matches them against your HCL files. It then outputs a detailed execution plan showing whether resources will be added, modified in place, or destroyed. Once an engineer reviews and approves this plan, the execution phase applies the changes to the real-world infrastructure.
Syntax and configuration
HashiCorp Configuration Language is designed to be readable by humans while remaining easily parsed by machines. An HCL configuration file consists primarily of blocks, arguments, and expressions. A block is a container for other content, usually representing a specific object like a resource or a provider.
For example, a provider block tells Terraform which cloud API or service integration to interact with, such as AWS or GitHub. A resource block defines a piece of infrastructure, such as a virtual private cloud, a compute instance, or an IAM user. Each resource block takes two labels: the resource type and a local name used to reference that resource elsewhere in your configuration.
Arguments assign values to configuration parameters within a block, such as instance sizes, region names, or tags. Expressions evaluate these values, which can be literal strings, numbers, booleans, or complex references to attributes generated by other resources. Understanding how these blocks interlock is vital for building modular and maintainable infrastructure projects.
CLI workflow
The Terraform command-line interface provides the primary mechanism for interacting with your projects. The foundational workflow follows a strict, deliberate sequence designed to prevent accidental infrastructure damage.
First, you initialize your workspace using the initialization command, which downloads provider plugins and configures the backend state storage. Second, you run the validation command to check your configuration syntax for errors before interacting with any cloud APIs. Third, you execute the planning command to generate a dry-run preview of proposed changes. Finally, you run the apply command to execute those changes.
It is essential to distinguish between terraform plan and terraform apply. The plan command never modifies real-world resources; it only displays what will happen. The apply command executes those changes, but it automatically generates and presents the exact same plan for confirmation unless explicitly overridden with automated flags.
Practical Terraform Example
Putting theory into practice requires a complete, working configuration that demonstrates how providers, resources, and outputs fit together. In this example, we examine a basic local file resource configuration to illustrate how Terraform manages files on your local filesystem without requiring complex cloud credentials.
This simplified scenario allows beginners to grasp the complete lifecycle without worrying about cloud billing or complex networking setups. The configuration defines a local provider, creates a text file containing greeting text, and outputs the unique identifier of the created file.
Example
Below is a complete, syntactically valid HCL configuration for managing a local text file. This example demonstrates the required provider block and resource block structure.
terraform {
  required_version = ">= 1.0.0"
  required_providers {
    local = {
      source  = "hashicorp/local"
      version = "~> 2.4.0"
    }
  }
}

provider "local" {
  # The local provider manages local files and system resources
}

resource "local_file" "welcome_note" {
  content  = "Hello, welcome to Infrastructure as Code!"
  filename = "${path.module}/welcome.txt"
}

output "file_id" {
  value       = local_file.welcome_note.id
  description = "The content-based identifier of the generated file."
}
To run this example, save the code into a file named main.tf, open your terminal in the same directory, and execute the initialization command to download the local provider plugin. Next, run the planning command to inspect the proposed file creation, followed by the apply command to generate the file on your disk.
Verification
Verifying that your infrastructure was provisioned correctly is a critical step in any deployment workflow. Verification confirms that the real-world state matches your declarative intent and ensures that downstream applications can successfully consume the provisioned resources.
When working with local files, verification can be as simple as checking your directory listing or inspecting the file contents. In cloud environments like AWS, verification involves querying cloud command-line tools, checking monitoring dashboards, or running automated health checks against provisioned endpoints.
Verification
To verify the local file example created in the previous section, you can use standard operating system commands or inspect the state file. Run the following terminal commands to confirm resource creation and review Terraform's tracked state.
# Check if the file exists in the current directory
ls -la welcome.txt

# Read the contents of the generated file
cat welcome.txt

# Inspect Terraform's recorded state for the resource
terraform show
If the file exists, contains the exact string specified in your HCL configuration, and appears in the terraform show output without errors, your provisioning workflow was successful.
Common Mistakes
Even experienced engineers occasionally make errors when writing infrastructure code. Understanding these common mistakes helps you avoid costly downtime and accidental data loss.
One frequent mistake is skipping the terraform plan step and blindly running apply in automated scripts without reviewing the execution output. Another dangerous error is hard-coding sensitive credentials, access keys, or database passwords directly into your HCL files. Credentials should always be injected via environment variables, secure secret managers, or provider-specific authentication mechanisms.
Beginners also frequently misunderstand the role of the state file. Manually editing the state file JSON or deleting it entirely without backing it up will desynchronize Terraform from your real infrastructure, leading to orphaned resources, deployment locks, and synchronization failures. Always treat the state file as a sensitive artifact that requires secure remote storage and state locking.
Best Practices
Production-grade Terraform deployments require adherence to established industry best practices. Implementing these guidelines early ensures that your infrastructure remains secure, maintainable, and resilient as your organization scales.
Always use remote state backends—such as secure cloud object storage with encryption enabled—rather than keeping state files locally on your laptop. Enable state locking via mechanisms like distributed database tables to prevent concurrent team members from applying conflicting changes simultaneously.
Pin your provider versions and Terraform core versions strictly in your configuration blocks to prevent unexpected breaking changes when new upstream versions are released. Implement rigorous access controls, ensuring that only authorized CI/CD pipelines or designated engineering roles possess permissions to execute infrastructure modifications in production environments.
Troubleshooting
Infrastructure deployments occasionally encounter failures due to network timeouts, expired credentials, API rate limits, or conflicting resource definitions. Knowing how to diagnose and resolve these failure modes efficiently is an essential skill.
When a deployment fails, carefully examine the full error output provided by the CLI. Terraform usually highlights the exact line number in your HCL code where the validation or execution error occurred, pointing you directly to the offending resource or argument.
Failure modes
State drift occurs when someone modifies cloud infrastructure manually outside of Terraform, causing the real-world configuration to diverge from the state file. To resolve drift, run a fresh plan to inspect the discrepancies and update your HCL code or apply corrections accordingly.
Locking conflicts happen when a previous Terraform process terminated unexpectedly, leaving a lock file active in your remote backend. You can safely release stale locks using the force-unlock command paired with the specific lock ID provided in the error message, provided you are certain no other apply process is currently running.
Authentication errors usually stem from expired cloud CLI sessions or missing environment variables. Verify your active credentials using provider-specific status commands before re-running your initialization and apply sequence.
📌 Recommended Next Guides & References
  <li>
    <a href="/article/docker-and-kubernetes-how-they-work-together-2" class="text-primary hover:underline font-semibold flex items-center gap-2">
      <span>→</span> <span>Docker and Kubernetes: How They Work Together</span>
    </a>
  </li>

  <li>
    <a href="/article/kubernetes-ingress-explained" class="text-primary hover:underline font-semibold flex items-center gap-2">
      <span>→</span> <span>Kubernetes Ingress Explained: Routing, Controllers, and TLS</span>
    </a>
  </li>

  <li>
    <a href="/article/kubernetes-ingress-controller-explained" class="text-primary hover:underline font-semibold flex items-center gap-2">
      <span>→</span> <span>Kubernetes Ingress Controller Explained: Architecture, Routing, and Implementation</span>
    </a>
  </li>