Quick Answer
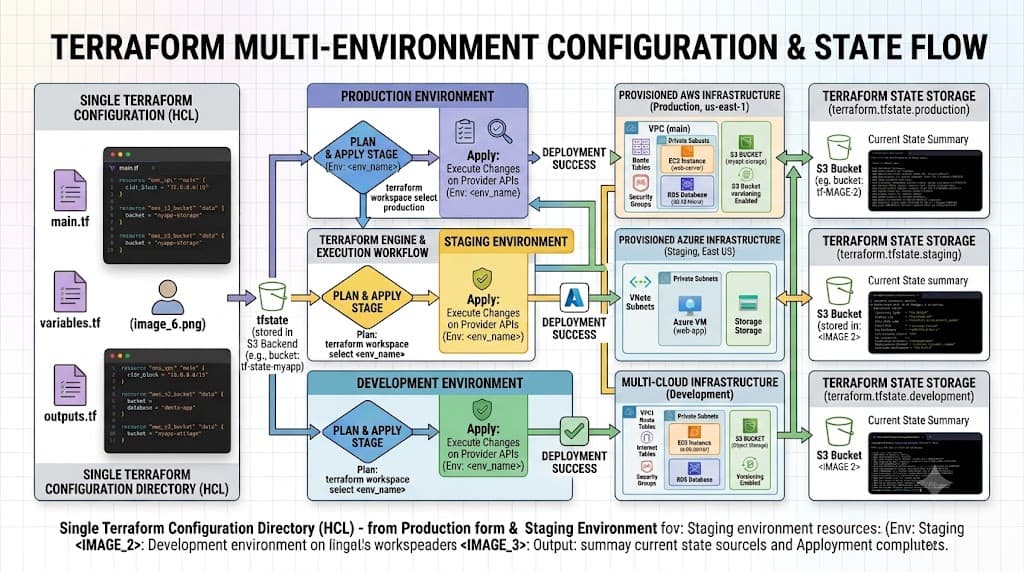
Managing multiple infrastructure environments like development, staging, and production requires careful isolation to prevent configuration drift and accidental resource modification. Terraform workspaces provide a built-in mechanism to maintain separate state files within a single working directory using the same HashiCorp Configuration Language (HCL) root module. By switching contexts using the workspace command, engineers can provision identical infrastructure topologies across isolated state environments without duplicating code directories. This guide explores the foundational design, underlying mechanics, HCL syntax, CLI workflows, safe verification patterns, common failure modes, and production considerations for professional infrastructure management.
Quick Answer
Terraform workspaces are isolated state files managed within a single Terraform configuration directory. Instead of maintaining separate folder structures for every target environment, a workspace allows you to run plans and applies against distinct state data using the same code base. The core command-line utility for managing these environments is the workspace command. Engineers can create, select, list, and delete workspaces using the terraform workspace subcommand suite. While powerful for rapid environment provisioning, workspaces are best suited for environments that share identical resource topologies, whereas distinct environments with divergent architectures or strict security boundaries are often better managed via separate directory layouts or distinct root modules.
Understanding the Concept
At its core, a Terraform workspace alters where state data is stored. Every time you initialize a configuration and run provisioning tasks, Terraform reads and writes state to keep track of managed resources. When you use a default workspace, your state file typically resides locally in terraform.tfstate or remotely under a default path. Creating a new workspace instructs Terraform to store state under a separate namespace or prefix within your configured backend.
Understanding state implications is critical when adopting this feature. Unlike separate directory structures where variables can be hard-coded per folder, workspaces share the exact same source code files. To provision environment-specific resource attributes—such as smaller instance types for development and larger clusters for production—you must parameterize your HCL configuration using conditional expressions or map variables keyed by the active workspace name. This decoupling of code from state allows teams to scale environment creation rapidly, but it also introduces risks if changes are mistakenly applied to the wrong target context.
How It Works
To understand how workspace-based state separation operates under the hood, examine how the underlying state backend handles isolated data streams. When you execute an operation, Terraform evaluates the active context to determine which state pointer to retrieve from your backend storage provider. Whether you are using a local backend, HashiCorp Consul, Amazon S3, or another remote storage system, the backend segregates state files according to the selected workspace identifier.
During command execution, the Terraform CLI injects the active workspace name into the evaluation context. This makes the workspace name accessible as a built-in interpolation variable throughout your HCL configuration. As you switch between contexts, the execution engine dynamically re-points its read and write targets to the corresponding state file. Because the underlying resource blocks remain identical, any modifications to the shared codebase immediately affect all workspaces upon the next plan and apply execution, reinforcing the need for rigorous code review and automated CI/CD gating.
Syntax and configuration
Leveraging workspaces effectively in HCL requires understanding how to reference the active environment within your resource definitions and provider configurations. Terraform exposes a built-in expression named terraform.workspace, which returns the string identifier of the currently selected context. You can use this value inside conditional logic, local values, or lookup maps to alter resource sizing, tagging, and naming conventions.
Consider a scenario where you want to provision an AWS EC2 instance or a Kubernetes cluster namespace with environment-appropriate sizing. You can define a local value map that matches workspace names to configuration parameters:
locals {
  environment_configs = {
    development = {
      instance_type = "t3.micro"
      node_count    = 1
    }
    staging = {
      instance_type = "t3.medium"
      node_count    = 3
    }
    production = {
      instance_type = "c6i.xlarge"
      node_count    = 6
    }
  }

  current_config = lookup(local.environment_configs, terraform.workspace, local.environment_configs["development"])
}
In this configuration, the lookup function evaluates terraform.workspace. If an engineer forgets to switch away from an unexpected context or runs a command in an unmapped workspace, the configuration gracefully falls back to the safe development profile. This pattern prevents hard-coding environment names directly into resource blocks, keeping your infrastructure code DRY and maintainable.
CLI workflow
The command-line interface provides dedicated subcommands under the workspace command suite to manage your environment contexts. Understanding each command and its operational impact prevents accidental state corruption.
To view all available environments and identify your current active context, run the list command:
terraform workspace list
This command queries the state backend and prints every existing namespace, highlighting the active context with an asterisk symbol. To create a brand new isolated environment state, use the new command followed by the desired name:
terraform workspace new staging
Executing this command instantly creates the new state namespace and automatically switches your active session to it. If you need to switch back to an existing context without creating a new one, use the select command:
terraform workspace select production
Finally, when an environment is decommissioned and no longer needed, you can remove its state namespace using the delete command. Note that you cannot delete the workspace you are currently inside; you must first select another context, and the target workspace must contain no managed resources before deletion will succeed:
terraform workspace select default
terraform workspace delete staging
Practical Terraform Example
To put these concepts into practice, let us walk through a complete working example that provisions an AWS S3 bucket with environment-specific naming and tagging based on the active workspace.
First, define your provider and resource blocks in a main.tf file:
terraform {
  required_version = ">= 1.5.0"
  required_providers {
    aws = {
      source  = "hashicorp/aws"
      version = "~> 5.0"
    }
  }
}

provider "aws" {
  region = "us-east-1"
}

locals {
  bucket_name_prefix = "company-app-data"
  is_production      = terraform.workspace == "production"
}

resource "aws_s3_bucket" "data_bucket" {
  bucket = "${local.bucket_name_prefix}-${terraform.workspace}"

  tags = {
    Environment = terraform.workspace
    ManagedBy   = "Terraform"
    Criticality = local.is_production ? "High" : "Low"
  }
}

resource "aws_s3_bucket_versioning" "versioning" {
  bucket = aws_s3_bucket.data_bucket.id
  versioning_configuration {
    status = local.is_production ? "Enabled" : "Suspended"
  }
}
To execute this workflow safely across multiple environments, follow this CLI sequence:
terraform init
terraform workspace new development
terraform plan
<a href="/article/terraform-apply-create-and-update-infrastructure-2" class="text-primary font-semibold hover:underline">terraform apply</a> -auto-approve

terraform workspace new production
terraform plan
terraform apply -auto-approve
In this sequence, the first apply provisions an S3 bucket named company-app-data-development with versioning suspended and low criticality tags. The second apply switches context to production, creating a completely separate state file and provisioning company-app-data-production with versioning enabled and high criticality tags, all while utilizing the exact same underlying HCL files.
Verification
Verifying your infrastructure deployments is critical to ensure that changes align with expectations before and after applying configurations. Always review the output of terraform plan carefully. The execution plan explicitly displays the target workspace name near the top of the terminal output, confirming which state namespace is being modified.
To verify your current operational context directly from the CLI before running any destructive or constructive commands, execute:
terraform workspace show
To inspect the underlying state file and verify that resources are bound to the correct workspace namespace without manual tampering, use the state inspection commands:
<a href="/article/terraform-state-explained-2" class="text-primary font-semibold hover:underline">terraform state</a> list
When working with remote backends in team environments or continuous integration pipelines, verify that state locking is functioning correctly. If an engineer attempts to run a plan while another session holds a lock on the workspace state, Terraform will gracefully halt and alert the operator, preventing race conditions and corrupted state files.
Common Mistakes
Infrastructure engineers frequently encounter avoidable pitfalls when adopting workspace-based environment separation. Recognizing these errors helps maintain stability across cloud environments.
- Skipping terraform plan: Assuming that because code worked in development it will behave identically in production without reviewing the target environment's specific execution plan.
- Hard-coding credentials or region strings: Embedding sensitive keys directly into configuration files instead of utilizing environment variables, provider defaults, or IAM roles.
- Misunderstanding state isolation: Assuming that variables or resource outputs from one workspace are easily accessible by another without explicit remote state data sources.
- Applying changes without review: Running
terraform applywithout checking the active workspace indicator, leading to accidental modifications in production infrastructure. - Treating workspaces as a security boundary: Relying on workspaces for multi-tenant isolation where strict access control lists or separate AWS accounts are actually required.
Best Practices
Implementing professional-grade workflows requires adhering to established patterns for state management, access control, and automation.
When managing shared infrastructure across teams using GitHub repositories and CI/CD pipelines, ensure that your pipeline scripts explicitly select or create the target workspace based on the deployment branch. For example, configure your CI/CD runner to map the main branch to the production workspace and the develop branch to the development workspace automatically.
Always enforce remote state storage with encryption at rest and state locking enabled (such as AWS S3 with DynamoDB locking). Never store state files locally on developer laptops when managing shared production environments. Furthermore, evaluate whether workspaces are truly appropriate for your use case: if your development and production environments require entirely different provider configurations, distinct authentication credentials, or completely separate cloud accounts, utilize separate directory structures or root modules instead of workspaces.
Troubleshooting
Real-world deployment issues often stem from state synchronization conflicts, missing resources, or incorrect context selection. Diagnosing these errors methodically ensures rapid recovery.
If you encounter a state locking error where a previous Terraform run crashed and left an active lock on your workspace, do not manually delete lock files in your backend storage unless all team members have confirmed no active processes are running. Instead, investigate the lock ID provided in the error message and use the force-unlock command cautiously:
terraform force-unlock <LOCK_ID>
Another common failure mode occurs when attempting to delete a workspace that still contains active resources. Terraform will reject the deletion request with an error stating that the workspace is not empty. To resolve this, select the target workspace, run <a href="/article/terraform-destroy-safely-remove-managed-infrastructure-4" class="text-primary font-semibold hover:underline">terraform destroy</a> to cleanly remove all associated cloud resources, switch back to your default context, and then proceed with deleting the empty workspace namespace.
terraform workspace select staging
terraform destroy -auto-approve
terraform workspace select default
terraform workspace delete staging
By following these diagnostic steps and verification procedures, platform engineers can harness the speed and efficiency of environment state isolation while maintaining robust operational safety.
📌 Recommended Next Guides & References
  <li>
    <a href="/article/docker-and-kubernetes-how-they-work-together-2" class="text-primary hover:underline font-semibold flex items-center gap-2">
      <span>→</span> <span>Docker and Kubernetes: How They Work Together</span>
    </a>
  </li>

  <li>
    <a href="/article/kubernetes-ingress-explained" class="text-primary hover:underline font-semibold flex items-center gap-2">
      <span>→</span> <span>Kubernetes Ingress Explained: Routing, Controllers, and TLS</span>
    </a>
  </li>

  <li>
    <a href="/article/kubernetes-ingress-controller-explained" class="text-primary hover:underline font-semibold flex items-center gap-2">
      <span>→</span> <span>Kubernetes Ingress Controller Explained: Architecture, Routing, and Implementation</span>
    </a>
  </li>