Quick Answer
Linux permissions form the foundational security layer of any Unix-like operating system. Whether you are managing a local development machine, provisioning an Ubuntu cloud server, or building container images for Docker and Kubernetes, understanding how the kernel regulates file access is non-negotiable. Every file and directory on a Linux filesystem is bound by rules that dictate who can read its contents, who can modify it, and who can execute it as a program. When these rules are misconfigured, applications crash, security vulnerabilities open up, and deployment pipelines grind to a halt. This guide provides a practical, developer-focused walkthrough of how linux permissions operate, how to inspect and change them safely, and how they impact modern DevOps workflows.
Quick Answer
Linux permissions control access to files and directories by assigning them to a specific user owner and group owner, and dividing all system actors into three distinct classes: User, Group, and Others. Each class can be granted three fundamental access types: Read, Write, and Execute. On the command line, administrators and developers use utilities like chmod to alter these access rights and chown to transfer ownership. For example, running chmod 755 script.sh grants the file owner full read, write, and execute permissions while restricting group and other users to read and execute access only. Getting these permissions right prevents unauthorized data access and ensures system daemons run with the correct privileges.
Understanding Linux Permissions
To work effectively with a Linux filesystem, you must understand the underlying model that governs access. At its core, the operating system does not care about your username alone; it evaluates numerical user IDs (UIDs) and group IDs (GIDs) associated with every running process and file. When a process attempts to open a file, the Linux kernel checks whether the process's credentials match the file's ownership profile and whether the requested operation is permitted.
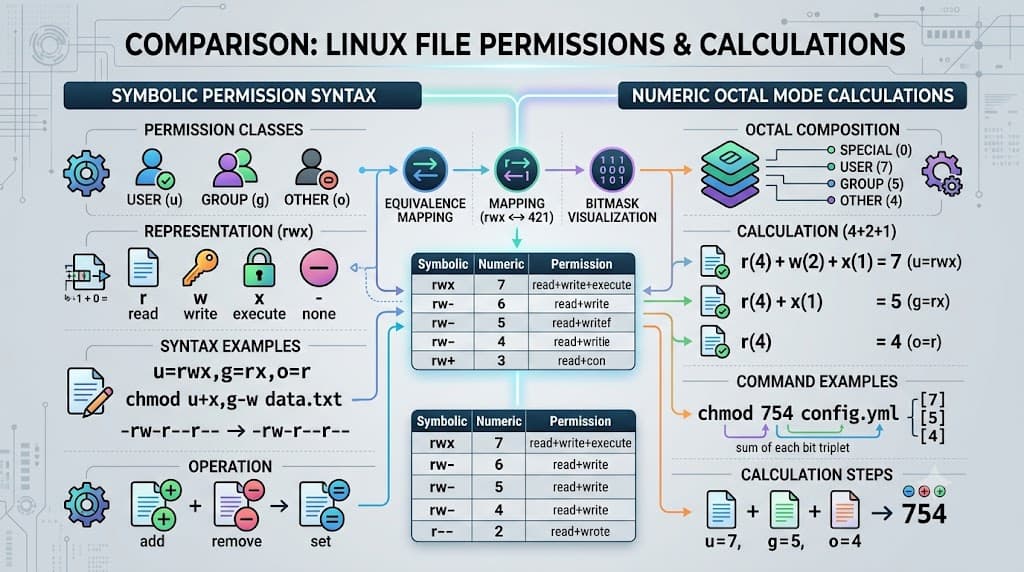
Every file and directory is assigned to exactly one User owner (often the account that created it) and one Group owner (often the primary group of the creating user). Beyond the owner and the group, every other user account on the system falls into the 'Others' category. This three-tier classification is why linux permissions are often visualized as three sets of flags. When you execute an incremental file listing with the long-form format using ls -l, the output displays these access bits clearly in the leftmost column. For instance, a string like -rwxr-xr-- reveals a file where the user has read, write, and execute rights, the group has read and execute rights, and everyone else has read-only access.
Understanding how these categories interact helps you avoid setting overly permissive rules. If a script needs to be executed by a web server daemon running under a specific service account, making it readable and executable by that specific group is far safer than opening it up to the entire system. Developers frequently encounter permission boundaries when checking code out of version control systems like Git, which might strip out execution bits if the repository configuration does not track file modes correctly.
How It Works
Behind the human-readable symbolic representation lies a robust system of numeric octal notation and kernel-level enforcement. The permission bits are evaluated as a series of binary flags. Read is worth 4 points, write is worth 2 points, and execute is worth 1 point. By adding these values together for each of the three classes (User, Group, Others), you arrive at a three-digit or four-digit octal number that completely defines the permission state of that filesystem object.
For example, an octal value of 644 breaks down as follows: the user digit is 4 plus 2 (read plus write, equaling 6), the group digit is 4 (read-only, equaling 4), and the others digit is also 4 (read-only, equaling 4). A value of 700 means the user has full read, write, and execute rights (4+2+1), while both group and others have zero permissions (0). There is also a leading fourth digit used for special permission bits: Setuid (4), Setgid (2), and the Sticky Bit (1). The sticky bit is commonly seen on shared directories like /tmp, ensuring that users can only delete their own files within that directory even if the directory itself is writable by everyone.
When a system call such as open() or execve() is invoked, the Linux kernel evaluates the requesting process's effective UID and GID against these bits. If the process owner matches the file owner, the kernel checks the user permission bits. If the process belongs to the file's group, it checks the group bits. Otherwise, it falls back to the others bits. This evaluation happens sequentially; if a permission check fails, the kernel immediately terminates the operation with an EACCES (Permission Denied) error, short-circuiting any further checks.
Practical Commands and Examples
Managing file access requires mastering two primary command-line tools: chmod for changing access permissions and chown for modifying ownership. When performing change permissions linux operations, you can use either symbolic mode (e.g., u+x) or numeric octal mode (e.g., 755).
To make a shell script executable for its owner while granting read access to others, use the symbolic syntax:
chmod u+x,go+r deploy.sh
To apply permissions recursively across an entire directory structure—such as a web application asset folder—use the recursive flag (-R):
chmod -R 755 /var/www/html
Warning: Running recursive commands on system-wide directories like / or /usr can break your operating system by stripping necessary permissions from critical system binaries. Always verify your target path before executing recursive commands.
To change the user and group ownership of a directory assigned to a deployment process, use chown:
chown -R www-data:www-data /var/www/html
In modern containerized workflows, linux permissions play a critical role during Dockerfile builds. If your Node.js or Python application runs inside a container as the root user by default, any files created during the build or runtime will be owned by root on the host mount, leading to permission lockouts when developers try to edit them locally. Best practice dictates creating a non-root system user inside your Dockerfile and using the USER instruction to drop privileges, ensuring generated cache or log files match standard host development expectations.
Similarly, in Kubernetes manifests and CI/CD runner configurations, securityContext settings often enforce strict RunAsUser and fsGroup parameters. Ensuring your persistent volumes match these expected UID and GID values prevents container crashes caused by unwriteable mount points.
Common Mistakes
One of the most frequent and dangerous mistakes engineers make when troubleshooting access errors is blindly applying blanket permissions like chmod 777. While running chmod -R 777 on a stubborn project directory instantly resolves permission denied messages, it grants every local user and potential web attacker full read, write, and execution rights over those files. In a multi-tenant server or shared CI/CD build agent, this compromises the entire environment.
Another common error is misunderstanding how directory execute bits differ from file execute bits. On a directory, the execute permission is required simply to traverse or enter that directory—meaning you cannot open any file inside a directory if you lack execute permission on the parent folder, even if the file itself has permissive read flags. Conversely, stripping the write permission from a directory prevents users from creating or deleting files within it, but does not necessarily prevent them from modifying existing files inside it if those individual files have open write permissions.
Developers also frequently run chown or chmod without accounting for symbolic links. By default, some older versions of permission utilities might follow symlinks and alter the target file rather than the link itself, or vice versa. Always check your command flags and use tools like stat to inspect exact inode details when working with complex symlink structures.
Troubleshooting and Verification
When debugging access failures in development or production, guessing at permission strings wastes valuable time. Instead, rely on systematic verification commands. The most direct way to inspect an object is using the long listing format combined with user lookup flags:
ls -la /app/config/database.yml
To view detailed filesystem metadata including exact inode numbers, link counts, and numeric permission octals, use the stat utility:
stat /app/config/database.yml
If a service running inside a container or under a systemd unit is failing with permission errors, inspect the running process's identity using ps and whoami:
ps aux | grep node
Consider a common troubleshooting scenario: a CI/CD pipeline job fails because a deployment script throws a Permission Denied error when trying to write to a log directory. To resolve this safely without resorting to 777 permissions, follow these steps:
- Identify the exact user running the CI/CD agent or container process using a diagnostic command like whoami or by reviewing runner logs.
- Inspect the ownership and group of the target directory using ls -ld /var/log/app.
- Verify whether the agent user belongs to the target directory's assigned group using the groups command.
- Adjust the group ownership so the service group owns the directory, and set the appropriate group write permissions:
sudo chown -R root:ci-runners /var/log/app
sudo chmod -R 775 /var/log/app
This targeted approach solves the access block while preserving strict system security boundaries.
Best Practices
Maintaining a secure and predictable filesystem requires adopting disciplined operational standards across your development teams and infrastructure automation scripts.
First, always adhere to the principle of least privilege. Files and directories should only be granted the minimum access required for legitimate processes to function. Configuration files containing database credentials or API secrets should be locked down strictly to the owning user service account, typically with permissions set to 600 or 400.
Second, automate permission checks within your infrastructure-as-code and container build pipelines. Instead of manually running chmod on production servers after a deployment, bake correct ownership into your Dockerfiles or configuration management playbooks using explicit USER and chown directives during the build phase.
Third, avoid using recursive chmod 777 or broad wildcards in automated deployment scripts. If build artifacts require specific execution bits, ensure your Git repository tracks file modes correctly by running git update-index --chmod=+x script.sh before committing, rather than relying on post-clone chmod hacks.
Finally, regularly audit sensitive system directories and log locations for permission drift using configuration drift detection tools or periodic compliance scans. Keeping your access controls clean ensures predictable deployments and robust defense-in-depth security.
📌 Recommended Next Guides & References
  <li>
    <a href="/article/docker-and-kubernetes-how-they-work-together-2" class="text-primary hover:underline font-semibold flex items-center gap-2">
      <span>→</span> <span>Docker and Kubernetes: How They Work Together</span>
    </a>
  </li>

  <li>
    <a href="/article/kubernetes-ingress-explained" class="text-primary hover:underline font-semibold flex items-center gap-2">
      <span>→</span> <span>Kubernetes Ingress Explained: Routing, Controllers, and TLS</span>
    </a>
  </li>

  <li>
    <a href="/article/kubernetes-ingress-controller-explained" class="text-primary hover:underline font-semibold flex items-center gap-2">
      <span>→</span> <span>Kubernetes Ingress Controller Explained: Architecture, Routing, and Implementation</span>
    </a>
  </li>