Quick Answer
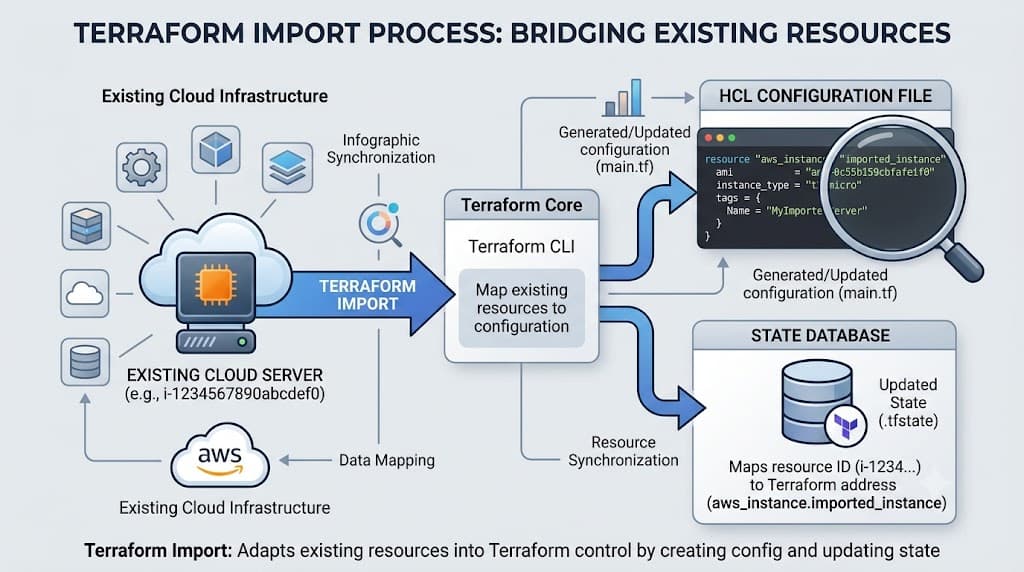
When managing cloud environments, engineers often encounter pre-existing resources created via console interfaces, scripts, or legacy automation tools. Terraform import is the core mechanism used to map these real-world, unmanaged resources to a declared resource block inside your Terraform configuration, associating them directly with your state file. For instance, executing a command such as terraform import aws_instance.web i-1234567890abcdef0 tells Terraform to locate an existing AWS EC2 instance with that provider identifier and record its current attributes in your state. This allows you to adopt Infrastructure as Code practices incrementally without tearing down and recreating running production workloads. Modern Terraform workflows support both the traditional CLI-driven import and declarative HCL import blocks, giving engineers robust options for bringing brownfield architectures under version control.
Quick Answer
Terraform import associates existing, unmanaged real-world infrastructure with your Terraform state file so that it can be managed via Infrastructure as Code. Rather than provisioning a brand-new resource, the import command queries the target cloud provider API for the resource's current configuration, writes its state representation into your local or remote state backend, and pairs it with a corresponding resource block in your HCL code. To perform this action, you first write an empty resource block in your configuration, such as resource "aws_security_group" "example" {}, and then execute the CLI command terraform import aws_security_group.example sg-0123456789abcdef0. Alternatively, modern versions of Terraform allow you to use a declarative import block directly in your configuration files containing id = "sg-0123456789abcdef0" and to = aws_security_group.example, which is then processed automatically during a terraform plan or <a href="/article/terraform-apply-create-and-update-infrastructure-2" class="text-primary font-semibold hover:underline">terraform apply</a>. Once imported, you must run terraform plan and carefully backfill the HCL resource arguments to match the actual configuration retrieved from the provider API, ensuring future plans show no drift.
Understanding the Concept
Infrastructure as Code thrives on consistency, auditability, and predictability. However, real-world engineering teams frequently inherit legacy environments, emergency hotfixes, or resources deployed manually via cloud provider web consoles. Without state synchronization, attempting to manage these components via Terraform results in errors where the tool tries to create resources that already exist, causing creation conflicts. Terraform state acts as the source of truth mapping your HCL configurations to actual remote objects. When you import an existing resource, you bridge the gap between unmanaged cloud artifacts and version-controlled infrastructure.
Historically, importing required executing standalone CLI commands that updated the state file without validating your local configuration files simultaneously. This created a decoupled workflow where engineers had to manually construct matching HCL blocks by inspecting JSON state files or provider documentation. The introduction of declarative import blocks modernized this paradigm by letting engineers define relationship mappings directly inside code files. This evolution minimizes human error, aligns with declarative GitOps workflows used in modern CI/CD pipelines, and ensures that state synchronization is trackable and reviewable in pull requests.
How It Works
Behind the scenes, the import mechanism operates through a close coordination between the Terraform core engine and the specific provider plugin (such as the AWS, Kubernetes, or GitHub provider). When you initiate an import, Terraform does not automatically generate your HCL configuration code. Instead, it queries the provider's API using the supplied unique identifier to fetch the object's current state attributes. It then normalizes this data structure and writes a corresponding resource entry directly into your active state backend.
This process requires an existing target resource block to be defined in your workspace configuration so that Terraform knows which provider schema and resource type to expect. The provider uses its defined schemas to interpret the API response and map remote attributes to the state properties. If there is a mismatch between the expected schema version or if the supplied ID points to a resource type that differs from your HCL definition, the import operation will fail. Once the state file contains the resource record, subsequent execution plans compare your written HCL against that stored state rather than querying the live cloud API directly for drift detection, making state integrity paramount.
Syntax and configuration
To configure an import using modern declarative syntax, you define an import block within your HCL files alongside your target resource definition. This approach pairs a specific remote resource identifier with your declared resource address. For instance, managing an AWS security group requires defining both the empty resource shell and the mapping block. The id attribute specifies the unique cloud provider identifier, while the to attribute points to the exact resource address in your configuration. This declarative structure allows teams to review import intentions during pull request code reviews before touching production state files.
import {
  to = aws_security_group.web
  id = "sg-0a1b2c3d4e5f6g7h8"
}

resource "aws_security_group" "web" {
  name        = "web-server-sg"
  description = "Security group for web servers"
  vpc_id      = "vpc-0123456789abcdef0"
}
CLI workflow
When working with legacy codebases or performing dynamic imports, the command-line interface provides imperative control over the state file. The standard CLI workflow consists of a sequence of distinct terminal commands executed in a specific order. First, you initialize your workspace and ensure your provider authentication credentials are correctly configured in your shell environment or credentials file. Next, you write a baseline resource block in your .tf files that matches the type and name you intend to assign to the imported resource. Finally, you execute the imperative command, passing the resource address and the cloud-specific ID as arguments. After a successful import, you immediately run an execution plan to identify missing configuration arguments and update your HCL code accordingly.
# Initialize your Terraform working directory
terraform init

# Execute the imperative import command
terraform import aws_security_group.web sg-0a1b2c3d4e5f6g7h8

# Generate a plan to review attribute discrepancies
terraform plan
Practical Terraform Example
Consider a scenario where an administrator provisioned an Amazon S3 bucket manually via an AWS management console script. The bucket name is company-production-assets-bucket, and its cloud identifier matches its unique name. To bring this existing resource under management without disrupting active storage workflows, you first create a matching resource block in your main configuration file. This ensures that when the import engine maps the resource, it has a valid structural destination inside your HCL schema.
resource "aws_s3_bucket" "assets" {
  bucket = "company-production-assets-bucket"
}
After writing the baseline configuration, you execute the import workflow. Using the CLI command, you instruct Terraform to bind the remote bucket to your declared resource address. The command contacts the AWS API, verifies that the bucket exists and belongs to the specified account, and populates the local state file with its current properties. Once this link is established, you can run an execution plan. Because your initial HCL block only defines the mandatory bucket name while leaving out optional settings like tagging or encryption policies, the execution plan will display modifications required to align the live resource with your desired code state.
Example
Executing a plan after importing an existing resource reveals how Terraform evaluates state versus configuration. When you run terraform plan, Terraform queries the provider API and compares the live remote attributes against both your HCL configuration and the newly populated state file. If your HCL file lacks attributes that are currently active on the cloud resource, the plan output will display changes that need to be applied. For example, if the imported S3 bucket has server-side encryption enabled in AWS but your HCL block does not declare it, the plan will indicate that encryption arguments must be added to your code to prevent drift.
Terraform used the selected providers to generate the following execution plan. Resource actions are indicated with the following symbols:
  ~ update in-out

Terraform will perform the following actions:

  # aws_s3_bucket.assets will be updated in-out
  ~ resource "aws_s3_bucket" "assets" {
        id            = "company-production-assets-bucket"
        arn           = "arn:aws:s3:::company-production-assets-bucket"
        bucket        = "company-production-assets-bucket"
      + server_side_encryption_configuration {
          rule {
            apply_server_side_encryption_by_default {
              sse_algorithm = "AES256"
            }
          }
        }
        # (12 ignored attributes hidden)
    }

Plan: 0 to add, 1 to update, 0 to destroy.
Verification
Verifying a successful import is a critical step to ensure that your infrastructure state accurately reflects reality without introducing unintended configuration drift or security misconfigurations. Because importing only populates the state file and does not automatically write your complete HCL configuration, engineers must systematically inspect the imported state data and validate it against live cloud resources. Skipping verification can lead to accidental modifications or deletions during subsequent pipeline runs.
Verification
To confirm that the resource was successfully added to your state file, use state inspection commands such as terraform state show. This command extracts the exact attribute mapping stored in your state backend for a specific resource address, allowing you to cross-reference properties like IDs, ARNs, tags, and networking parameters. Following state inspection, always execute terraform plan. A healthy import verification results in a clean plan indicating zero additions and zero deletions, provided your HCL configuration has been fully backfilled to match the live resource attributes.
# Inspect the imported resource state directly
terraform state show aws_s3_bucket.assets

# Run an execution plan to verify zero unexpected drift
terraform plan
Common Mistakes
Engineers frequently encounter pitfalls when importing infrastructure due to misunderstandings of state mechanics or provider expectations. One of the most hazardous mistakes is skipping terraform plan immediately after an import operation, which leaves unmapped attributes hidden from version control. Another common error is hard-coding cloud credentials directly into provider blocks or command-line arguments instead of utilizing environment variables or IAM instance profiles, exposing sensitive secrets in shell history files or version control systems.
Furthermore, developers often fail to lock shared remote state backends before executing imports in collaborative environments, leading to race conditions and corrupted state files. Assuming that provider behaviors are universal across different cloud services is also dangerous; resource identification formats vary drastically between providers (e.g., AWS ARNs versus Kubernetes resource names or GitHub repository slugs). Finally, applying changes without fully reviewing generated plans can result in destructive updates, where Terraform attempts to destroy and recreate an existing production resource because an attribute requires replacement.
Failure modes
Import operations can fail due to several recurring technical roadblocks. A frequent failure mode is an ID mismatch, where the identifier passed to the import command does not match the provider's expected format, resulting in an immediate API error. Another common failure is a schema version conflict caused by using an outdated provider version that does not recognize attributes returned by newer cloud APIs. Additionally, attempting to import a resource into a locked state backend will cause the operation to abort until the conflicting lock is released.
Error: Cannot import non-existent remote object

An object with the specified ID could not be found by the provider API. Please verify
that the resource ID is correct and that your provider credentials have sufficient permissions.
Best Practices
Production-grade infrastructure management requires disciplined operational guardrails when adopting existing resources. Always utilize remote state backends equipped with state locking mechanisms—such as DynamoDB tables for S3 backends—to prevent concurrent modifications by multiple engineers or automated CI/CD pipelines. Implement strict Role-Based Access Control (RBAC) to ensure that only authorized platform engineers can execute state-altering commands against production environments.
Pin your provider versions in your configuration blocks to prevent unexpected breaking changes during provider updates. Integrate your import workflows into automated pull request validation pipelines running in isolated staging environments before applying changes to production. Never execute raw imperative import commands directly on production servers without peer review; instead, prefer declarative import blocks committed to version control where changes can be audited, tested, and rolled back safely.
Troubleshooting
When an import operation stalls or corrupts your working state, systematic troubleshooting is required to restore system integrity. Common issues include corrupted local state files, stuck state locks, or schema drifts that cause persistent validation errors during plan execution. Resolving these incidents safely requires careful manipulation of state management subcommands rather than manual text editing of state JSON files.
Troubleshooting example
When a resource ID is incorrectly formatted, Terraform throws a validation error and aborts the operation. To recover without corrupting your state file, first verify the exact resource identifier required by reviewing the official provider documentation for that specific resource type. If an incorrect resource was accidentally imported into your state file, you can safely remove it from state without destroying the underlying real-world infrastructure by using the state removal command.
# Remove an incorrectly imported resource from state without deleting it in the cloud
terraform state rm aws_s3_bucket.assets

# Verify that the state is clean before re-attempting the import with the correct ID
terraform state list
📌 Recommended Next Guides & References
  <li>
    <a href="/article/docker-and-kubernetes-how-they-work-together-2" class="text-primary hover:underline font-semibold flex items-center gap-2">
      <span>→</span> <span>Docker and Kubernetes: How They Work Together</span>
    </a>
  </li>

  <li>
    <a href="/article/kubernetes-ingress-explained" class="text-primary hover:underline font-semibold flex items-center gap-2">
      <span>→</span> <span>Kubernetes Ingress Explained: Routing, Controllers, and TLS</span>
    </a>
  </li>

  <li>
    <a href="/article/kubernetes-ingress-controller-explained" class="text-primary hover:underline font-semibold flex items-center gap-2">
      <span>→</span> <span>Kubernetes Ingress Controller Explained: Architecture, Routing, and Implementation</span>
    </a>
  </li>