Quick Answer
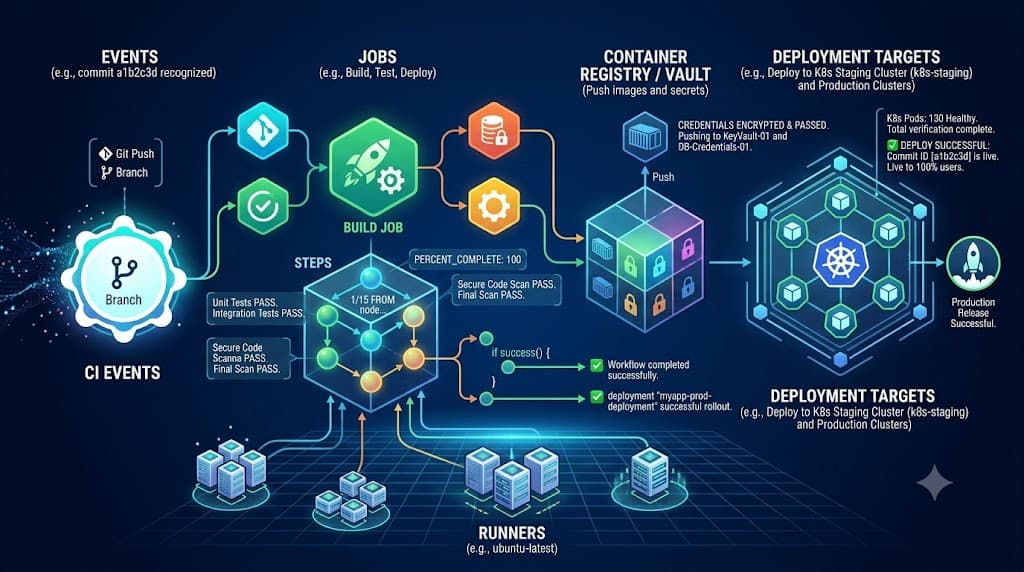
A GitHub Actions workflow is an automated procedure defined in YAML that you add to your repository. It automatically responds to repository events, spins up compute instances called runners, and executes ordered blocks of tasks known as jobs and steps. Whether you are building a simple continuous integration pipeline or orchestrating a complex continuous deployment strategy, understanding these core structural components is vital for maintaining robust automation.
Quick Answer
A GitHub Actions workflow is a YAML-defined automation configuration stored in your repository under the '.github/workflows/' directory. It is triggered by specific repository events, such as a push, pull request, or scheduled timer. When an event fires, GitHub initiates one or more jobs. Each job runs inside a dedicated virtual environment called a runner. Within each job, a sequence of individual steps executes shell commands or pre-built actions to build, test, package, and deploy your software.
Workflow Anatomy
At the core of every GitHub Actions workflow is a YAML file structured according to a strict schema. The anatomy of this configuration file defines everything from the human-readable display name to the execution permissions and environment variables shared across tasks. Understanding this structural blueprint ensures that your automation scales cleanly as your codebase grows.
Every workflow file requires a distinct root structure. The 'name:' key provides the title that appears in the GitHub Actions UI. The 'on:' key specifies the trigger events. Following these, the 'jobs:' block houses one or more individual job definitions. Optional root-level keys include 'env:' for global environment variables and 'permissions:' for controlling the security tokens granted to the workflow execution.
When writing workflow files, syntax validation is critical. A single indentation error or misspelled keyword will cause GitHub to reject the workflow payload before execution even begins. It is best to use an IDE extension that validates your YAML against the official GitHub Actions JSON schema. Furthermore, keeping your workflow files modular and well-commented helps teams troubleshoot failures quickly without digging through raw logs.
Events
Workflows do not run in a vacuum; they require an explicit trigger to start execution. In GitHub Actions terminology, these triggers are known as events. Events are defined using the 'on' keyword at the top level of your workflow configuration file. They can range from direct code changes to repository activity, webhook payloads, or manual triggers.
The most common event is the 'push' event, which fires whenever commits are pushed to a specified branch. Another widely used event is 'pull_request', which triggers when a pull request is opened, synchronized, or closed. You can also configure scheduled workflows using cron syntax with the 'schedule' event, or trigger workflows entirely on-demand using the 'workflow_dispatch' event.
Below is an example configuration demonstrating both 'push' and manual 'workflow_dispatch' triggers, along with branch filtering:
name: CI Pipeline

on:
  push:
    branches:
      - main
      - develop
  workflow_dispatch:
    inputs:
      environment:
        description: 'Target deployment environment'
        required: true
        default: 'staging'
        type: choice
        options:
          - staging
          - production

jobs:
  build:
    runs-on: ubuntu-latest
    steps:
      - name: Checkout repository
        uses: actions/checkout@v4
      - name: Run build script
        run: echo "Deploying to ${{ inputs.environment }}"
Event configuration also supports fine-grained activity types and filters. For instance, a pull request event can be restricted to specific actions such as 'opened', 'synchronize', or 'reopened'. Utilizing these filters prevents unnecessary workflow runs, conserving your repository build minutes and ensuring that compute resources are only allocated when meaningful code changes occur.
Jobs
A workflow is composed of one or more jobs that run as part of the automation pipeline. By default, multiple jobs run concurrently in parallel, significantly reducing overall pipeline duration. However, you can also configure jobs to execute sequentially by establishing explicit dependency relationships.
Each job runs within its own virtual machine runner or container instance. This means that files, caches, and environment modifications made in one job do not automatically persist to another unless you explicitly upload and download them as artifacts or share them via external storage. This isolation guarantees clean, reproducible test environments for every execution stage.
Defining jobs requires a unique identifier key under the main 'jobs:' map. For example, a workflow might contain a 'lint' job, a 'test' job, and a 'build' job. Each job block must specify the 'runs-on' parameter to indicate the operating system environment, followed by the 'steps' array containing the executable units of work.
Managing job concurrency and timeouts is an essential practice for production pipelines. You can configure a maximum execution time using the 'timeout-minutes' key to prevent hung processes from consuming your repository resources indefinitely. Additionally, you can utilize matrix builds within a job to run the same set of steps across multiple language versions, operating systems, or configuration permutations simultaneously.
Steps
While jobs represent the structural containers of your workflow, steps are the individual operational tasks executed sequentially within a job. A step can either run a series of shell commands using the 'run' keyword or execute a reusable community or custom action using the 'uses' keyword.
Steps execute in the exact order they are listed in the workflow file. Because they share the same runner shell environment for a given job, changes made to the working directory by one step—such as installing dependencies or compiling binary files—are immediately available to subsequent steps within that same job.
Here is an example illustrating a job with multiple ordered steps utilizing both shell commands and established actions:
jobs:
  test-suite:
    runs-on: ubuntu-latest
    steps:
      - name: Check out source code
        uses: actions/checkout@v4

      - name: Set up Node.js environment
        uses: actions/setup-node@v4
        with:
          node-version: '20'

      - name: Install project dependencies
        run: npm ci

      - name: Run unit test suite
        run: npm test
When writing steps, naming them descriptively using the 'name:' key is strongly recommended. Clear step names make reading execution logs intuitive, as GitHub displays these names in the web interface during pipeline runs. Furthermore, managing step-level environment variables and exit codes allows you to handle warnings gracefully or fail fast when unexpected errors occur.
Runners
A runner is the virtual machine or container instance that executes your workflow jobs when they are triggered. GitHub provides fully managed, secure hosting options for Linux, macOS, and Windows environments, but organizations can also host their own self-hosted runners to execute workloads on private infrastructure or specialized hardware.
The 'runs-on' directive specifies which runner type a job should utilize. For standard cloud-hosted runners, you might specify 'ubuntu-latest', 'windows-latest', or 'macos-latest'. These managed runners come pre-installed with a wide array of software development kits, developer tools, and database clients, minimizing the time spent bootstrapping your environment.
Self-hosted runners offer greater flexibility for enterprises with strict security compliance, custom architecture requirements, or internal network access needs. When configuring self-hosted runners, administrators must manage operating system updates, security patches, and tool installations manually. Ephemeral runners, which automatically tear down after executing a single job, are often preferred in self-hosted setups to prevent state pollution and security drift between runs.
Resource allocation and performance trade-offs should be considered when choosing runner types. Standard GitHub-hosted runners offer fixed CPU, RAM, and storage allocations. For heavy compilation workloads or large machine learning training tasks, upgrading to larger runner sizes or deploying custom self-hosted hardware ensures that your build pipelines remain performant and cost-effective.
Dependencies
In many CI/CD architectures, certain tasks cannot begin until others have successfully completed. For example, you should not attempt to deploy an application artifact before the build and test jobs have verified its integrity. GitHub Actions handles these relationships using the 'needs' keyword.
When a job specifies the 'needs' keyword, it declares a dependency on one or more preceding jobs. GitHub's orchestrator analyzes these dependencies to construct a directed acyclic graph, ensuring that dependent jobs do not start until all required upstream jobs have concluded with a successful status.
Here is an example demonstrating job dependency configuration:
jobs:
  lint:
    runs-on: ubuntu-latest
    steps:
      - uses: actions/checkout@v4
      - run: npm run lint

  build:
    needs: lint
    runs-on: ubuntu-latest
    steps:
      - uses: actions/checkout@v4
      - run: npm run build

  deploy:
    needs: [lint, build]
    runs-on: ubuntu-latest
    steps:
      - run: echo "Deploying verified build to production"
Beyond simple sequencing, job dependencies enable data sharing through workflow artifacts. Upstream jobs can upload built binaries, test reports, or generated packages using the 'actions/upload-artifact' action. Downstream jobs can subsequently download these files using 'actions/download-artifact', allowing separate compute instances to pass build artifacts securely across pipeline stages.
Conditions
Conditional execution allows you to control whether a specific job or step should run based on the outcome of previous tasks, environment contexts, or event metadata. By utilizing the 'if' conditional expression, you can skip unnecessary steps or implement fallback behaviors without failing the entire workflow.
GitHub Actions evaluates 'if' expressions against expression contexts such as 'github', 'env', 'needs', and 'steps'. For instance, you can ensure that a deployment step only executes if the current branch is 'main' and all preceding test jobs succeeded. If an 'if' expression evaluates to false, GitHub marks that job or step as skipped rather than failed.
Below is an example showing conditional step and job execution:
jobs:
  release:
    runs-on: ubuntu-latest
    if: github.ref == 'refs/heads/main' && github.event_name == 'push'
    steps:
      - uses: actions/checkout@v4
      - name: Publish Release
        run: echo "Publishing official release version"
When writing conditional expressions, it is important to remember that status check functions like 'success()', 'failure()', and 'always()' behave in specific ways. By default, if a step fails, all subsequent steps are skipped unless an explicit failure handler function is invoked. Mastering these status functions ensures your workflows can perform necessary cleanup operations even when upstream builds encounter errors.
Reusable Workflows
As organizations scale their automation across multiple repositories and teams, maintaining duplicate workflow YAML files introduces significant technical debt. To solve this, GitHub Actions supports reusable workflows, allowing you to define a centralized workflow and call it securely from other repositories or separate directories.
A reusable workflow is structured similarly to a standard workflow, but it uses the 'workflow_call' trigger instead of 'push' or 'pull_request'. It can accept input parameters and secrets from the caller workflow, process them, and even return output values back to the calling pipeline.
Here is an example of a caller workflow invoking a centralized reusable security scan workflow:
name: Caller Pipeline

on: [push]

jobs:
  call-scanner:
    uses: octo-org/security-workflows/.github/workflows/scan.yml@v1
    with:
      severity-level: 'high'
    secrets:
      token: ${{ secrets.SCAN_API_TOKEN }}
Reusable workflows enforce the DRY principle across enterprise engineering organizations. They allow platform teams to establish standardized CI/CD security controls, compliance checks, and deployment patterns that individual product teams can inherit with minimal configuration overhead. Proper version pinning via git tags or commit hashes ensures that calling workflows remain stable when centralized templates are updated.
Troubleshooting and Common Mistakes
Even well-designed automation pipelines occasionally encounter failures. Recognizing common syntax pitfalls, understanding error codes, and implementing systematic verification strategies will save your team hours of debugging time.
One frequent mistake is failing to scope permissions correctly. By default, GitHub tokens have broad read and write permissions depending on repository settings. Explicitly defining the 'permissions:' block at the workflow or job level prevents unauthorized token abuse and avoids permission-denied errors during deployment steps. Another common issue involves environment variable scoping; remember that variables defined at the workflow root are not automatically accessible inside runner shells unless explicitly passed via 'env' keys at the job or step level.
When troubleshooting failing workflows, always inspect the raw step logs in the GitHub Actions web interface. You can enable runner diagnostic logging by setting repository secrets named 'ACTIONS_STEP_DEBUG' to 'true'. This exposes verbose debug output, making it easier to diagnose network timeouts, authentication failures, or malformed command arguments.
Finally, weigh the trade-offs between complex monolithic workflows and modular reusable architectures. While splitting pipelines into many dependent jobs and reusable workflows improves maintainability, excessive orchestration overhead can increase queue times and make end-to-end execution tracing more challenging. Balance modularity with operational simplicity to maintain a fast, reliable developer experience.
📌 Recommended Next Guides & References
  <li>
    <a href="/article/docker-and-kubernetes-how-they-work-together-2" class="text-primary hover:underline font-semibold flex items-center gap-2">
      <span>→</span> <span>Docker and Kubernetes: How They Work Together</span>
    </a>
  </li>

  <li>
    <a href="/article/kubernetes-ingress-explained" class="text-primary hover:underline font-semibold flex items-center gap-2">
      <span>→</span> <span>Kubernetes Ingress Explained: Routing, Controllers, and TLS</span>
    </a>
  </li>

  <li>
    <a href="/article/kubernetes-ingress-controller-explained" class="text-primary hover:underline font-semibold flex items-center gap-2">
      <span>→</span> <span>Kubernetes Ingress Controller Explained: Architecture, Routing, and Implementation</span>
    </a>
  </li>