Quick Answer
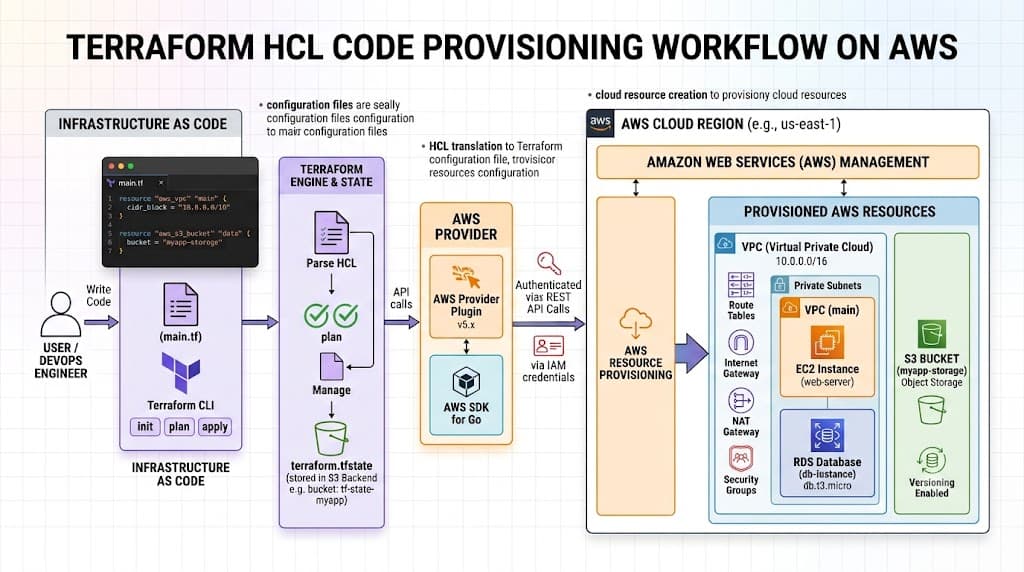
Terraform AWS is an industry-standard Infrastructure as Code approach that allows engineers to define, provision, and orchestrate Amazon Web Services resources using declarative configuration files. Instead of manually clicking through the AWS Management Console, teams use HashiCorp Configuration Language to describe their desired cloud state. The Terraform CLI reads these files, compares them against the actual infrastructure state, and executes precise API calls to bridge the gap. This workflow eliminates human configuration drift, ensures reproducibility across environments, and enables automated testing and deployment. When managing complex architectures involving computing instances, networking components, and storage buckets, leveraging a codified approach streamlines scaling and compliance.
Understanding the Concept
Infrastructure as Code treats provisioning as a software engineering discipline. In traditional setups, engineers modify servers and networks via point-and-click interfaces, making tracking changes difficult and recovery prone to human error. With terraform aws, every network interface, security group, and virtual machine is represented as a resource block in a text file. These text files can be version-controlled, reviewed via pull requests, and audited over time.
The core engine of Terraform communicates with target cloud platforms through modular plugins known as providers. The AWS provider acts as an intermediary, translating abstract resource declarations into concrete API requests directed at Amazon Web Services endpoints. Behind the scenes, Terraform maintains a state file, usually named terraform.tfstate, which maps your real-world cloud resources to your configuration declarations. Understanding how this state file tracks metadata is critical, as it allows Terraform to calculate precisely which resources need creation, modification, or destruction during an execution run.
How It Works
Terraform operates through a continuous feedback loop driven by the core engine, provider plugins, and state storage. When you write declarations in HashiCorp Configuration Language, the core parser builds a dependency graph of your architecture. This graph ensures that foundational elements, such as Virtual Private Clouds and subnets, are provisioned before dependent services like relational databases or compute nodes.
The execution lifecycle follows a predictable pattern. First, initialization downloads required provider binaries and configures backend storage. Second, planning analyzes current state against desired configurations to generate an execution blueprint. Third, application executes the approved blueprint against cloud APIs. Finally, destruction dismantles resources when they are no longer required. Each phase relies heavily on strict syntax rules and proper authentication boundaries to ensure secure operations across distributed cloud environments.
Syntax and configuration
Writing valid configurations requires an understanding of basic HCL blocks. Every configuration typically includes provider blocks, resource blocks, variable blocks, and output blocks. The provider block configures the specific cloud vendor, including region specifications and authentication parameters. Avoid hard-coding credentials directly into these files. Instead, leverage environment variables such as AWS_ACCESS_KEY_ID and AWS_SECRET_ACCESS_KEY, or rely on IAM instance profiles and shared credentials files.
Consider a basic provider configuration block:
terraform {
  required_version = ">= 1.0.0"
  required_providers {
    aws = {
      source  = "hashicorp/aws"
      version = "~> 5.0"
    }
  }
}

provider "aws" {
  region = "us-east-1"
}
This snippet tells the initialization engine to fetch version 5.0 or newer of the official HashiCorp AWS provider and target the us-east-1 region. Defining explicit version constraints prevents unexpected breaking changes when team members run initialization commands across different workstations or automated build agents.
CLI workflow
The Terraform command-line interface provides the primary mechanism for interacting with your infrastructure definitions. Mastering the core command sequence is essential for daily engineering workflows.
- terraform init: Scans your configuration files, identifies required providers, and downloads them into a local .terraform directory. It also configures your backend state storage.
- terraform plan: Queries your current infrastructure, compares it against your configuration files, and generates a dry-run execution preview. Additions appear with green plus signs, modifications with yellow tildes, and deletions with red minus signs.
- terraform apply: Takes an approved execution plan and applies the changes directly to the target cloud environment. Always review the plan output thoroughly before confirming this action.
- terraform destroy: A destructive operation that tears down all resources managed by the current configuration. Use this command with extreme caution in production environments.
Distinguishing between planning and applying is vital. The plan phase is read-only and carries zero risk to running systems, whereas the apply phase executes mutations against live cloud infrastructure.
Practical Terraform Example
To see these concepts in action, let us examine a complete, working HCL configuration that provisions a secure Amazon Virtual Private Cloud along with a single public subnet. This example demonstrates how multiple resources link together through reference expressions.
resource "aws_vpc" "main" {
  cidr_block           = "10.0.0.0/16"
  enable_dns_hostnames = true
  enable_dns_support   = true

  tags = {
    Name        = "production-vpc"
    Environment = "production"
  }
}

resource "aws_subnet" "public" {
  vpc_id                  = aws_vpc.main.id
  cidr_block              = "10.0.1.0/24"
  map_public_ip_on_launch = true

  tags = {
    Name        = "public-subnet"
    Environment = "production"
  }
}

output "vpc_id" {
  description = "The ID of the provisioned VPC"
  value       = aws_vpc.main.id
}

output "subnet_id" {
  description = "The ID of the provisioned public subnet"
  value       = aws_subnet.public.id
}
In this configuration, the aws_vpc resource creates an isolated network space with a specified CIDR block. The aws_subnet resource then references the VPC identifier via aws_vpc.main.id, establishing an implicit dependency. Terraform automatically knows that the VPC must be created before the subnet can be initialized. Finally, output blocks expose key identifiers for downstream consumption or verification.
Verification
Validating that your cloud infrastructure matches your expectations requires a combination of Terraform inspection tools and native cloud verification mechanisms. Never assume an apply command succeeded without checking both the CLI output and the actual cloud console or API.
Begin by checking the values exposed by your output blocks using the terraform output command. You can inspect the entire state file using terraform show, which formats resource attributes in a human-readable layout. For deeper inspection, utilize the AWS CLI to verify that resources exist in the correct region with appropriate tags and security parameters.
For example, to verify the provisioned VPC using the AWS CLI, execute:
aws ec2 describe-vpcs --filters "Name=tag:Name,Values=production-vpc"
This command queries the AWS API directly, confirming that the network object exists independently of your local state file. Regularly reconciling local state representations with actual cloud states prevents silent configuration drift.
Common Mistakes
Even experienced engineers encounter recurring pitfalls when managing cloud infrastructure through code. Recognizing these errors early saves troubleshooting time and prevents accidental downtime.
- Skipping terraform plan: Blindly running apply without reviewing the execution preview often leads to unintended resource replacement or accidental data deletion.
- Hard-coding credentials: Embedding secret access keys or passwords directly into HCL files creates severe security vulnerabilities if code is pushed to public or shared code repositories.
- Mismanaging state files: Storing state files locally on individual laptops in a team environment leads to state locking conflicts, race conditions, and corrupted metadata.
- Ignoring state drift: Making manual changes inside the cloud console without updating your configuration files causes discrepancies that break subsequent deployment runs.
- Over-complicating module hierarchies: Writing excessively nested custom modules before simple, flat configurations are fully understood introduces unnecessary complexity.
Best Practices
Adopting production-grade patterns ensures your infrastructure remains resilient, secure, and maintainable as your organization scales.
Always store your state files in a remote backend, such as an encrypted cloud storage bucket coupled with a distributed locking mechanism. This prevents concurrent modification races when multiple engineers or automated pipelines attempt to execute updates simultaneously.
Structure your repository logically. Separate root configurations by environment, such as staging and production, while keeping reusable building blocks inside shared modules. Integrate automated linting, formatting checks, and security scanning into your continuous integration pipelines. Tools like formatters enforce consistent syntax, while security scanners flag insecure security group rules or unencrypted storage volumes before code ever reaches a review stage.
Troubleshooting
When deployments fail, systematic debugging helps isolate root causes quickly. Common issues range from network timeouts and permission denials to provider version incompatibilities.
If an apply operation hangs or fails with authorization errors, verify your active credentials and ensure your IAM principal possesses sufficient permissions to create the requested resource types. If you encounter state locking errors, investigate whether a previous run terminated abruptly, leaving a stale lock in your remote backend.
Consider a troubleshooting scenario where a resource fails to apply due to a naming conflict or missing dependency:
Error: Error creating VPC: VpcLimitExceeded: The maximum number of VPCs has been reached.

  on main.tf line 1, in resource "aws_vpc" "main":
   1: resource "aws_vpc" "main" {
When facing resource limit errors, inspect your AWS account quotas via the service quota console, request an increase if necessary, or clean up unneeded legacy resources before attempting another run.
📌 Recommended Next Guides & References
  <li>
    <a href="/article/docker-and-kubernetes-how-they-work-together-2" class="text-primary hover:underline font-semibold flex items-center gap-2">
      <span>→</span> <span>Docker and Kubernetes: How They Work Together</span>
    </a>
  </li>

  <li>
    <a href="/article/kubernetes-ingress-explained" class="text-primary hover:underline font-semibold flex items-center gap-2">
      <span>→</span> <span>Kubernetes Ingress Explained: Routing, Controllers, and TLS</span>
    </a>
  </li>

  <li>
    <a href="/article/kubernetes-ingress-controller-explained" class="text-primary hover:underline font-semibold flex items-center gap-2">
      <span>→</span> <span>Kubernetes Ingress Controller Explained: Architecture, Routing, and Implementation</span>
    </a>
  </li>