Quick Answer
Every developer eventually faces the dreaded dilemma: you are knee-deep in experimental code, your working directory is a chaotic mess of modified files, and suddenly an urgent production bug fix comes in on a completely different branch. You are not ready to make a formal commit because your changes are incomplete, broken, or simply untidy. Creating a sloppy work-in-progress commit pollutes your project history, but throwing away your work is out of the question. This is precisely the scenario where Git stash acts as an indispensable safety net. By providing a clean slate without losing your current progress, Git stash allows you to temporarily shelve your uncommitted work, switch contexts effortlessly, and return to your feature later exactly where you left off. Understanding how to leverage this built-in capability is a hallmark of a proficient developer, saving countless hours of manual code-backing and frustration. In this comprehensive guide, we will explore the inner mechanics of the stash stack, examine core and advanced commands, walk through realistic daily development workflows, and discuss critical strategies to avoid common pitfalls.
What is Git Stash?
At its core, Git stash is a utility that records the current state of your working directory and your staging area, saves it onto a stack of unfinished changes, and then reverts your working directory back to match the most recent commit on your current branch. When developers talk about a dirty working directory, they refer to files that have been modified or staged but not yet committed. Normally, Git prevents you from checking out a different branch if your local modifications would conflict with the files on that target branch. Git stash solves this restriction by lifting those modifications out of your way entirely. Think of it as a temporary clipboard or a staging shelf attached to your local repository. You can place your half-written functions, style updates, and configuration tweaks onto the shelf, perform your urgent hotfix on another branch, and then pull your exact files back down when you are ready to resume work. Crucially, stashing is local to your repository; stashes are never pushed to remote servers when you run git push, meaning your experimental drafts remain entirely private and secure on your local machine. Because it operates independently of your commit history, you can rapidly prototype ideas without worrying about whether your intermediate states are clean enough to be shared with teammates or integrated into the main release pipeline.
How Git Stash Works
To use Git stash effectively, it helps to understand the underlying mechanics of how Git tracks your code. Git maintains three primary states: the working directory where you edit files, the staging area or index where changes are prepared, and the local repository containing your commit history. When you execute a stash operation, Git takes a snapshot of your modified tracked files in the working directory as well as any changes currently sitting in your index. It wraps these snapshots into special internal commit objects. These objects are stored locally in a stack structure, which operates on a Last-In, First-Out principle. The most recent stash you create sits at the top of the stack, designated as stash@{0}, while older stashes are pushed down to indices like stash@{1}, stash@{2}, and so forth. By default, Git stash only records changes to tracked files—meaning files that Git already knows about because they were previously committed or explicitly added to the staging area. Untracked files, such as newly created log files or configuration templates, are generally ignored unless you supply specific flags to include them. Understanding this stack architecture is vital because it explains why subsequent stashes stack on top of one another rather than overwriting your previous temporary work. It also highlights why keeping your stash list well-maintained is important; letting dozens of forgotten stashes accumulate can lead to confusion when you eventually need to retrieve a specific set of modifications.
Core Components and Commands
Mastering Git stash requires familiarity with a handful of essential commands that govern saving, viewing, applying, and deleting your shelved code. Let us break down the primary commands every developer should know.
To save your current modifications with an optional descriptive message, you use the save command or the modern equivalent:
git stash push -m "WRP: refactoring user authentication module"
Adding a descriptive message is considered a best practice because trying to distinguish between ten different stashes labeled simply as WIP becomes nearly impossible after a few days. If you want to include untracked files in your stash, you can add the -u or --include-untracked flag:
git stash push -u -m "Including new config templates"
To view all the stashes currently stored in your repository stack along with their associated branches and descriptive messages, you run:
git stash list
This command outputs a list formatted like stash@{0}: WIP on main: 7a2b3c1 Update readme. When you are ready to retrieve your stashed changes and reapply them to your working directory, you have two primary choices: git stash pop and git stash apply.
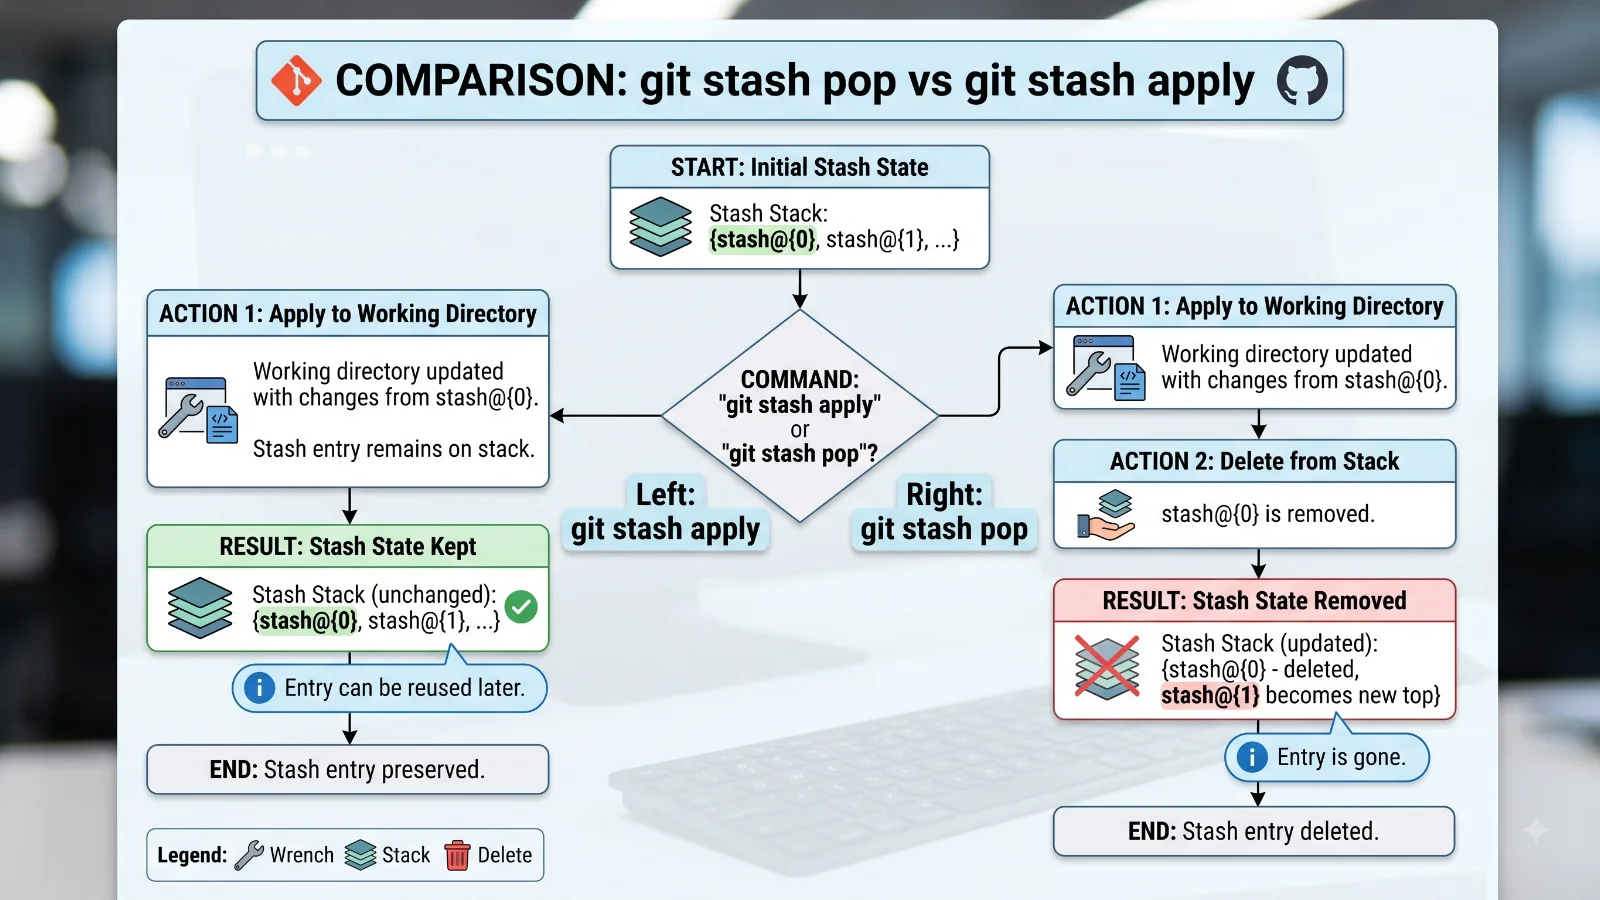
The git stash pop command applies the topmost stash to your working directory and simultaneously removes it from the stash stack. This is the most common choice when you are completely finished with your detour on another branch and want to resume your primary task. Conversely, git stash apply applies the changes to your working directory but keeps a copy of the stash safely in the stack. This is useful if you want to apply the same set of changes across multiple branches or if you want to verify that the stash applies cleanly before deleting it. If you need to apply or pop a specific stash rather than the most recent one, you simply append the stash reference identifier:
git stash apply stash@{2}
Finally, when you have successfully applied a stash and no longer need it, or if you decide to discard a temporary experiment entirely, you can remove it using git stash drop followed by its identifier, or clear the entire stack at once using git stash clear.
Practical Example: Using Git Stash in Real Workflows
To ground these concepts in reality, let us walk through a typical developer scenario. Imagine you are working on the feature-login branch of a web application. You have modified two files: auth.js and login.css. Suddenly, a senior developer informs you of a critical security vulnerability on the main branch that needs an immediate patch.
First, you check the status of your working directory:
git status
Git confirms you have uncommitted modifications. Instead of committing your incomplete UI styles and half-baked authentication logic, you stash your changes with a clear message:
git stash push -m "Incomplete login form styling and auth logic"
Your working directory is now completely clean, matching the latest commit on feature-login. Next, you switch to the main branch and pull the latest updates:
git checkout main
git pull origin main
You create a new hotfix branch, implement the security fix, commit your changes, push them for review, and merge them back into main. The urgent crisis is averted. Now you can return to your original task:
git checkout feature-login
At this point, your working directory is clean, and your previous modifications are safely resting on the local stash stack. You verify the stash exists by running git stash list, which displays your descriptive message. Finally, you retrieve your work by popping the top stash off the stack:
git stash pop
Git successfully merges your stashed changes back into your working directory. You notice that auth.js and login.css are modified once again, and you can seamlessly continue writing code right where you left off without missing a beat.
Benefits of Using Git Stash
Integrating Git stash into your daily programming routine offers substantial workflow advantages. First and foremost, it preserves a pristine, linear commit history. Many inexperienced developers fall into the trap of making excessive work-in-progress commits—often with vague messages like "fixing stuff," "saving before lunch," or "WIP"—just to move between branches. These noisy commits clutter the project history, complicate code reviews, and make tools like git bisect significantly harder to use when hunting down bugs. Git stash provides a clean alternative: you keep your intermediate experiments isolated in a local temporary storage area, reserving actual commits exclusively for meaningful, tested, and self-contained units of work. Furthermore, Git stash drastically reduces context-switching friction. When an urgent interruption occurs, you can secure your working state in seconds with a single command, address the priority issue with total focus, and restore your exact environment just as quickly. This agility keeps your mind clear and prevents the mental overhead of manually copying files or dealing with messy branch-switching blocks.
Limitations and Potential Pitfalls
While Git stash is remarkably powerful, developers must remain aware of its limitations and potential risks. The most common hazard is stash loss. Because stashes are stored locally in the Git reflog, they are not permanently backed up. If you accidentally drop a stash, clear your entire stash stack, or if your local repository experiences corruption, recovering those uncommitted changes can range from difficult to impossible. Another frequent challenge arises when applying stashes across different branches or after significant time has passed. If the underlying codebase has evolved substantially since you created the stash, running git stash apply or git stash pop can trigger merge conflicts. Resolving stash conflicts is similar to resolving standard merge conflicts: Git inserts conflict markers into your files, requiring you to manually inspect the differences, edit the files to keep the desired code, and mark the conflicts as resolved. Additionally, managing multiple stashes without clear naming conventions can lead to severe confusion. If your stash list contains five entries all labeled simply as "WIP," guessing which one contains your database migration script versus your frontend refactoring is purely a guessing game. To mitigate these risks, always use descriptive stash messages, avoid letting your stash stack grow indefinitely, and turn stashes into proper commits or branches if you intend to keep them for more than a few days.
Frequently Asked Questions
How do I recover a deleted git stash?
If you accidentally drop a stash using git stash drop or clear your stack, the underlying commit objects often remain temporarily accessible in the Git reflog. You can inspect the stash reflog by running git reflog show stash to find the commit hash of your lost stash, and then recreate it or inspect its contents using standard Git commands.
What is the difference between git stash pop and git stash apply?
Both commands retrieve stashed changes and apply them to your current working directory. However, git stash pop applies the changes and immediately deletes the stash from the stack, whereas git stash apply applies the changes while keeping a duplicate copy of the stash safely in the stack for future use.
Can I stash only untracked files in Git?
Yes. By default, Git stash ignores untracked files, but you can target them specifically by running git stash push --include-untracked or git stash push -u. If you want to stash only untracked files and leave tracked modifications alone, you can combine flags or stage your desired files beforehand.
How do I delete a specific stash from the list?
You can remove a single, targeted stash without affecting the rest of your stack by passing its specific reference identifier to the drop command, such as git stash drop stash@{1}.
Conclusion
Git stash is an essential utility in any modern software developer's toolkit. By understanding how the stash stack operates and mastering core commands like push, list, apply, and pop, you can navigate interruptions, urgent hotfixes, and experimental tangents with absolute confidence. Embracing Git stash helps maintain a clean, readable commit history while offering the flexibility to pivot between tasks instantly. Practice incorporating stashes into your everyday branching workflows, make a habit of writing clear descriptions for your shelved code, and enjoy a smoother, more efficient development experience.
📌 Recommended Next Guides & References
  <li>
    <a href="/article/docker-and-kubernetes-how-they-work-together-2" class="text-primary hover:underline font-semibold flex items-center gap-2">
      <span>→</span> <span>Docker and Kubernetes: How They Work Together</span>
    </a>
  </li>

  <li>
    <a href="/article/kubernetes-ingress-explained" class="text-primary hover:underline font-semibold flex items-center gap-2">
      <span>→</span> <span>Kubernetes Ingress Explained: Routing, Controllers, and TLS</span>
    </a>
  </li>

  <li>
    <a href="/article/kubernetes-ingress-controller-explained" class="text-primary hover:underline font-semibold flex items-center gap-2">
      <span>→</span> <span>Kubernetes Ingress Controller Explained: Architecture, Routing, and Implementation</span>
    </a>
  </li>