Quick Answer
Every developer eventually experiences the sinking feeling of running a merge or pull command only to be greeted by a wall of conflict warnings. In collaborative software engineering, divergent histories are an inevitable reality. When multiple team members work on overlapping features, modify the same configuration files, or refactor shared utilities, Git cannot always guess how to automatically stitch those changes back together. Understanding how to git resolve merge conflict states safely and efficiently is a fundamental skill that separates novice programmers from confident, productive engineers. This comprehensive guide explores the mechanics behind these conflicts, how to interpret conflict markers, and how to execute a clean, tested resolution workflow without breaking your production codebase.
Definition of a Git Merge Conflict
For more detail, see git merge.
A Git merge conflict occurs when two separate branches have made edits to the exact same line within a file, or when a file has been deleted in one branch and modified in another. When you attempt to combine these divergent histories using commands like git merge, git pull, or git rebase, Git halts the automated process. It stops because it lacks the human context required to determine which version of the code is correct. Instead of guessing and risking catastrophic data loss, Git flags the file as conflicted, leaves detailed markers directly inside the text, and pauses the operation until a developer intervenes.
It is vital to understand that a merge conflict is not a bug or an error in Git. It is a protective mechanism. It tells you that your local modifications and the incoming changes overlap in a way that requires manual review. Far from being a roadblock, encountering a conflict is a normal part of agile team collaboration. The goal of any developer facing this situation is not to bypass Git, but to use Git's tooling to carefully reconcile the differences, verify the final output, and preserve the integrity of the application.
How Git Merge Conflicts Work
To master the art of resolving these divergent states, you must first understand how Git tracks history under the hood. Git relies on directed acyclic graphs of commits, where every snapshot points to its parent commits. When you branch off from a main development line, both your feature branch and the target branch share a common ancestor commit. As development continues independently, each branch accumulates its own unique commit history.
When you initiate a merge, Git performs a three-way merge algorithm. It compares three distinct versions of every file: the common ancestor commit, the tip of your current branch (often referred to as HEAD or local changes), and the tip of the branch you are attempting to merge in (incoming changes). If modifications occur in completely different files, or in separate, non-overlapping sections of the same file, Git's algorithm automatically combines them into a new merge commit. However, if the same lines are touched differently in both the local and incoming branches, the three-way merge algorithm cannot resolve the ambiguity. It drops conflict markers into the affected files, stops the automated merge, and leaves the repository in a temporary merging state.
Components of a Merge Conflict
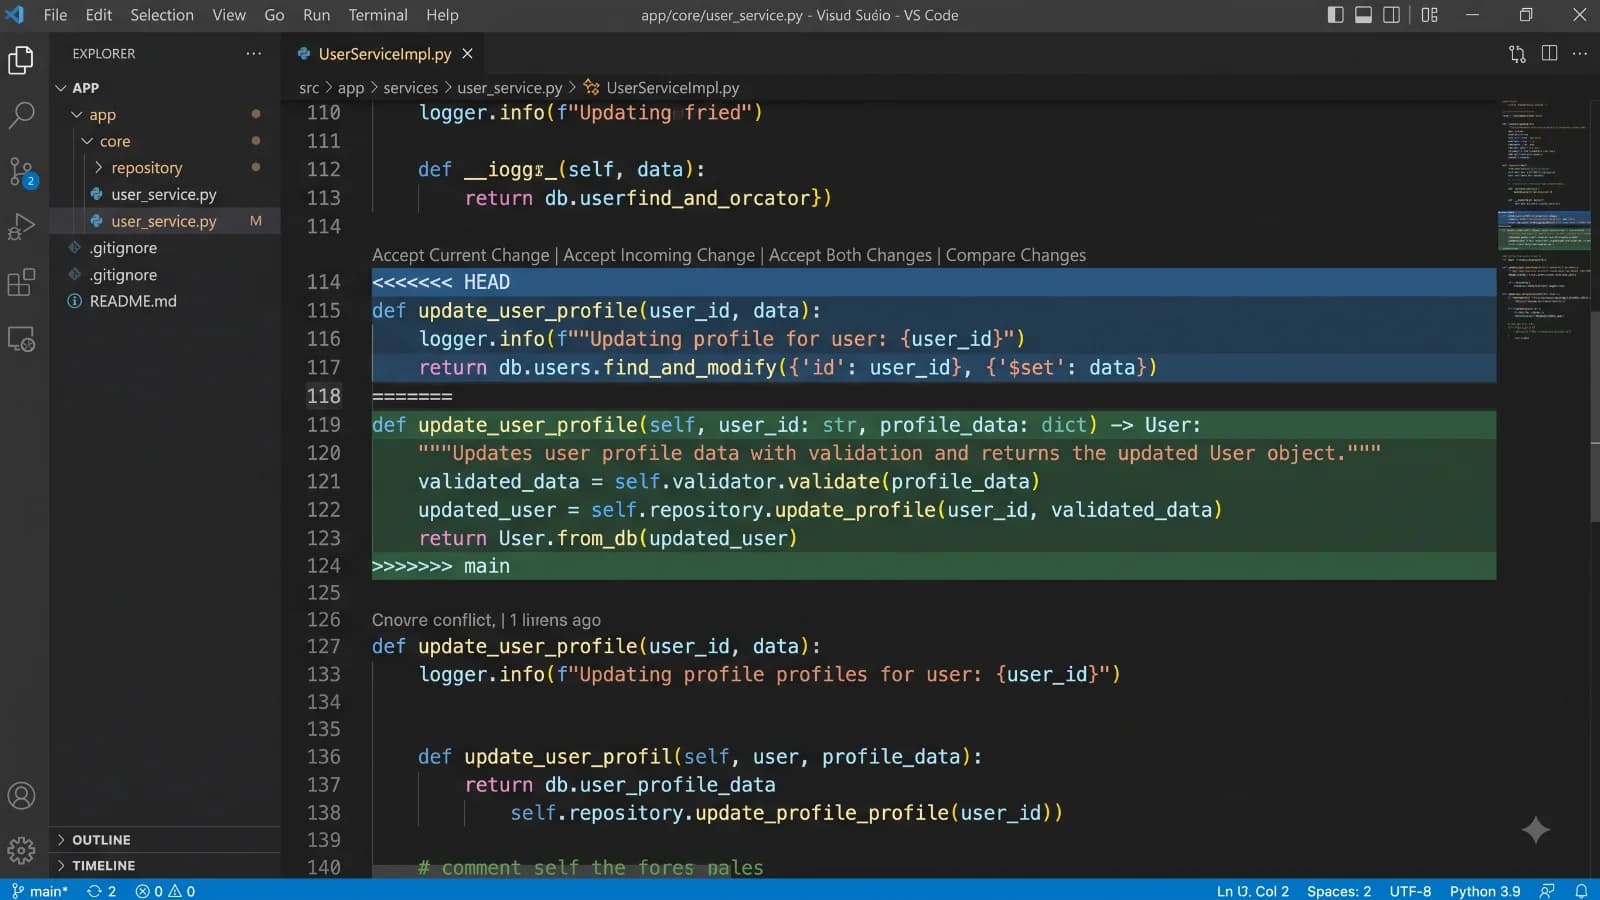
When Git encounters a conflicting edit, it modifies the source code file to explicitly display the competing changes. These visual indicators are known as conflict markers, and knowing how to read them is essential for any developer.
A typical conflict block consists of specific delimiter lines:
<<<<<<< HEADmarks the beginning of the lines that exist in your current working branch.=======acts as the dividing line separating your current changes from the incoming changes.>>>>>>> branch-namemarks the end of the incoming changes from the branch you are trying to merge.
Between these markers lie the conflicting code snippets. For example, if you modified a database configuration line in your local branch while another developer updated the same line on the main branch, your file might look like this:
{
<<<<<<< HEAD
  "timeout": 30,
=======
  "timeout": 60,
>>>>>>> feature/fast-response
}
In this scenario, HEAD represents your current local configuration file with a timeout value of 30, whereas the incoming branch feature/fast-response specifies a timeout value of 60. To git resolve merge conflict scenarios effectively, you must inspect these blocks, determine which value or combination of values is correct, delete the conflict markers entirely, and leave behind clean, syntactically valid code.
Practical Example of Resolving a Conflict
For more detail, see Git stash.
Let us walk through a concrete, real-world scenario. Imagine you are working on a web application and modifying an authentication utility function. You run git pull origin main to update your local feature branch, but Git halts the process and outputs a conflict warning for src/auth.js.
Step 1: Identify the conflicted files. Run git status in your terminal. Git will list all files that have unmerged paths, clearly identifying src/auth.js as the source of friction.
Step 2: Open the conflicted file in your favorite code editor or IDE. Locate the conflict markers. Suppose you see the following block:
function validateUser(user) {
<<<<<<< HEAD
  return user && user.isActive && user.tokenExpiry > Date.now();
=======
  return user?.isActive ?? false;
>>>>>>> main
}
Step 3: Analyze both versions. Your local HEAD version checks multiple properties including token expiration, while the incoming main version uses modern optional chaining for concise safety. After consulting with your team or reviewing requirements, you decide that combining the strict expiration check with the modern syntax is the best approach.
Step 4: Edit the code to create the resolved version. Remove all conflict markers (<<<<<<<, =======, >>>>>>>) and save the file:
function validateUser(user) {
  return user?.isActive === true && user?.tokenExpiry > Date.now();
}
Step 5: Test the code thoroughly. Run your unit test suite, integration tests, and linters to ensure your manual edits did not introduce syntax errors or behavioral regressions.
Step 6: Stage the resolved file. Run git add src/auth.js to inform Git that the conflict has been manually addressed.
Step 7: Complete the merge process. If you were in the middle of a merge, run git commit to finalize the merge commit. If you were running git pull or git rebase, follow the terminal prompts to conclude the workflow.
Benefits of Proper Conflict Resolution
Disciplined conflict resolution yields immense benefits for software development teams. First, it forces developers to communicate and review overlapping architectural decisions. Rather than blindly overwriting code, team members must evaluate intent and choose the most robust implementation. Second, maintaining a clean git history ensures that bug tracking, git bisect investigations, and code audits remain accurate. When conflicts are resolved with care rather than rushed hacks, the resulting codebase remains stable, maintainable, and free of technical debt accumulated from hasty merges.
Furthermore, mastering conflict resolution builds psychological safety within development teams. Many junior developers fear merge conflicts, often avoiding frequent pulls or complex branching strategies out of anxiety. By treating conflict resolution as a routine, manageable technical task, teams foster a culture of confident collaboration where parallel feature development thrives without fear of breaking the repository.
Limitations and Pitfalls
Despite the power of Git's resolution tools, developers frequently fall into common traps that compromise code quality. One major pitfall is leaving stray conflict markers in the codebase. If a developer forgets to delete a ======= or >>>>>>> line, the compiler or interpreter will throw syntax errors when building the application.
Another dangerous habit is blindly accepting either HEAD or incoming changes in their entirety without reviewing the surrounding logic. While commands like git checkout --ours or git checkout --theirs offer fast shortcuts to accept one version completely, using them indiscriminately can wipe out critical bug fixes or business logic introduced by teammates. Always inspect the diff manually or use a reliable merge tool to ensure no valuable code is silently discarded.
Finally, attempting to resolve complex conflicts during high-stress deployment windows often leads to mistakes. Rushed edits bypass thorough testing, resulting in regressions slipping into production environments. Maintaining disciplined testing protocols after every resolution is non-negotiable.
Frequently Asked Questions
How do I abort a merge conflict in Git?
If a merge is proving too difficult to resolve or you realize you initiated the wrong operation, you can cancel the entire process at any time before committing. Run git merge --abort to return your working directory to the exact state it was in before you started the merge.
Can I use a GUI tool to resolve Git merge conflicts?
Yes. Many modern IDEs and editors—such as Visual Studio Code, JetBrains WebStorm, and GitKraken—include built-in visual merge editors. These tools present three-way split screens showing local changes, incoming changes, and the resulting file, allowing you to click buttons to accept either side or combine them easily.
What do the <<<, ===, and >>> symbols mean in Git?
These are conflict markers inserted by Git. <<<<<<< HEAD denotes the start of your local changes. ======= separates your local changes from the incoming changes. >>>>>>> marks the end of the incoming changes along with the branch name they originated from.
How do I know which files have merge conflicts?
Running the git status command in your terminal will display a list of all files with unmerged paths, clearly highlighting the files that require manual conflict resolution.
Conclusion
Encountering and resolving merge conflicts is an inevitable part of writing software with Git. By approaching conflicts with a structured methodology—identifying affected files, carefully reading conflict markers, blending logic thoughtfully, and running comprehensive tests—you transform a frustrating hurdle into an opportunity for code refinement. Embrace frequent integration, communicate openly with your team, and practice these resolution steps to maintain a clean, resilient, and collaborative codebase.
📌 Recommended Next Guides & References
  <li>
    <a href="/article/docker-and-kubernetes-how-they-work-together-2" class="text-primary hover:underline font-semibold flex items-center gap-2">
      <span>→</span> <span>Docker and Kubernetes: How They Work Together</span>
    </a>
  </li>

  <li>
    <a href="/article/kubernetes-ingress-explained" class="text-primary hover:underline font-semibold flex items-center gap-2">
      <span>→</span> <span>Kubernetes Ingress Explained: Routing, Controllers, and TLS</span>
    </a>
  </li>

  <li>
    <a href="/article/kubernetes-ingress-controller-explained" class="text-primary hover:underline font-semibold flex items-center gap-2">
      <span>→</span> <span>Kubernetes Ingress Controller Explained: Architecture, Routing, and Implementation</span>
    </a>
  </li>