Quick Answer
Branch management is a core competency when working with version control systems. Over the course of a project's lifecycle, requirements shift, naming conventions evolve, and features are repurposed. Consequently, you will often find yourself needing to rename a branch to better reflect its current purpose or maintain team-wide consistency. Whether you are correcting a typo in a feature branch or aligning a release tag with a new naming scheme, knowing how to execute these changes smoothly without breaking your workflow is essential.
When developers search for how to git rename branch instructions, they usually encounter a mix of local and remote operations. Simply changing the name in your local terminal window is often only half the job. If the branch has already been pushed to a shared remote repository like GitHub, GitLab, or Bitbucket, you must also handle remote tracking references properly. Neglecting the remote side can result in disconnected tracking links, confusing error messages for your colleagues, or accidental recreation of old branch names during subsequent push and pull operations.
In this comprehensive guide, we will break down the exact commands required to update your workspace safely. We will cover renaming your current working branch, updating branches you are not currently checked out on, synchronizing remote repositories, and managing shared team workflows without causing merge conflicts or disruption to your peers.
Introduction to Renaming Git Branches
Branch names serve as communicative labels for lines of development. Good names provide immediate context to anyone inspecting the commit history or reviewing a pull request. However, initial branch names are frequently improvised during rapid prototyping or bug-fixing sessions. As a feature matures, a generic label like fix-bug-123 becomes inadequate, making a more descriptive identifier necessary.
From a technical perspective, Git stores branches as lightweight pointers to specific commits. Because they are just pointers, changing their labels is a local metadata operation rather than a fundamental rewrite of the underlying commit history. However, once a branch has been pushed to a remote server, that local pointer is mirrored remotely, establishing a tracking relationship. This relationship ensures that commands like git pull and git push know which remote counterpart corresponds to your local workspace.
Understanding this underlying architecture helps clarify why a simple local rename does not automatically propagate to shared servers. Git treats your local repository and the remote host as distinct entities that require explicit synchronization steps. By mastering both local modifications and remote tracking updates, you maintain a clean, organized repository structure that reduces cognitive load for your entire engineering team.
How to Rename A Local Git Branch
See also: delete local Git branches
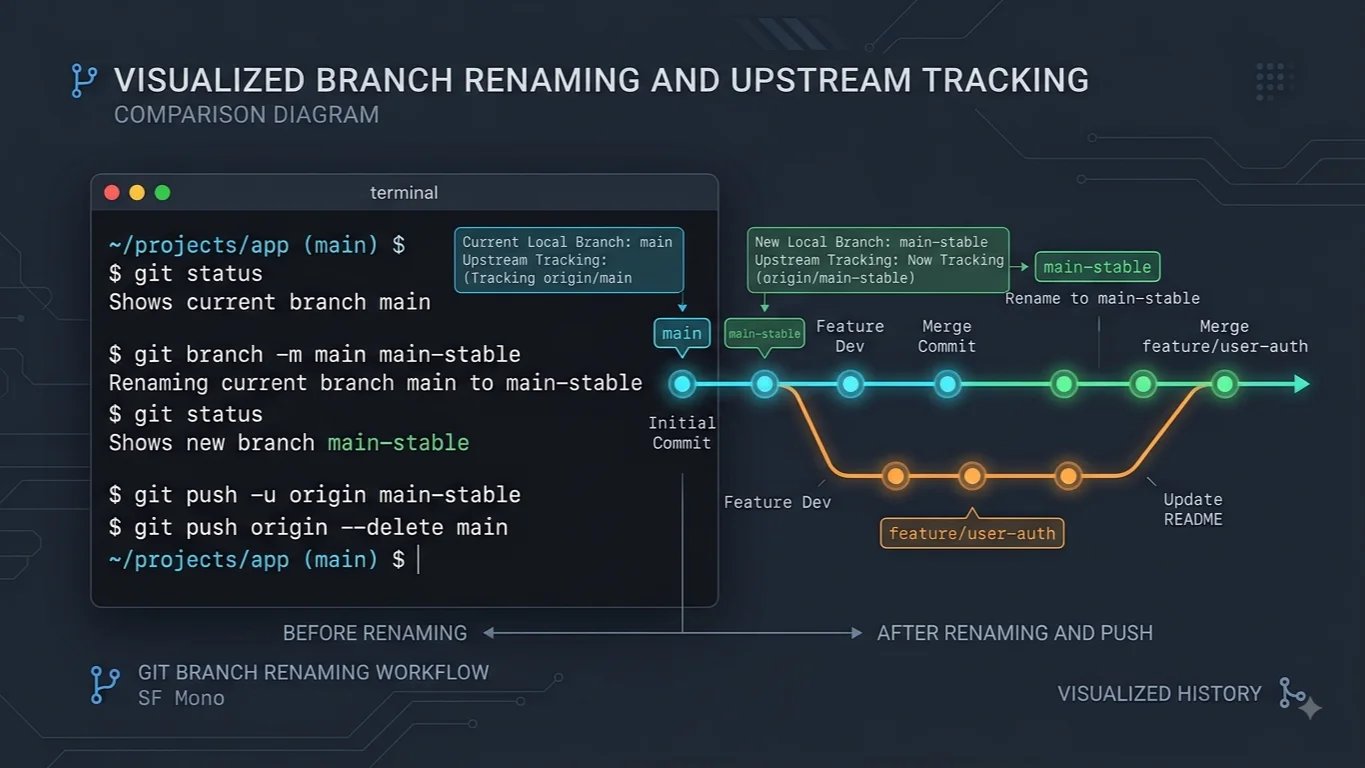
Renaming a local branch is a straightforward process handled primarily through the branch subcommand. To rename the branch you are currently checked out on, you use the -m flag, which stands for move or rename. For example, if you are currently working on a branch named feature/old-name and want to change it to feature/new-name, you execute a simple command in your terminal.
git branch -m feature/new-name
This command instantly updates the current branch label in your local .git directory. If you are not currently checked out on the branch you wish to rename, you can still target it by providing both the old name and the new name in the same command string. This is particularly helpful when you notice a misnamed feature branch while reviewing your status on the main development line.
git branch -m old-branch-name new-branch-name
Sometimes, you might encounter a situation where the new name you have chosen already exists locally. By default, Git protects you from accidentally overwriting an existing branch by throwing an error. If you are entirely certain that you want to overwrite an existing branch with your renamed branch, you can use the capital -M flag instead of the lowercase -m flag. The capital flag forces the operation, overriding safety checks.
git branch -M old-branch-name existing-branch-name
Before moving on to remote operations, it is always wise to verify your local branch structure. Running git branch will list all local branches, highlighting your currently active workspace with an asterisk. Taking a moment to confirm the name change locally prevents syntax errors and ensures your working tree is clean before you interact with any remote servers.
Updating Remote Tracking Branches
See also: delete the obsolete remote reference
Once your local branch has been successfully renamed, the next phase involves synchronizing those changes with your remote hosting service. If the previous name was never pushed to the remote server, your work is complete. However, if the old branch name exists on a remote server like GitHub, simply running git push will not automatically rename the remote branch; instead, it will push your renamed branch as an entirely new, separate remote branch.
To properly update a remote repository, you must execute a specific sequence of commands. First, push your newly renamed local branch to the remote server and set it as the upstream tracking branch.
git push -u origin new-branch-name
The -u or --set-upstream flag instructs Git to remember the connection between your local branch and the specified remote branch, making future pushes and pulls seamless. After successfully pushing the new branch, the old branch name still exists on the remote server and must be explicitly deleted to avoid clutter and confusion.
git push origin --delete old-branch-name
By combining these steps—pushing the new branch with upstream tracking and deleting the obsolete remote reference—you successfully migrate your development line without losing commit history or breaking integration pipelines. Always double-check your remote connection status using git remote show origin to confirm that tracking links point to the correct updated branches.
Common Mistakes and Collaboration Risks
Renaming branches that are shared with a development team introduces specific collaboration challenges. Unlike personal projects where you control all interactions, shared repositories require clear communication. If you rename a remote branch that other team members are actively contributing to, their local tracking references will become outdated, leading to confusing error messages when they attempt to pull updates or push their own commits.
The most frequent mistake developers make is renaming and pushing a shared branch without notifying their colleagues. When a teammate tries to run git pull on the old branch name, Git will fail to find the remote reference. To resolve this, teammates must update their local repository tracking references. They can prune obsolete tracking branches using git fetch --prune and switch to the newly renamed branch using standard checkout procedures.
Another risk involves continuous integration and deployment pipelines. Automated build servers, testing suites, and webhook triggers often listen to specific branch names, such as staging or main. Renaming a branch tied to CI/CD pipelines can inadvertently break automated deployments or cause build checks to fail silently. Always review your repository webhook configurations and pipeline triggers before altering active branch names in shared environments.
To mitigate these collaboration risks, establish team conventions. Whenever a shared branch must be renamed, announce the change in your team communication channel, ensure all open pull requests targeting the old branch are updated or closed, and coordinate a scheduled window for the update so all contributors can align their local workspaces simultaneously.
📌 Recommended Next Guides & References
  <li>
    <a href="/article/docker-and-kubernetes-how-they-work-together-2" class="text-primary hover:underline font-semibold flex items-center gap-2">
      <span>→</span> <span>Docker and Kubernetes: How They Work Together</span>
    </a>
  </li>

  <li>
    <a href="/article/kubernetes-ingress-explained" class="text-primary hover:underline font-semibold flex items-center gap-2">
      <span>→</span> <span>Kubernetes Ingress Explained: Routing, Controllers, and TLS</span>
    </a>
  </li>

  <li>
    <a href="/article/kubernetes-ingress-controller-explained" class="text-primary hover:underline font-semibold flex items-center gap-2">
      <span>→</span> <span>Kubernetes Ingress Controller Explained: Architecture, Routing, and Implementation</span>
    </a>
  </li>