Quick Answer
A Kubernetes Deployment is a declarative API object that provides automated updates and rolling rollouts for your stateless applications, ensuring that the number of currently running Pods matches your specified desired state. When you configure a workload, the system automatically provisions and manages underlying ReplicaSets to handle Pod creation, deletion, and rescheduling when nodes fail. Rather than manually managing individual containers or handling manual updates, engineers rely on a kubernetes deployment to orchestrate container lifecycles safely and predictably across a cluster.
Quick Answer
A kubernetes deployment is a high-level API controller that manages Pods through ReplicaSets, ensuring your applications maintain a specified desired state and scale without downtime. To get started quickly, you can run an imperative command like kubectl create deployment web-app --image=nginx:latest --replicas=3 or apply a declarative manifest using kubectl apply -f deployment.yaml. This approach abstracts away lower-level container management, making it the standard workload primitive for production cloud-native applications.
What a Deployment Is
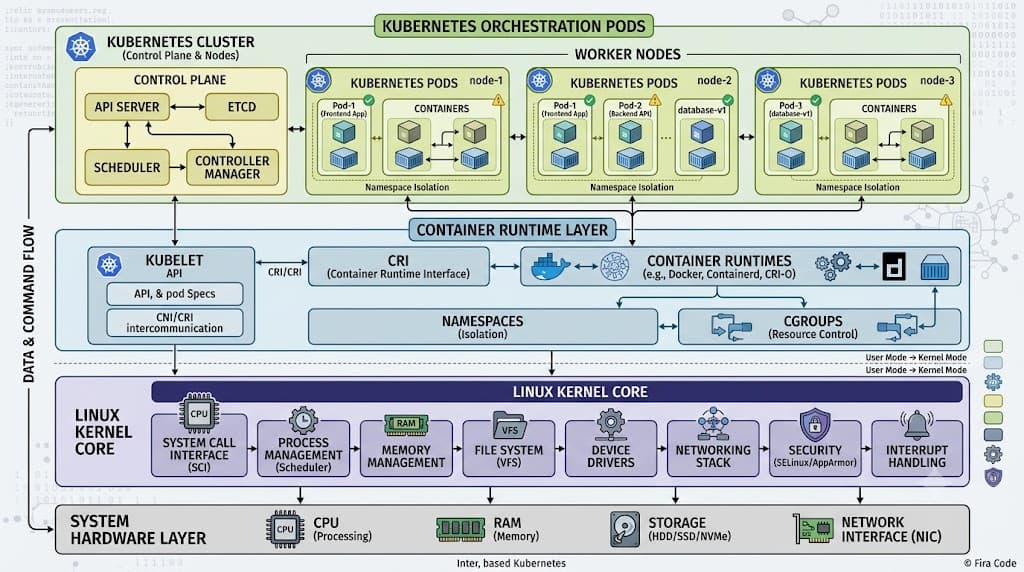
Understanding how a kubernetes deployment functions requires looking at the separation of concerns between different abstraction layers within the cluster control plane. At the foundation, a Pod represents a single instance of a running process inside your cluster, encapsulating one or more containers. However, managing raw Pods directly is impractical because they are ephemeral and do not self-heal if a node crashes or becomes unreachable.
To bridge this gap, a Deployment acts as a higher-level management controller. It does not manage Pods directly; instead, it creates and oversees one or more ReplicaSets. Each ReplicaSet maintains a stable set of identical Pod replicas at any given time. When you modify your application configuration, the Deployment controller orchestrates a seamless transition from the old ReplicaSet to a new one, coordinating rolling updates, history revisions, and rapid rollbacks if errors occur.
Maintaining the desired state is the core mechanism of the Kubernetes control plane. The control plane continuously loops, comparing the actual state of your cluster against the desired state declared in your deployment specification. If a node running two of your application Pods goes offline, the control plane detects the discrepancy—observing that the actual replica count has dropped below the desired count—and immediately schedules new Pods on healthy cluster nodes. This self-healing property eliminates the need for manual operator intervention during routine infrastructure disruptions or node maintenance.
Deployment YAML
See also: ConfigMaps and Secrets
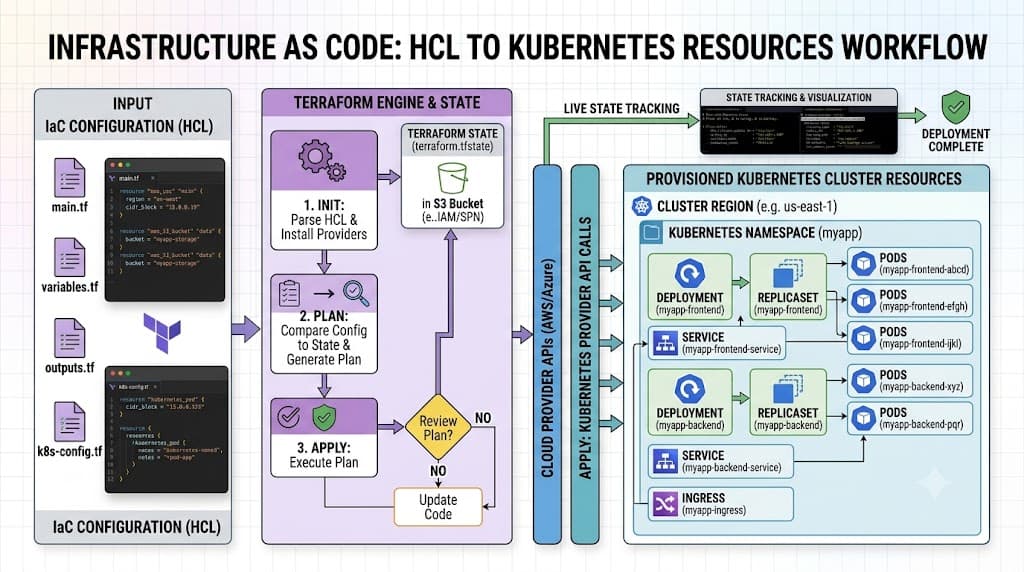
Declarative configuration is the cornerstone of robust infrastructure management in cloud-native environments. A kubernetes deployment yaml manifest allows teams to version-control their application definitions, review changes through pull requests, and apply identical configurations reliably across development, staging, and production clusters.
A typical deployment manifest consists of several top-level fields: apiVersion, kind, metadata, and spec. The apiVersion field specifies the Kubernetes API version being targeted, such as apps/v1 for standard production workloads. The kind field must be set to Deployment. The metadata block holds identifying information, including the resource name, namespace, and custom labels used for organizational tracking.
The spec block is where the core workload behavior is defined. It contains the replicas count, a selector to match underlying Pods, and a template sub-spec. The template is essentially a complete Pod definition nested inside the deployment manifest, complete with its own metadata and container specifications. This includes container image tags, resource requests and limits, environment variables, liveness and readiness probes, and volume mounts.
When writing a kubernetes yaml manifest, strict adherence to schema rules is essential. Invalid indentation or missing required fields will cause the API server to reject the configuration upon submission. Best practices dictate keeping manifests modular, avoiding hardcoded environment-specific values by leveraging ConfigMaps and Secrets, and ensuring that all containers define explicit resource requests to prevent resource starvation on your worker nodes.
Replicas and Selectors
Managing workloads at scale requires precise mechanisms to identify, group, and control collections of Pods. This is achieved through the interplay between kubernetes replicas and label selectors. Selectors are logical expressions that tie a deployment controller to its managed ReplicaSets and Pod templates.
Every Deployment defines a selector field, typically using matchLabels, which must precisely mirror the labels defined within the template.metadata.labels section of the Pod specification. This immutable contract ensures that the Deployment controller only adopts and manages Pods that belong to its specific workload identity. If these labels drift or do not match, the controller will fail to recognize existing Pods, leading to orphaned workloads or infinite creation loops.
Replicas define the exact number of identical Pod instances that should run concurrently. The deployment controller constantly monitors this count. If developer actions or infrastructure events alter the active population, the system reconciles the difference. When scaling up, new Pods are spawned using the current template specification. When scaling down, excess Pods are gracefully terminated, allowing active connections to drain before the container processes receive a shutdown signal.
Maintaining consistency across selectors, labels, and template definitions is critical. A common pitfall occurs when engineers manually edit active Pod labels or modify deployment selectors after initial creation without understanding the cascading effects. Such modifications can fracture the ReplicaSet linkage, preventing rolling updates from completing successfully and requiring manual cleanup of stale infrastructure artifacts.
Rolling Updates
One of the most powerful features of a kubernetes deployment is its ability to perform zero-downtime rolling updates. Instead of terminating all running instances simultaneously—which would cause immediate service outages—the deployment controller updates Pods incrementally according to configured strategy parameters.
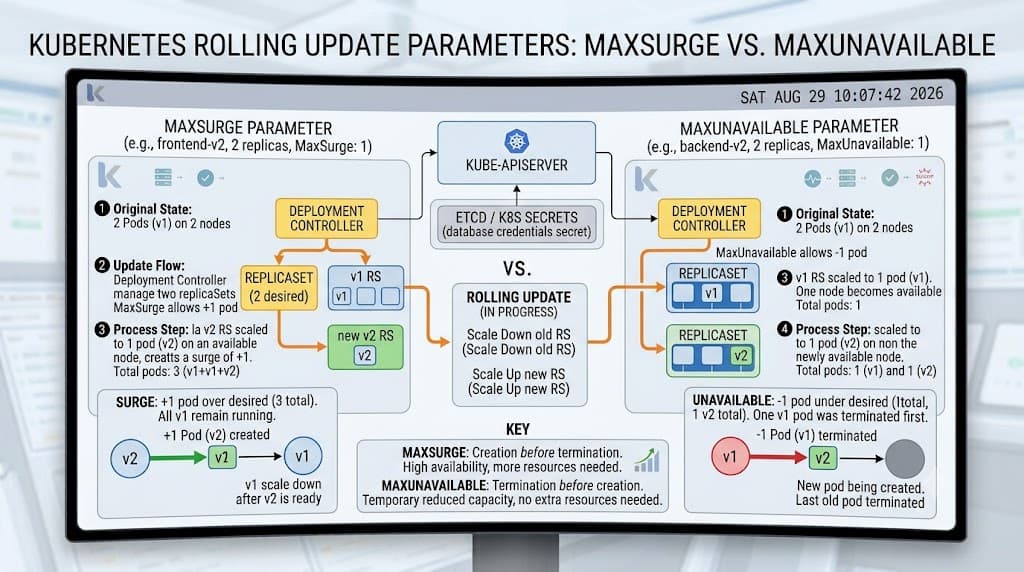
When you trigger a kubernetes rollout by updating a container image version or modifying environment variables in your YAML manifest, the controller creates a new ReplicaSet. It then scales up the new ReplicaSet while scaling down the old one in a controlled, measured fashion. You can fine-tune this behavior using the rollingUpdate strategy parameters: maxSurge and maxUnavailable.
The maxSurge parameter specifies the maximum number of Pods that can be created above the desired number of replicas during the update process. For example, if your deployment specifies 10 replicas and maxSurge is set to 25%, the cluster can temporarily run up to 13 Pods while the update is in progress. Conversely, maxUnavailable defines the maximum number of Pods that can be unavailable during the update sequence. Setting this to 0 ensures that your application capacity never dips below the desired replica threshold, guaranteeing uninterrupted client traffic handling.
Throughout this process, the cluster continuously evaluates readiness probes on newly spawned Pods. Traffic is only routed to the new instances once they signal that they are fully initialized and healthy. If a new container crashes repeatedly or fails its startup checks, the rollout automatically pauses, preventing broken code from propagating across the entire production environment.
Rollbacks
Even with rigorous testing pipelines, faulty code configurations, incompatible database migrations, or unhandled startup exceptions can occasionally slip through into production environments. When a problematic update is deployed, having a reliable mechanism to revert changes is vital for maintaining high service availability and minimizing Mean Time to Recovery.
Kubernetes maintains a historical record of previous deployment configurations through revision tracking. Every time a deployment's spec is modified—whether through an image update, a resource limit adjustment, or an environment variable change—the system records a new revision associated with a distinct ReplicaSet. This history allows operators to inspect past states, compare configuration diffs across revisions, and instantly revert to a known stable version without needing to reconstruct previous YAML files from scratch.
To execute a revert operation, the deployment controller utilizes an undo mechanism that targets the revision history. By instructing the system to roll back, the controller scales up the ReplicaSet associated with the previous stable revision while scaling down the faulty one. This transition follows the same safe, rolling update principles, ensuring that traffic remains uninterrupted as the system reverts to the healthy application state.
It is important to manage your revision history retention limits carefully using the revisionHistoryLimit field in your deployment spec. Retaining too many revisions consumes unnecessary etcd storage space in your cluster control plane, while keeping too few can limit your ability to roll back past a recent series of rapid configuration changes. A balanced limit of 5 to 10 revisions is standard practice for most production workloads.
Scaling
Application traffic rarely remains constant throughout the day. Buristic user activity, scheduled batch jobs, and marketing campaigns require your infrastructure to adapt dynamically to fluctuating workload demands. A kubernetes deployment handles this requirement seamlessly through both manual and automated scaling capabilities.
Manual scaling is ideal for predictable traffic shifts, maintenance windows, or testing scenarios. By adjusting the replica count via command-line utilities, an engineer can instantly scale an application up or down without modifying or reapplying YAML manifests. The deployment controller immediately detects the new target count and reconciles the active Pod population accordingly.
For dynamic, unpredictable workloads, manual adjustments are insufficient. Kubernetes supports automatic scaling through the Horizontal Pod Autoscaler (HPA). The HPA queries metrics APIs—such as CPU utilization, memory consumption, or custom application metrics gathered by Prometheus—and automatically adjusts the deployment's replica count within predefined minimum and maximum boundaries. When traffic spikes, the HPA increases replicas; as traffic subsides, it scales back down to conserve cluster resources and cloud compute costs.
Effective scaling requires properly tuned resource requests and limits on your container definitions. If your CPU or memory requests are misconfigured, the autoscaler may base its scaling decisions on inaccurate utilization metrics, leading to thrashing (rapid, unnecessary scaling loops) or resource starvation where Pods are throttled or evicted by the kubelet.
Troubleshooting
Operating production workloads inevitably involves diagnosing and resolving unexpected failures. When a kubernetes deployment encounters issues—such as failing rollouts, stuck container creation, or unreachable endpoints—systematic troubleshooting is required to identify root causes and restore normal operation.
Common errors often stem from configuration mismatches, container image pull failures, or failing health probes. For instance, an ImagePullBackOff error indicates that the cluster cannot retrieve the specified container image, often due to an incorrect image tag, a missing private registry image pull secret, or network connectivity issues. Another frequent issue is a rollout stuck in progress, which typically occurs when new Pods fail their readiness probes, preventing the controller from safely terminating the old ReplicaSet.
Selector inconsistency is a critical warning area. If you attempt to apply a deployment manifest where the selector labels do not match the template labels, the Kubernetes API server will reject the request outright with a validation error. However, if changes are made to existing resources in ways that violate immutable field rules, unexpected reconciliation behavior can occur. Always verify your object definitions using dry-run flags before applying changes to production clusters.
Safe deployment workflows incorporate multiple layers of validation and verification. This includes running static analysis linters on your YAML manifests, enforcing policy guardrails using admission controllers, utilizing staging clusters that mirror production topologies, and monitoring rollout status metrics in real time during every deployment cycle.
kubectl create deployment
The kubectl create deployment command provides a fast, imperative method for bootstrapping new application workloads directly from the command line without manually authoring YAML manifests from scratch. This command is particularly useful during rapid prototyping, local development, or quick testing sessions where speed takes precedence over declarative configuration management.
To initialize a deployment imperatively, you specify the deployment name and the container image. For example, executing kubectl create deployment web-frontend --image=nginx:alpine --replicas=3 instructs the Kubernetes API server to create a new deployment named web-frontend, pull the specified Alpine-based NGINX image, and maintain three running replica Pods. You can also pass additional flags to customize the workload, such as --port=80 to document container port exposure or --dry-run=client -o yaml to output the generated manifest to your terminal for review before submitting it to the cluster.
While convenient, imperative commands should be used with caution in production environments. Because they bypass version-controlled YAML files, they make cluster state difficult to audit and reproduce. Whenever possible, use imperative commands strictly for scaffolding, then transition your workloads to declarative manifests managed within a Git repository.
kubectl apply -f
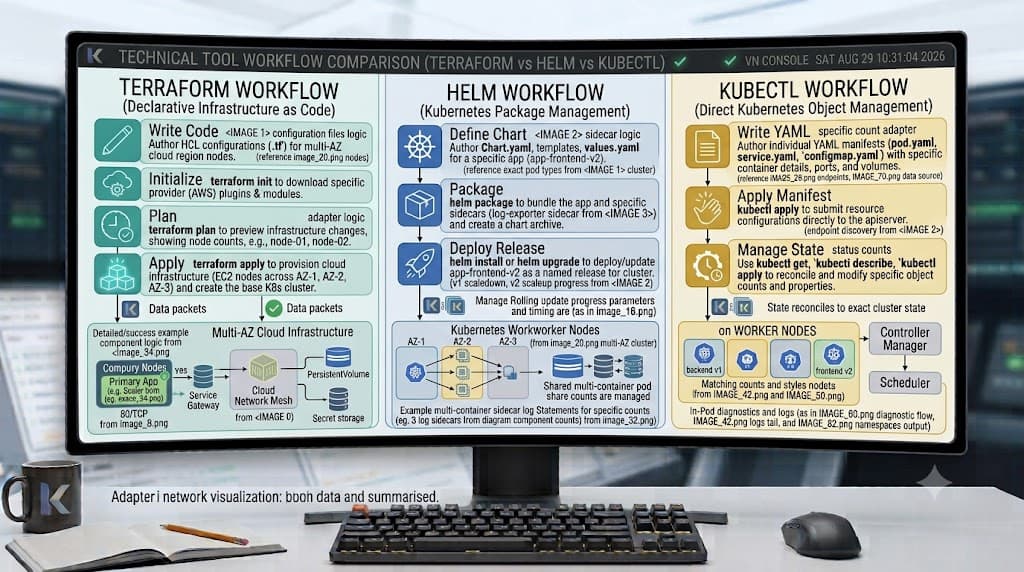
The kubectl apply -f command is the foundational workhorse of declarative Kubernetes management. It processes configuration manifest files—such as your kubernetes deployment yaml—and applies the desired state to the cluster against the live API server.
When you execute kubectl apply -f deployment.yaml, Kubernetes performs a three-way merge patch, comparing your local file, the live cluster state, and the last-applied configuration stored as an annotation on the resource object. This intelligent merging ensures that fields managed by external controllers or autoscalers are not inadvertently overwritten by routine updates to your manifest file.
Using this command as part of your CI/CD pipeline enables GitOps workflows, where commits to your repository automatically trigger synchronization and application updates across your clusters. To verify syntax and catch structural errors before committing changes to production, you can combine this command with validation flags such as kubectl apply --dry-run=server -f deployment.yaml.
kubectl rollout status
Monitoring the real-time progress of an active update is essential for verifying that application changes are deploying successfully without causing downtime or regression errors. The kubectl rollout status command provides a blocking, real-time progress report on ongoing updates.
Running kubectl rollout status deployment/web-frontend queries the cluster control plane and streams status updates to your terminal until the rollout completes successfully. It informs you whether the new ReplicaSet is scaling up, whether old Pods are terminating cleanly, and whether any blocking conditions are stalling the update sequence.
If a rollout encounters a critical issue—such as continuous container crashes—the command will report the stall and exit with a non-zero status code. Integrating this command into automated deployment scripts allows CI/CD pipelines to detect failed rollouts immediately, abort further promotion, and trigger automated alerts or rollback routines.
kubectl rollout undo
When an update introduces critical bugs or destabilizes application behavior, the kubectl rollout undo command provides an immediate safety net to revert the workload to its previous stable revision.
Executing kubectl rollout undo deployment/web-frontend instructs the deployment controller to roll back the workload to revision history minus one. If you need to target a specific historical revision rather than the immediate predecessor, you can specify it explicitly using the --to-revision flag, such as kubectl rollout undo deployment/web-frontend --to-revision=2.
Before executing an undo operation in a production setting, inspect your revision history using kubectl rollout history deployment/web-frontend to verify the contents and configuration diff of the target revision. This ensures you are reverting to a known, tested version and prevents compounding configuration errors.
kubectl scale
Adjusting the capacity of your application workload on demand is handled via the kubectl scale command. This utility allows administrators to modify the number of running replicas instantly without altering underlying deployment manifest files.
To manually resize a workload, run kubectl scale deployment/web-frontend --replicas=5. The deployment controller immediately reconciles the difference, spawning two new Pods or terminating excess instances gracefully depending on the scaling direction.
To verify that your scaling operation has successfully completed and that the new Pods are healthy and ready to accept traffic, follow this command immediately with kubectl get pods -l app=web-frontend or check the rollout status. Always ensure your cluster worker nodes have sufficient spare CPU and memory capacity before scaling up large replica counts to prevent scheduling bottlenecks.
📌 Recommended Next Guides & References
  <li>
    <a href="/article/docker-and-kubernetes-how-they-work-together-2" class="text-primary hover:underline font-semibold flex items-center gap-2">
      <span>→</span> <span>Docker and Kubernetes: How They Work Together</span>
    </a>
  </li>

  <li>
    <a href="/article/kubernetes-ingress-explained" class="text-primary hover:underline font-semibold flex items-center gap-2">
      <span>→</span> <span>Kubernetes Ingress Explained: Routing, Controllers, and TLS</span>
    </a>
  </li>

  <li>
    <a href="/article/kubernetes-ingress-controller-explained" class="text-primary hover:underline font-semibold flex items-center gap-2">
      <span>→</span> <span>Kubernetes Ingress Controller Explained: Architecture, Routing, and Implementation</span>
    </a>
  </li>