Quick Answer
Quick Answer
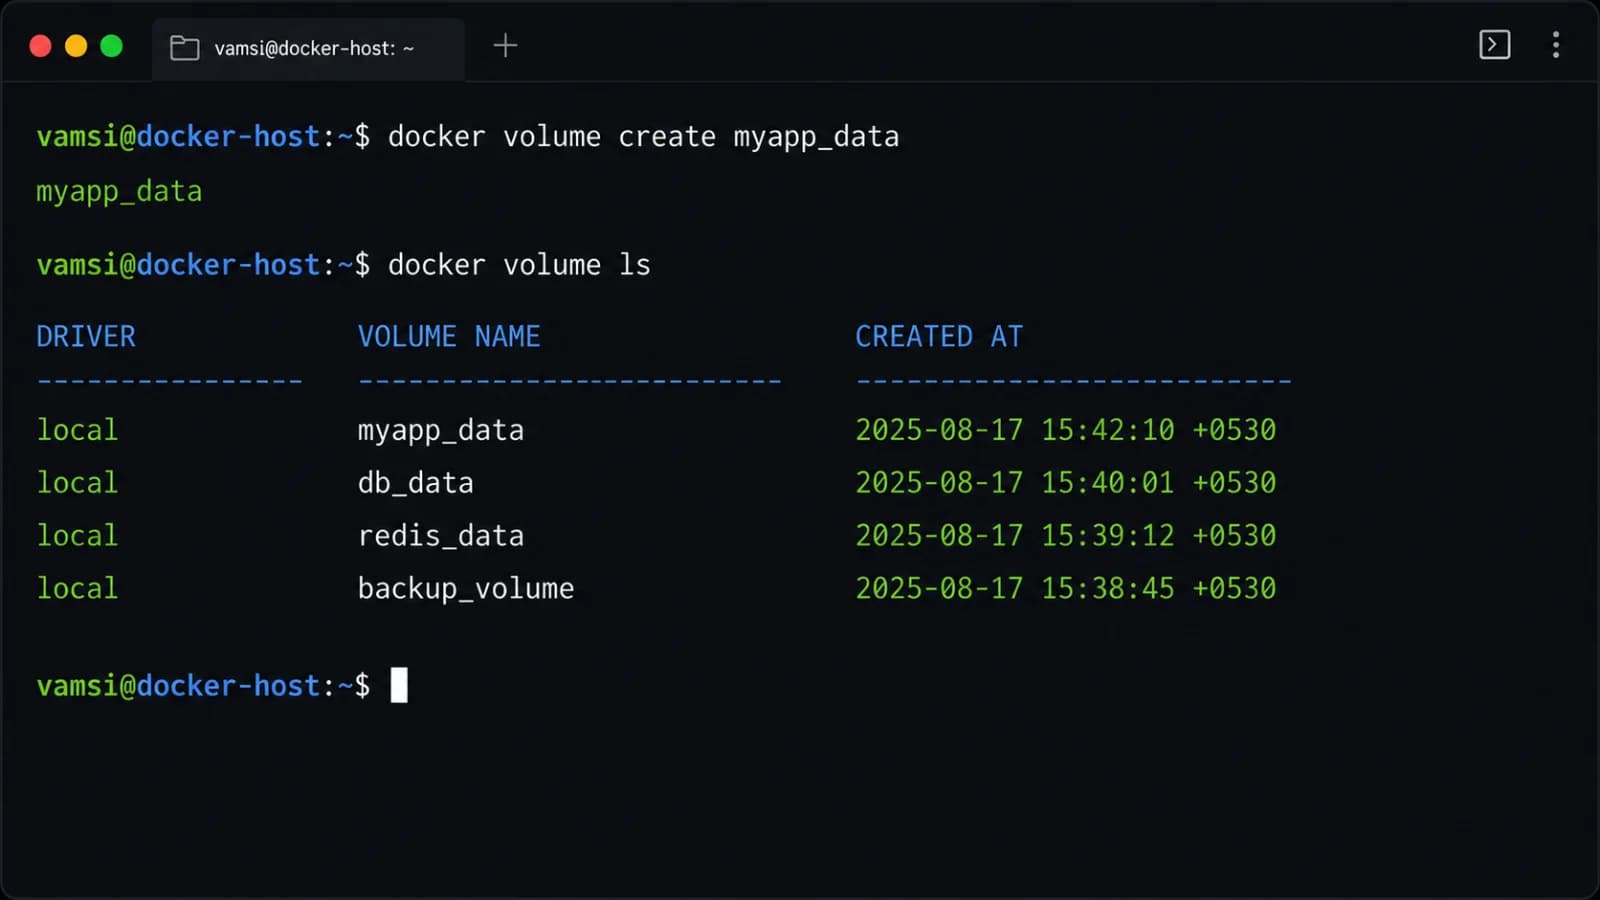
Docker volumes are the preferred mechanism for persisting data generated and used by Docker containers. Unlike container writable layers that disappear when a container is removed, volumes exist independently on the host filesystem. To create persistent storage and attach it instantly to a running container, you can execute two simple commands in your terminal. First, create the storage object by running <a href="/article/docker-volume-vs-bind-mount" class="text-primary font-semibold hover:underline">docker volume</a> create my_data. Second, attach that storage when starting your container using the flag docker run -d -v my_data:/app/data nginx. This mounts your persistent volume directly inside the container path /app/data, ensuring all data written there survives container deletion, updates, and restarts.
What Is a Docker Volume?
Docker volumes represent dedicated directories managed entirely by Docker, isolated from the core host operating system. When evaluating container storage options, developers generally choose between named volumes, anonymous volumes, and bind mounts. Named volumes are explicitly created and given a unique identifier, making them the industry standard for production databases and application state because they are easy to back up, inspect, and share across multiple containers. Anonymous volumes, by contrast, are generated automatically by Docker the moment a container starts if no specific name is provided; they lack descriptive identifiers and are typically orphaned when containers are removed, making them harder to track. Bind mounts offer a different approach entirely, mapping a file or directory directly from the host machine into the container. While bind mounts are useful for local development because they reflect code changes instantly, volumes are safer and more portable for production workloads because they do not depend on the host machine's specific directory structure.
Create and List Docker Volumes
Managing your storage objects manually is a fundamental skill for any developer or DevOps engineer working with containerized environments. To begin generating storage objects outside of runtime container creation, you use the docker volume create command followed by your desired identifier. For instance, typing docker volume create app_database_cache provisions a fresh storage area managed by the default local driver. Once created, you will want to verify its existence and examine what storage objects currently reside on your host machine. Executing docker volume ls outputs a clean table displaying all existing volumes alongside their assigned drivers. When you need deeper diagnostic details—such as the exact physical mount point on the host disk, driver options, or assigned labels—you can run docker volume inspect followed by the volume name. This returns a structured JSON payload revealing low-level metadata that helps verify where your persistent files actually live on the underlying operating system.
Mount a Volume to a Container
Attaching storage to your containers bridges the gap between ephemeral compute processes and persistent data architectures. Docker provides two primary flags for this purpose during runtime: the classic -v or --volume flag, and the more explicit --mount flag. The traditional -v flag uses a colon-separated syntax where the left side specifies the volume name and the right side specifies the internal container path, such as docker run -d --name web_server -v app_database_cache:/var/lib/mysql mysql. If the specified volume does not already exist, Docker creates it automatically. Alternatively, the newer --mount flag uses a comma-separated key-value pair syntax like --mount type=volume,source=app_database_cache,target=/var/lib/mysql. While more verbose, --mount is generally preferred in enterprise scripts because it is stricter, easier to read, and fails explicitly if configuration parameters contain syntax errors or missing targets.
Docker Volumes in Compose
Managing multi-container applications manually with individual CLI commands quickly becomes unmaintainable, which is where Docker Compose excels. In a declarative docker-compose.yml file, you define your storage requirements under a top-level volumes key and then reference them within individual service definitions. This allows you to orchestrate databases, backend APIs, and reverse proxies while ensuring persistent data survives restarts of the entire stack. When you run docker compose up -d, Docker automatically provisions any declared volumes before starting the dependent services. If you need to inspect or manage these declarative resources, standard commands like docker volume ls will display them prefixed with your project name. This approach keeps your infrastructure configuration version-controlled, reproducible, and portable across development, staging, and production clusters.
Inspecting and Managing Volumes
Administrative oversight is crucial for maintaining healthy containerized environments over time. Beyond initial creation and runtime mounting, DevOps engineers routinely inspect storage drivers, check disk consumption, and clean up stale artifacts. Different storage plugins, known as volume drivers, allow Docker to integrate with cloud storage providers, network-attached storage, or encrypted filesystems. You can inspect which driver a particular storage object uses by utilizing the inspection tooling mentioned earlier. When applications scale down or testing environments are torn down, unused storage objects can accumulate and consume valuable disk space on the host machine. Routinely auditing your storage landscape ensures you understand resource utilization and prevents unexpected storage exhaustion incidents in production.
Permissions and Common Errors
One of the most frequent hurdles developers encounter when working with persistent storage is encountering a permission denied error. These issues typically arise because a volume is created by the root user on the host system, but the application running inside the container executes under a non-root user account for security best practices. When the container process attempts to write to the mounted directory, the operating system rejects the write operation due to mismatched user and group IDs. To resolve this, ensure your container base image properly configures user ownership, adjust directory permissions within your Dockerfile build steps, or initialize the container entrypoint script to adjust ownership of the mounted path dynamically before launching the primary application process.
Safe Cleanup with docker volume prune
Reclaiming disk space is an essential part of system maintenance, but aggressive cleanup can easily lead to catastrophic data loss if performed carelessly. The docker volume prune command removes all unused volumes that are not currently referenced by any container, whether running or stopped. Before executing this command, you must verify that no important database or stateful storage has been left detached from an inactive container. Running docker volume prune -a or confirming the interactive prompt without reviewing the listed items can permanently erase critical persistent data. To prevent accidental deletions, always check your active and stopped containers first using docker ps -a, and explicitly target single, unneeded storage objects using docker volume rm rather than relying on blanket pruning commands in production environments.
Backup and Recovery Basics
Ensuring business continuity requires a reliable strategy for exporting, backing up, and restoring your stateful data. Because volumes reside in specific paths managed by Docker on the host filesystem, standard host-level backup utilities can archive them, but container-based backup workflows are often safer and more portable. A common pattern involves running a temporary utility container that mounts the target volume alongside a local backup directory, using a command like docker run --rm -v app_database_cache:/volume -v $(pwd):/backup alpine tar czf /backup/backup.tar.gz -C /volume .. This compresses the entire contents of the storage object into a portable tarball. Restoring the data follows the reverse procedure: provisioning a new volume, mounting it inside a temporary container alongside the archive, and extracting the contents back into place.
Conclusion
Mastering storage management is a defining milestone for anyone moving beyond basic containerization. By understanding the distinctions between named volumes, bind mounts, and container writable layers, you can design resilient architectures that protect critical application data. Implementing robust backup routines, respecting proper user permissions, and exercising caution with cleanup commands ensures your containerized applications remain both performant and secure across all deployment environments.
📌 Recommended Next Guides & References
  <li>
    <a href="/article/docker-and-kubernetes-how-they-work-together-2" class="text-primary hover:underline font-semibold flex items-center gap-2">
      <span>→</span> <span>Docker and Kubernetes: How They Work Together</span>
    </a>
  </li>

  <li>
    <a href="/article/kubernetes-ingress-explained" class="text-primary hover:underline font-semibold flex items-center gap-2">
      <span>→</span> <span>Kubernetes Ingress Explained: Routing, Controllers, and TLS</span>
    </a>
  </li>

  <li>
    <a href="/article/kubernetes-ingress-controller-explained" class="text-primary hover:underline font-semibold flex items-center gap-2">
      <span>→</span> <span>Kubernetes Ingress Controller Explained: Architecture, Routing, and Implementation</span>
    </a>
  </li>