Quick Answer
When you need to ensure every single instruction in your Dockerfile executes fresh without relying on stored layers, you use the docker build --no-cache command. This instructs BuildKit and the legacy builder to ignore all existing cached layers for the build context, forcing a complete recreation of your container image from top to bottom. It is a critical troubleshooting tool when dependencies fail to update or external repositories return stale data.
Quick Answer
To build a container image without using any cached layers, run the docker build command with the appropriate flag in your terminal. The standard syntax requires appending the flag alongside your image tag and build context path:
docker build --no-cache -t my-image:latest .
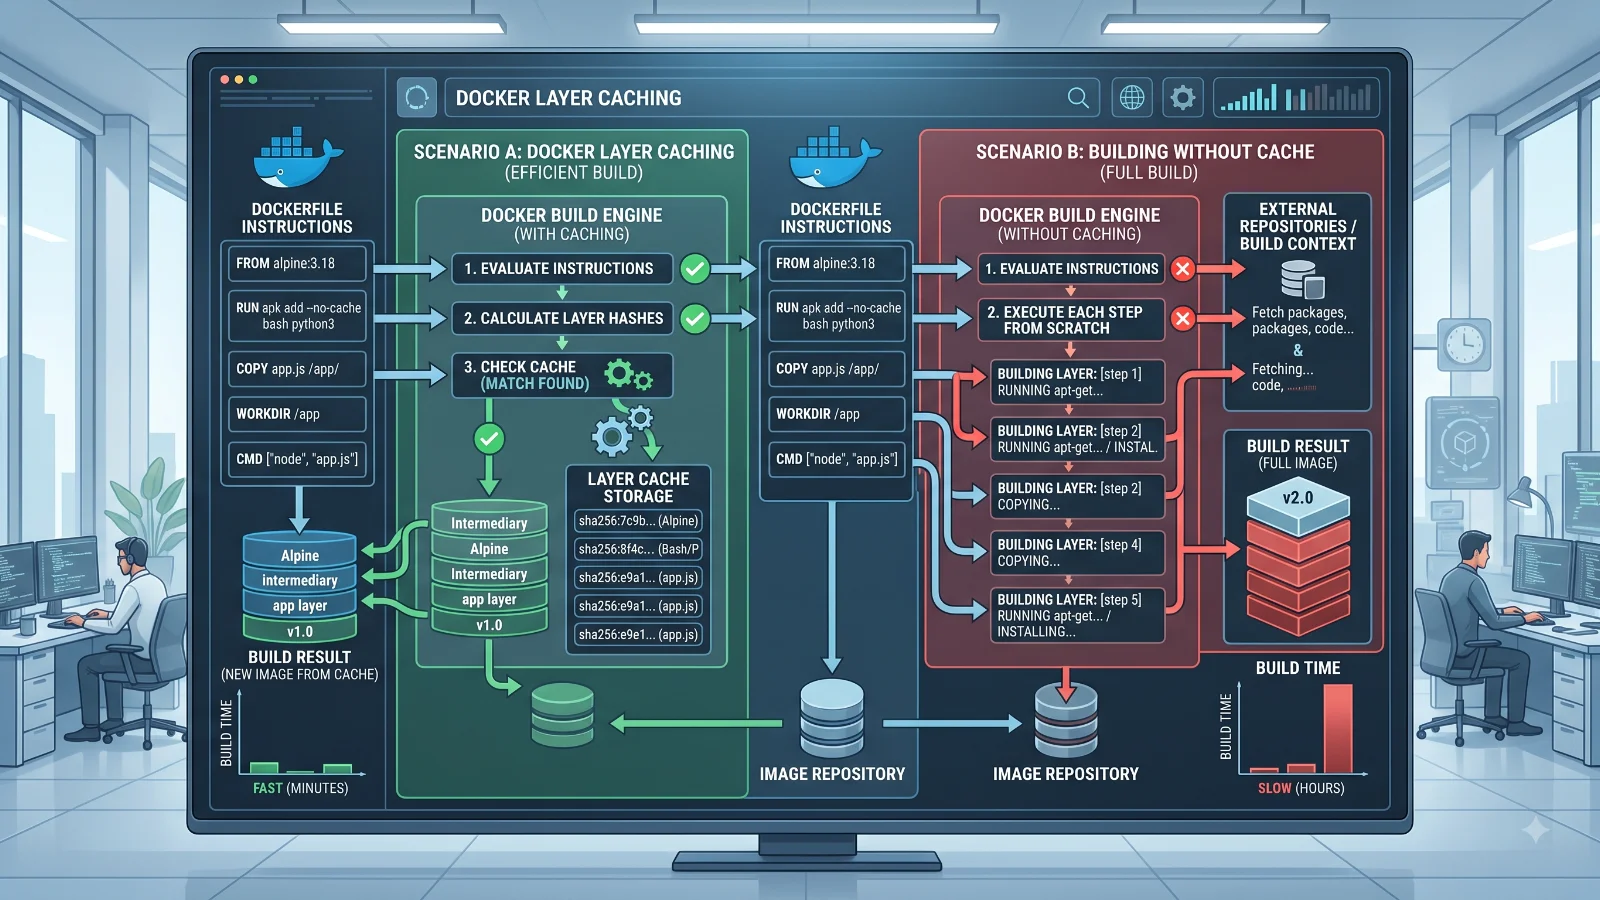
This single command tells the builder to bypass all intermediate layer caches stored on your local machine. Every instruction—from the initial base image setup down to the final working directory configuration—will run as if it were the very first time the image was built. While this guarantees that no old artifacts linger in your intermediate layers, it also means your build process will take significantly longer because every package manager, dependency tree, and compilation step must execute completely from scratch.
What --no-cache Does
Understanding the docker build cache mechanism helps clarify why this flag exists. Docker builds images as a series of read-only layers based on your Dockerfile instructions. Each instruction creates a new layer representing the delta from the previous state. When you trigger a standard build, the daemon calculates a cryptographic checksum for each instruction and checks if an identical instruction with the same context already exists in local storage.
When you introduce the flag, you override this optimization step entirely. The builder still reads your instructions sequentially, but it treats every single step as an automatic cache miss. It does not delete your existing local cache store; it simply refuses to read from it during the execution of the current build operation. Consequently, intermediate container layers generated during this run are still saved to your local storage afterward, meaning subsequent normal builds can still benefit from caching unless you explicitly disable it again.
How to Build Without Cache
Applying the cache bypass flag requires integrating it smoothly into your regular terminal workflows and automated pipelines. For most standard development tasks, placing the flag directly after the build command and before your tagging arguments is the standard approach.
docker build --no-cache -t my-app:v1.2.0 .
If your project utilizes a custom Dockerfile name located in a different subdirectory, you combine the flag with the file specification flag seamlessly:
docker build --no-cache -f docker/production.Dockerfile -t my-app:prod .
For developers working with multi-stage builds, the flag affects every stage uniformly. Every single stage in your multi-stage Dockerfile will execute from scratch, ensuring that build-time dependencies, testing frameworks, and final runtime artifacts are all compiled without relying on stale intermediate states.
--no-cache vs --pull
A common point of confusion among engineers is believing that ignoring the local build cache also updates your base operating system images. In reality, docker build --no-cache only forces the re-execution of your Dockerfile instructions using whatever base image currently resides in your local Docker image cache. If your local machine already has an older version of ubuntu:22.04 cached, bypassing the build cache will reuse that exact same local base image version.
To ensure that your base image is also refreshed from the remote container registry, you must combine the flag with the pull flag:
docker build --pull --no-cache -t my-image:latest .
Using both flags together ensures absolute freshness. The pull flag checks the remote registry for newer security patches or updates to your FROM image, while the bypass flag ensures your build instructions run fresh against that newly downloaded base layer.
Docker Compose No-Cache Builds
When managing multi-container applications defined in compose files, developers frequently need to rebuild services without relying on cached data. You achieve this using the dedicated compose syntax in your terminal.
docker compose build --no-cache
If you are maintaining legacy infrastructure environments that still rely on the hyphenated binary version, the equivalent command is:
docker-compose build --no-cache
To target a specific service within your configuration file instead of rebuilding every single container defined in your stack, pass the service name at the end of the command:
docker compose build --no-cache web-service
This targeted approach saves valuable development time when you are troubleshooting a single application tier without needing to recompile upstream databases or proxy servers.
When No-Cache Helps
Bypassing the build cache is genuinely necessary in several specific operational scenarios. Non-deterministic build steps are the most common justification. For instance, if your build script fetches a dynamic URL, pulls a rolling tag from an external repository, or downloads a frequently updated internal artifact without a strict version hash, the local cache will incorrectly serve the old version.
Another valid scenario involves troubleshooting environment inconsistencies between developer workstations and continuous integration pipelines. If a colleague reports that an image builds successfully on their machine but fails on yours, forcing a fresh build eliminates corrupted local layers as the root cause. It is also invaluable when updating security scanning tools or testing new package manager configurations where dependency resolutions might otherwise get stuck in stale state records.
When It Does Not Fix the Problem
A frequent misconception is treating the cache bypass flag as a universal cure-all for every build issue. Most notably, docker build --no-cache does not fix copy problems related to your local build context. If your application code is not updating inside the container, the issue is almost never the build cache.
Instead, stale source code inside a container typically stems from an improper .dockerignore file configuration, incorrect file permissions, or running a development setup that mounts local directories via volumes rather than copying them during build time. If you modify a local JavaScript or Python file and see no change inside the container despite using the bypass flag, verify your build context directory contents, check your ignore rules, and ensure your working directory paths align properly with your COPY instructions.
Cache and Build Performance
While bypassing storage layers solves specific staleness problems, it introduces significant performance trade-offs. Caching is intentionally designed to accelerate the software delivery lifecycle. When you disable it, your build times can skyrocket from a few seconds to several minutes, especially in large monolithic applications with extensive dependency compilation steps.
To balance freshness and performance, adopt modern cache invalidation best practices. Structure your Dockerfiles so that infrequently changing instructions—such as system package installations and dependency manifests—occur near the top of the file. Place frequently modified source code and COPY commands as late in the file as possible. This structural ordering allows BuildKit to maximize cache efficiency during normal operations, making cache-busting measures necessary only when external dependencies genuinely change.
Troubleshooting
When working with container builds, engineers often encounter syntax mistakes, unexpected storage bloat, or data-safety risks. A frequent syntax error involves misplacing flags or omitting the mandatory build context path dot at the very end of the command string.
Another common concern is disk space management. Repeatedly running builds without cache leaves orphaned intermediate layers dangling on your local machine, quickly consuming gigabytes of storage. You can safely clean up these unreferenced build artifacts by executing the builder pruning utility:
docker builder prune -a
Be cautious with the prune command, as the all flag removes all dangling and unused build cache, meaning your next set of standard builds will take longer until new layers are established. Always verify your storage utilization before running aggressive cleanup operations in shared staging environments.
📌 Recommended Next Guides & References
  <li>
    <a href="/article/docker-and-kubernetes-how-they-work-together-2" class="text-primary hover:underline font-semibold flex items-center gap-2">
      <span>→</span> <span>Docker and Kubernetes: How They Work Together</span>
    </a>
  </li>

  <li>
    <a href="/article/kubernetes-ingress-explained" class="text-primary hover:underline font-semibold flex items-center gap-2">
      <span>→</span> <span>Kubernetes Ingress Explained: Routing, Controllers, and TLS</span>
    </a>
  </li>

  <li>
    <a href="/article/kubernetes-ingress-controller-explained" class="text-primary hover:underline font-semibold flex items-center gap-2">
      <span>→</span> <span>Kubernetes Ingress Controller Explained: Architecture, Routing, and Implementation</span>
    </a>
  </li>