Quick Answer
Kubernetes networking is the foundational layer that enables every container inside a Pod to communicate reliably with other Pods, external clients, and cluster control planes. Unlike traditional monolithic infrastructures where machines live on static networks, Kubernetes manages an ephemeral fleet of containers whose network identities change dynamically as they scale, restart, or migrate between nodes. Understanding this system is crucial for maintaining resilient, secure applications in production environments.
Quick Answer
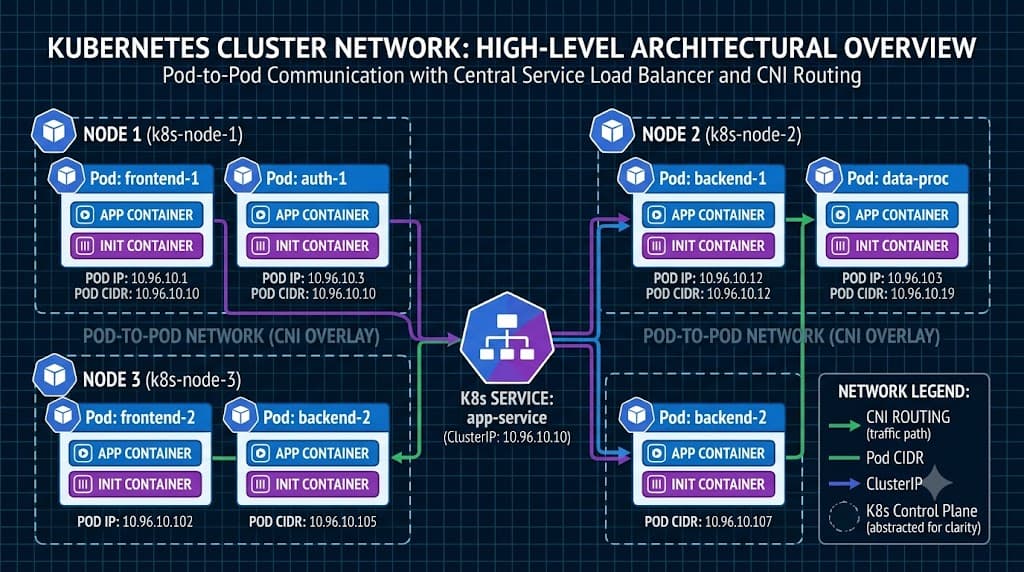
Kubernetes networking works by assigning every single Pod a unique, routable IP address within a flat cluster-wide network, allowing containers to communicate directly without NAT. This model is maintained by enforcing core rules: all Pods can communicate with all other Pods on any node, all agents on a node can communicate with all Pods on that same node, and the IP that a Pod sees itself as is the exact same IP that every other Pod sees it as. To interact with these ephemeral Pods reliably, Kubernetes abstracts them behind Services and CoreDNS for stable name resolution and load balancing.
Kubernetes Networking Model
The core design requirement of kubernetes networking is simplicity and uniformity. The native model dictates that network communication must happen without resorting to Network Address Translation (NAT) for Pod-to-Pod traffic. Every Pod receives its own IP address, meaning containers within the same Pod share a single network namespace, localhost loopback, and port space. This eliminates port collision issues for containers inside the same Pod while requiring developers to plan application port assignments carefully if multiple processes share a sandbox.
Because Pods come and go rapidly due to rolling updates, node failures, or horizontal autoscaling, relying on static Pod IPs for application communication is an anti-pattern. Instead, the cluster architecture relies on a multi-layered approach where the network model provides raw IP connectivity, and higher-level abstractions handle discovery and traffic routing. Network traffic across physical or virtual machine boundaries is handled transparently by the underlying Container Network Interface implementation, which programs routes, bridges, or overlay tunnels behind the scenes.
Pod Networking
Pod-to-Pod communication forms the baseline of the entire architecture. When a Pod on Node A needs to communicate with a Pod on Node B, the packet must traverse the node boundary. Because the underlying physical network only knows the IP addresses of the worker nodes, the cluster networking layer encapsulates or routes the Pod traffic accordingly. There are two primary mechanisms for achieving this: Layer 2 bridging/routing directly on the host network, and overlay networks (such as VXLAN or Geneve) that encapsulate Pod packets inside standard UDP packets for transport across arbitrary network topologies.
Within a single node, containers inside different Pods communicate via virtual Ethernet pairs (veth pairs) connected to a Linux bridge or routing table managed by the local network plugin. This setup ensures ultra-low latency for local communication. Understanding how these packets move helps administrators diagnose dropped packets, MTU mismatches, or routing table corruption on worker nodes when cluster connectivity degrades.
kubectl get pods -o wide
To inspect how Pods are distributed across nodes and verify their assigned IP addresses, engineers use the kubectl get pods -o wide command. This diagnostic command outputs an extended view of the Pod list, revealing critical metadata including the internal Pod IP address, the node hosting the workload, and additional status flags.
When troubleshooting cluster issues, running this command is often the first step to confirm whether Pods are running on expected nodes and whether they have successfully acquired an IP address from the cluster IPam block. If a Pod remains in the ContainerCreating state or shows an empty IP address, it usually indicates that the underlying network plugin has failed to allocate an IP or configure the local network namespace.
Services and DNS
Because Pod IPs are ephemeral, Kubernetes introduces the Service resource to provide a stable network abstraction. A Service groups a set of Pods using label selectors and exposes a single, unchanging ClusterIP along with a stable internal DNS name managed by CoreDNS. When traffic hits a Service IP, kube-proxy—running as a daemon on every worker node—intercepts the traffic using iptables or IPVS rules and distributes it across the healthy backing Pods.
CoreDNS integrates tightly with this mechanism by automatically creating DNS records for every Service and Pod in the cluster. For instance, a Service named payment-api in the production namespace becomes reachable at payment-api.production.svc.cluster.local. When an application queries this DNS name, CoreDNS returns the stable ClusterIP, and kube-proxy handles load balancing to the actual backend Pods without application code needing to manage dynamic server lists.
kubectl get svc
To inspect existing services, their assigned ClusterIPs, port mappings, and selectors, administrators use the kubectl get svc command. This command lists all active services in the current namespace, showing their service type (such as ClusterIP, NodePort, or LoadBalancer) and external IP bindings.
Reviewing the output of kubectl get svc helps verify that a service is listening on the correct ports and that its selector matches the intended workload labels. If an application cannot reach a service, checking the service definition is essential to confirm that target ports and service ports are correctly aligned.
kubectl get endpointslice
Behind every Service lies an EndpointSlice object that dynamically tracks the exact IP addresses and readiness status of the Pods backing that service. You can inspect these dynamic endpoints by running the kubectl get endpointslice command.
EndpointSlices scale much more efficiently in large clusters than older Endpoints objects by chunking large groups of backend IPs into manageable pieces. Examining endpoint slices allows operators to verify whether traffic routing targets healthy, running Pods or if backing Pods are failing health checks and being automatically removed from the load balancing pool.
CNI
The Container Network Interface (CNI) is the plugin-based architecture that makes kubernetes cni implementations flexible and vendor-neutral. Kubernetes itself does not implement IP allocation, network routing, or overlay encapsulation; instead, it defines a standard specification and expects a CNI plugin to handle the actual network plumbing when a Pod is created or destroyed.
Popular CNI plugins include Calico, Cilium, Flannel, and AWS VPC CNI, each offering different trade-offs. For example, some plugins rely on standard Linux routing tables for maximum performance, while others use eBPF data planes or overlay encapsulations to simplify multi-cloud or restricted network setups. When planning a cluster, selecting the right CNI is a permanent architectural decision because migration often requires cluster downtime or complex dual-stack transitions. Always review vendor-specific documentation regarding network policies, encryption in transit, and resource overhead before deploying a CNI to production.
Ingress and NetworkPolicy
See also: Ingress controllers
While Services handle internal cluster traffic, Ingress controllers manage external HTTP and HTTPS access to cluster services from outside the network. An Ingress resource defines routing rules based on hostnames and URL paths, allowing a single external load balancer to terminate TLS and route traffic to multiple internal kubernetes service endpoints efficiently.
Conversely, internal security is enforced using a kubernetes network policy. By default, all Pods are completely non-isolated and accept traffic from any source. Network policies act as a distributed firewall, letting operators define layer 3 and layer 4 ingress and egress rules based on namespace selectors, IP blocks, or Pod labels. Implementing strict network policies is a core requirement for multi-tenant clusters and zero-trust security postures.
Troubleshooting
Systematic troubleshooting of networking failures requires working methodically from the application layer down to the physical node network. Common failure modes include DNS resolution timeouts, misconfigured network policies blocking legitimate traffic, and kube-proxy rule corruption. The debugging workflow should always isolate whether the issue is local to the Pod, related to service discovery, or caused by external firewall rules.
Begin by checking if the Pod can resolve internal DNS names, then test direct TCP connectivity to backing endpoints, and finally verify that network policies are not inadvertently dropping packets. Utilizing ephemeral debugging containers or transient test pods allows engineers to run diagnostic tools like nslookup, curl, or tcpdump directly inside the affected network namespace without altering production workloads.
kubectl run
When diagnosing connectivity issues, spinning up an ephemeral test pod using kubectl run is an invaluable troubleshooting technique. By executing a command like kubectl run tmp-shell --rm -i --tty --image=nicolaka/netshoot -- bash, an engineer instantly gains access to a fully loaded diagnostic container equipped with network utilities.
From inside this temporary container, you can test DNS resolution against CoreDNS, verify direct connectivity to target Pod IPs, and inspect routing tables. This method isolates whether a connection failure is due to a misconfigured kubernetes service or a broader network policy restriction.
Remember to clean up temporary test pods immediately after diagnosis to maintain cluster hygiene and prevent security risks associated with lingering debug shells.
📌 Recommended Next Guides & References
  <li>
    <a href="/article/docker-and-kubernetes-how-they-work-together-2" class="text-primary hover:underline font-semibold flex items-center gap-2">
      <span>→</span> <span>Docker and Kubernetes: How They Work Together</span>
    </a>
  </li>

  <li>
    <a href="/article/kubernetes-ingress-controller-explained" class="text-primary hover:underline font-semibold flex items-center gap-2">
      <span>→</span> <span>Kubernetes Ingress Controller Explained: Architecture, Routing, and Implementation</span>
    </a>
  </li>

  <li>
    <a href="/article/kubernetes-environment-variables-complete-guide-2" class="text-primary hover:underline font-semibold flex items-center gap-2">
      <span>→</span> <span>Kubernetes Environment Variables: Complete Guide to ConfigMaps, Secrets, and YAML Examples</span>
    </a>
  </li>