Quick Answer
Introduction to Git Restore
Version control systems like Git are essential tools for modern software development, but managing changes across different states of your repository can sometimes feel overwhelming. Historically, developers relied heavily on commands like git checkout and git reset to perform a wide variety of tasks, ranging from switching branches to undoing code modifications. Because these older commands were overloaded with multiple responsibilities, they often led to confusion and accidental data loss. To address this usability challenge, Git introduced the git restore command in version 2.23. Designed with a clear and singular purpose, git restore focuses exclusively on restoring files in your working tree and staging area. By separating file-level restoration from branch management, Git provides a much safer, more intuitive experience for developers at all skill levels. Whether you need to discard an experimental code snippet or unstage a file before committing, git restore streamlines your daily workflow while reducing the risk of mistakes.
Definition and Core Concepts
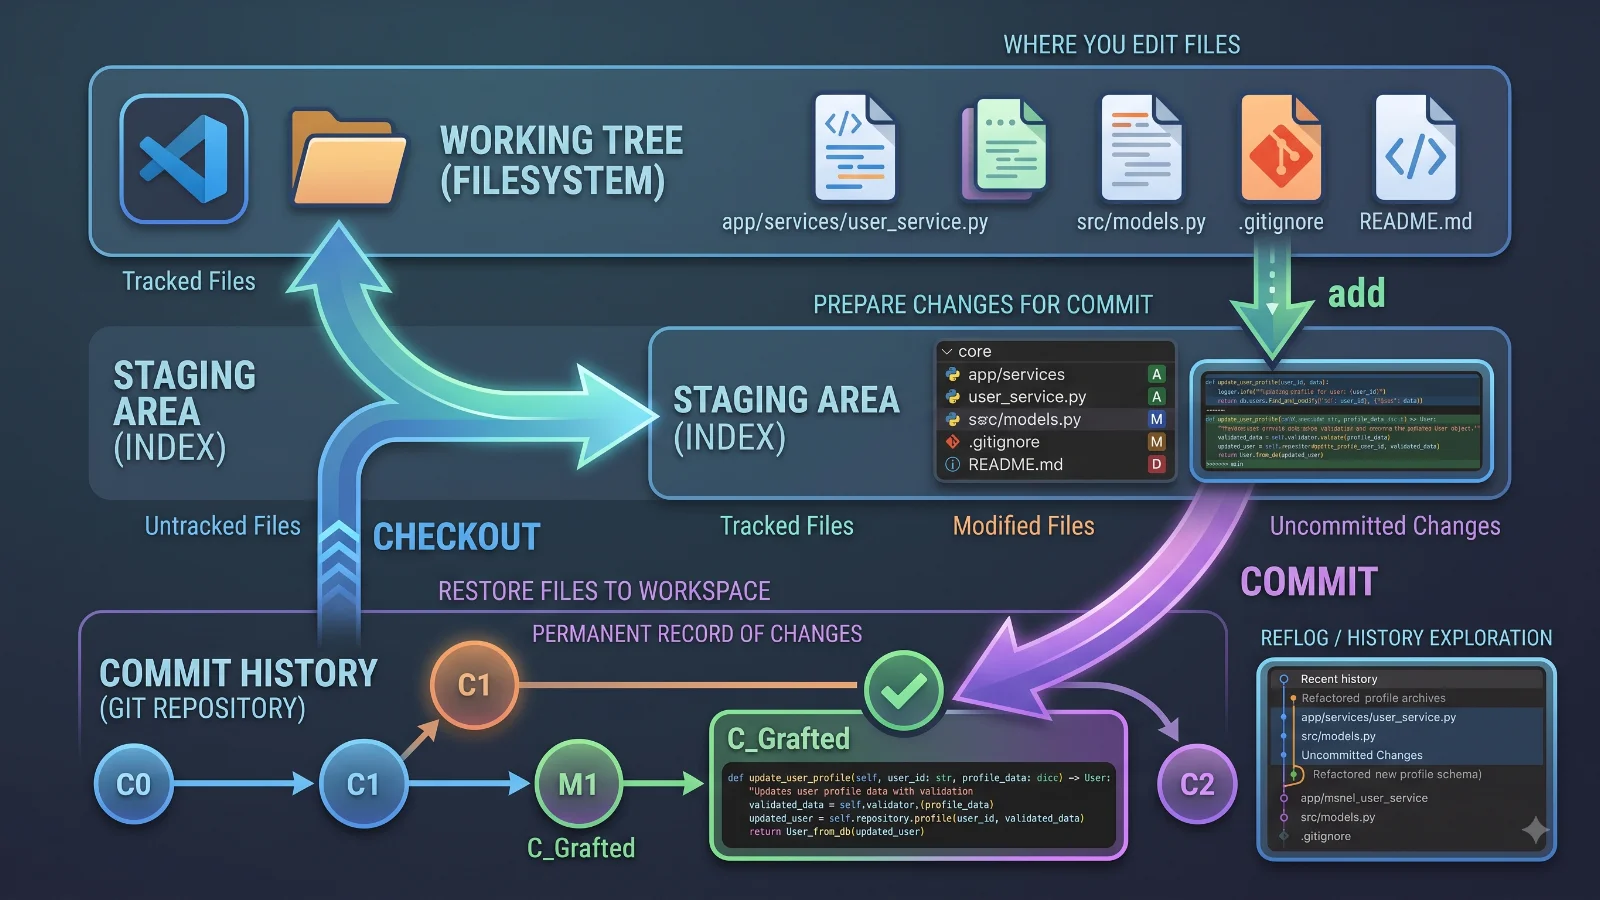
To master git restore, you must first understand the fundamental areas of a Git repository: the working tree, the staging area, and the commit history. The working tree represents your actual physical files on disk where you write and edit code. The staging area, or index, is where you prepare a snapshot of your changes before making a permanent commit. The git restore command is designed to update files in either or both of these areas using content from a specific source, which is typically the HEAD commit or the staging area itself. When you run git restore, you are essentially telling Git to overwrite the current state of a specified file with a known good state from history or the index. This capability is vital when you realize that your recent edits are heading in the wrong direction and you need a reliable way to reset a file back to its pristine, unmodified state. Understanding these core concepts ensures you always know which files will be affected and what data you might overwrite.
How Git Restore Works Internally
Beneath the surface, git restore interacts directly with Git internal pointers and object databases to manipulate file states. When you execute a standard restore operation without specifying a source commit, Git pulls the reference version from the index or the HEAD commit, depending on whether you target staged or unstaged changes. If you target the working tree, Git copies the content of the specified file from the staging area directly into your working directory, instantly overwriting any uncommitted modifications. If you include flags that also target the staging area, Git updates the index with the content from HEAD, effectively unstaging the file while leaving your working tree intact depending on the exact flags used. Because this process interacts directly with your files on disk without creating a new commit in your project history, understanding this internal mechanics helps you anticipate the exact impact of your command before you press enter. It also highlights why having a solid backup or using version control discipline is critical when discarding uncommitted work.
Key Components and Syntax Options
Mastering git restore requires familiarity with its primary flags and parameters, which allow you to tailor the command to your exact needs. The most frequently used flag is --staged, which tells Git to restore files in the staging area rather than the working tree, effectively allowing you to unstage recent additions. Conversely, the --worktree flag targets the physical files in your working directory. You can combine these flags or use them independently depending on whether you want to affect both areas simultaneously. Another powerful option is the --source= flag, which lets you specify a different commit hash or branch reference to restore files from, rather than defaulting to HEAD. Additionally, you can use pathspecs like dot (.) to target all files in the current directory or specify exact file paths to limit the scope of the restoration. Reviewing the help documentation via git restore --help provides a comprehensive reference for these options, ensuring you apply the correct syntax for every scenario.
Practical Examples of Using Git Restore
To see git restore in action, let us walk through some of the most common development scenarios. Imagine you have modified a configuration file in your working directory, but realize your edits broke the application. To discard these changes and revert the file back to its exact state in the last commit, you simply run git restore config.json. If you instead added that configuration file to the staging area using git add, but now want to remove it from staging while keeping your edits intact, you run git restore --staged config.json. For situations where you need to completely wipe out all uncommitted modifications across your entire repository, you can combine the command with a pathspec, such as git restore --worktree --staged . to reset everything in the current directory back to the HEAD commit. These practical commands form the backbone of everyday troubleshooting, helping you maintain a clean and functional workspace.
Benefits of Git Restore Over Git Checkout
For many years, developers used git checkout to perform file restoration, a practice that caused immense confusion because git checkout was primarily designed for switching branches. Using a single command for both navigation and data destruction meant a simple typo could result in unexpected behavior or lost code. The introduction of git restore cleanly solves this problem by adhering to the Unix philosophy of doing one thing well. Unlike git checkout, which mixes branch switching and file manipulation, git restore is strictly dedicated to restoring files. This clear separation of concerns makes scripts easier to read, documentation simpler to follow, and reduces the cognitive load on developers. By adopting git restore, teams eliminate the ambiguity of older workflows and embrace a modern, safer standard for version control management.
Limitations and Common Mistakes
While git restore is a powerful tool, it comes with inherent risks that every developer must keep in mind. The most common and dangerous mistake is discarding working tree changes without realizing that the modifications were never committed or backed up. Once you run git restore on an unstaged file, those local modifications are permanently lost because Git has no record of them in its database. To avoid accidental data loss, always verify your repository status using git status before executing destructive restore commands, and consider stashing your work using git stash if you think you might need those experimental edits later. Another mistake is forgetting to specify the --staged flag when you only intended to unstage a file, which can inadvertently wipe out working directory changes at the same time. Being mindful of these limitations ensures you leverage the command safely without risking valuable code.
Frequently Asked Questions
Developers often encounter specific edge cases when learning to use git restore. One frequent question is whether git restore affects untracked files; the answer is no, because git restore only operates on tracked files that are already known to Git. Another common query involves recovery options: can you recover changes after running git restore? If the changes were never staged or committed, the answer is generally no, emphasizing the importance of caution. Users also frequently ask how to unstage a file, which is easily accomplished using the git restore --staged command. Finally, developers transitioning from older workflows often wonder about the precise differences in error handling and flag behavior compared to legacy commands, finding that modern Git error messages are much more descriptive and helpful.
Conclusion
Incorporating git restore into your daily development routine is a great way to streamline your workflow and maintain a clean repository. By understanding its core concepts, internal mechanics, and syntax options, you can confidently manage staged and unstaged files without risking accidental data loss. Replacing older, overloaded commands with git restore aligns your practices with modern version control standards, separating branch navigation from file restoration. Always remember to check your repository status before running destructive commands, and utilize staging flags appropriately to keep your changes organized. With these best practices in mind, you are well-equipped to handle any file-level restoration task that comes your way.
Related Reading
For more detail, see git stash.
📌 Recommended Next Guides & References
  <li>
    <a href="/article/docker-and-kubernetes-how-they-work-together-2" class="text-primary hover:underline font-semibold flex items-center gap-2">
      <span>→</span> <span>Docker and Kubernetes: How They Work Together</span>
    </a>
  </li>

  <li>
    <a href="/article/kubernetes-ingress-explained" class="text-primary hover:underline font-semibold flex items-center gap-2">
      <span>→</span> <span>Kubernetes Ingress Explained: Routing, Controllers, and TLS</span>
    </a>
  </li>

  <li>
    <a href="/article/kubernetes-ingress-controller-explained" class="text-primary hover:underline font-semibold flex items-center gap-2">
      <span>→</span> <span>Kubernetes Ingress Controller Explained: Architecture, Routing, and Implementation</span>
    </a>
  </li>