Quick Answer
Containerization has transformed how we build, ship, and run applications, moving us away from monolithic deployments toward distributed, microservices-based architectures. When running multi-container applications, ensuring seamless communication between services is just as important as running the containers themselves. This is where Docker Compose networking comes in. By abstracting the complexities of Docker's underlying networking layer, Compose allows developers to define, manage, and connect multiple containers using simple YAML configuration files. Without orchestration tools, managing individual container interfaces, virtual bridges, and port bindings can quickly become an administrative burden. Docker Compose automates these workflows, establishing default networks for your projects and giving you fine-grained control when custom topologies are required.
Introduction to Docker Compose Networking
At its core, Docker Compose networking is a layer built on top of Docker's native networking capabilities, known as libnetwork. When you run containers independently using the standard Docker CLI, you must manually create networks using docker network create and explicitly attach each container using flags like --network. If you forget to connect them, containers remain isolated in their own network namespaces, unable to reach one another even on the same host machine. Docker Compose streamlines this entire process by automating network creation and management as part of the application lifecycle. When you execute docker compose up, the tool reads your configuration file, provisions the necessary network infrastructure, and attaches every defined service to the appropriate network. This ensures that your multi-container application spins up as a cohesive, interconnected system rather than a collection of isolated islands. Whether you are running a simple web server backed by a database or a complex microservices architecture featuring API gateways, message queues, and caching layers, Docker Compose networking provides a predictable and repeatable foundation for communication. Furthermore, because the network configuration is declared directly in your codebase alongside your service definitions, your networking setup becomes version-controlled, portable, and identical across every environment from a local development laptop to a staging server.
How Docker Compose Networking Works
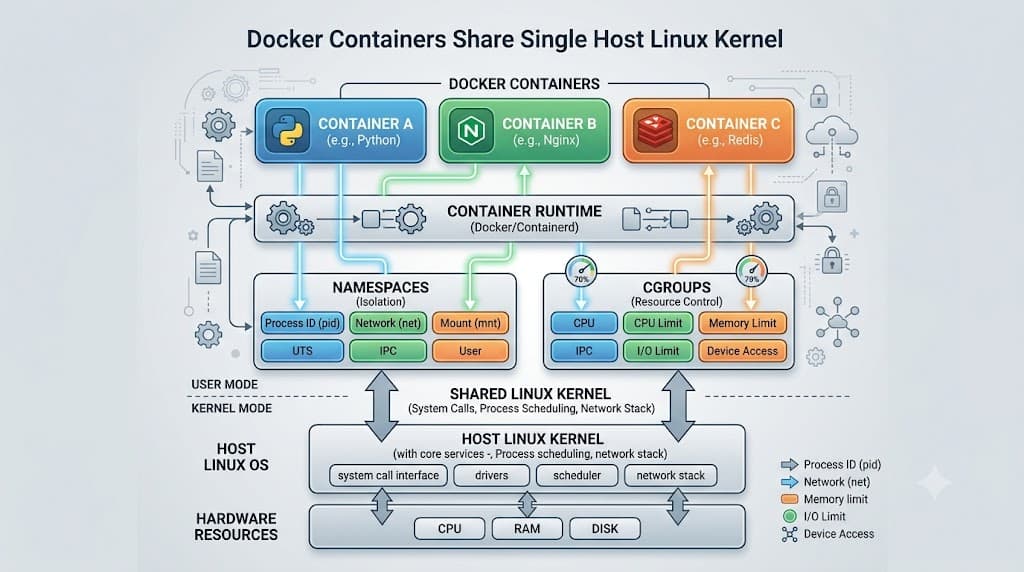
To understand how Docker Compose networking functions under the hood, we must first look at default network creation behavior. When you initialize a project without specifying any custom networks in your YAML file, Docker Compose automatically creates a single, dedicated bridge network for that specific project. This default network typically adopts a name derived from your project directory, such as projectname_default. Every service defined within your compose file is automatically attached to this bridge network unless explicitly configured otherwise. This means that out of the box, containers belonging to the same Compose project can communicate with each other freely without requiring manual intervention or complex port mappings. Docker achieves network isolation by leveraging Linux kernel features such as network namespaces, iptables rules, and virtual Ethernet pairs (veth pairs). Each container receives its own isolated network stack, including its own loopback device, network interfaces, and routing table. The virtual bridge acts as a software switch, forwarding packets between containers attached to the same network segment. This design guarantees strong security boundaries; containers running in one Compose project cannot communicate with containers in another project or access the default bridge of the Docker daemon unless explicitly joined to a shared external network. This automatic isolation prevents port collisions, unauthorized data access, and accidental cross-talk between entirely unrelated applications running on the same host machine.
Service Discovery and Internal DNS
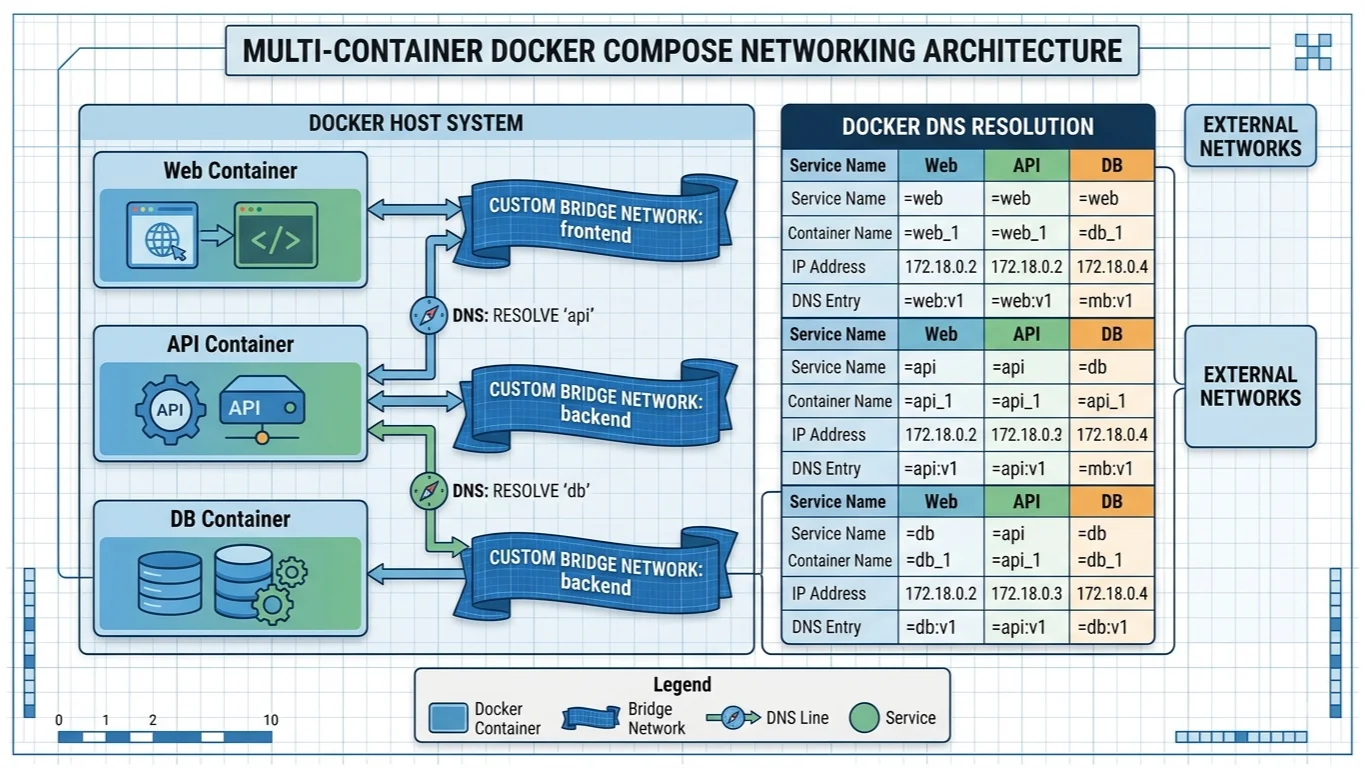
One of the most powerful features of Docker Compose networking is built-in automatic service discovery backed by an internal DNS server. When containers communicate on a user-defined or default Compose network, they do not need to rely on hardcoded IP addresses, which are notoriously volatile and can change every time a container restarts. Instead, Docker maintains an embedded DNS resolver that automatically registers every service name defined in your compose file. For example, if you define a service named postgres and another named web, the web container can communicate with the database simply by sending requests to http://postgres:port. The internal DNS server intercepts this hostname lookup, resolves it to the correct internal IP address of the active postgres container, and routes the traffic accordingly. This mechanism abstracts away the dynamic nature of container lifecycles, ensuring that even if your database container crashes, gets recreated, or scales horizontally, dependent services will continue to reach it seamlessly through its stable service name. It is important to note that built-in automatic service discovery via custom hostnames is primarily a feature of user-defined networks and the default project bridge network. Containers attached to the default bridge network created by the standard Docker daemon cannot resolve each other by container name without using legacy features like the --link flag, which has been deprecated. Therefore, leveraging Docker Compose's project-scoped networks is essential for taking full advantage of modern service discovery workflows.
Configuring Custom Networks and Drivers
While the default project network is sufficient for many basic use cases, production environments and complex applications often require custom network configurations. Docker Compose allows you to define custom networks using various network drivers, giving you complete control over routing, isolation, and external connectivity. The most common driver is the bridge driver, which creates a private software bridge allowing containers on the same host to communicate. However, you can also configure overlay networks for multi-host Docker Swarm deployments, macvlan networks for assigning MAC addresses to containers so they appear as physical devices on your network, or host networks to remove network isolation entirely and bind the container directly to the host's network stack. Below is a concrete configuration example demonstrating how to define custom bridge networks within a compose file:
version: '3.8'

services:
  frontend:
    image: nginx:latest
    networks:
      - frontend-net
  backend:
    image: my-api:latest
    networks:
      - frontend-net
      - backend-net
  database:
    image: postgres:15
    networks:
      - backend-net

networks:
  frontend-net:
    driver: bridge
  backend-net:
    driver: bridge
    internal: true
In this example, we segment our architecture into two distinct networks: frontend-net and backend-net. The frontend service is attached only to the frontend network, while the database is isolated on the backend network. The backend service acts as a bridge between the two, sitting on both networks so it can receive requests from the frontend and query the database. Furthermore, the backend-net network is marked with internal: true, which completely disables external internet access for any container attached exclusively to it. This configuration enhances security by ensuring that sensitive data stores cannot initiate or receive outbound traffic from the public internet, significantly reducing your application's attack surface.
Managing Ports: Ports vs Expose
When configuring connectivity in Docker Compose, developers frequently encounter confusion regarding the difference between container-to-container port exposure and host-to-container port mapping. Getting this distinction right is crucial for both application accessibility and security. The expose instruction defines ports that the container listens on internally, enabling communication between services on the same network without publishing those ports to the outside world. Exposed ports are strictly internal; they serve as documentation and allow other containers on the same network to reach the service, provided they know the internal port number. Conversely, the ports instruction maps container ports directly to ports on the host machine. When you specify ports: - "8080:80", Docker configures iptables rules on the host to forward incoming traffic arriving on port 8080 of the host machine directly to port 80 inside the container. This makes the service accessible to external clients, such as users browsing your website over the public internet or external monitoring tools querying your APIs. As a best practice, you should only map ports to the host when external access is strictly required. For internal databases, caching layers, and backend microservices, rely on internal communication via exposed or default ports within your custom networks, leaving host port bindings disabled to prevent unauthorized external access.
Common Connectivity Issues and Troubleshooting
Even with robust configurations, multi-container applications can occasionally suffer from connectivity issues due to DNS resolution failures, port conflicts, or network isolation rules. When troubleshooting docker compose network troubleshooting scenarios, having a systematic debugging approach is essential. One of the most common issues is a service failing to resolve another hostname, usually resulting in a temporary name resolution error. This often happens when containers are accidentally attached to different networks or when a developer attempts to use service discovery on the default docker0 bridge instead of a Compose-managed network. Another frequent problem is port binding conflicts, which occur when two different services in your compose file—or an external application already running on your host—try to bind to the exact same host port, causing the container startup to fail with an address already in use error. To diagnose these issues effectively, you can use several practical Docker CLI and networking commands. Running docker compose logs [service-name] helps inspect startup errors within the application runtime. You can inspect active network attachments and IP assignments using docker network inspect [network-name]. If you need to test connectivity interactively, you can spin up an ephemeral shell inside a temporary container attached to your network using a command like docker compose exec [service-name] sh or use diagnostic utilities like curl, ping, and nslookup within a running container to verify that internal DNS resolution and port routing are functioning as expected.
Conclusion
Docker Compose networking is a cornerstone of modern local development and lightweight multi-container orchestration. By automating the creation of isolated bridge networks, providing seamless built-in service discovery through internal DNS, and offering flexible configuration options via custom drivers and port mappings, Compose eliminates the manual toil traditionally associated with container networking. Understanding the nuances of default versus custom networks, properly separating internal traffic from external access using ports and expose directives, and mastering essential troubleshooting techniques empowers you to design robust, scalable, and secure distributed applications. As you continue building with Docker, taking full advantage of these networking primitives will ensure your multi-container environments remain performant, maintainable, and secure across every stage of the software development lifecycle.
📌 Recommended Next Guides & References
  <li>
    <a href="/article/docker-and-kubernetes-how-they-work-together-2" class="text-primary hover:underline font-semibold flex items-center gap-2">
      <span>→</span> <span>Docker and Kubernetes: How They Work Together</span>
    </a>
  </li>

  <li>
    <a href="/article/kubernetes-ingress-explained" class="text-primary hover:underline font-semibold flex items-center gap-2">
      <span>→</span> <span>Kubernetes Ingress Explained: Routing, Controllers, and TLS</span>
    </a>
  </li>

  <li>
    <a href="/article/kubernetes-ingress-controller-explained" class="text-primary hover:underline font-semibold flex items-center gap-2">
      <span>→</span> <span>Kubernetes Ingress Controller Explained: Architecture, Routing, and Implementation</span>
    </a>
  </li>