Quick Answer
Kubernetes has become the industry standard for container orchestration, automating the deployment, scaling, and management of containerized workloads across clusters of hosts. Whether you are migrating legacy microservices or architecting cloud-native applications from scratch, mastering this powerful platform is an essential milestone for modern software engineers. However, the sheer volume of concepts—ranging from pods and deployments to services and ingress controllers—can feel overwhelming to newcomers who are just starting out.
This comprehensive guide is designed to cut through the complexity. By the time you finish this hands-on walkthrough, you will have configured a local cluster, deployed a live application, exposed it to external traffic, scaled it dynamically, inspected its logs for troubleshooting, and torn it down safely. Let us dive in and build your practical, production-ready foundation.
Quick Answer
To learn Kubernetes and deploy your first application effectively, start by spinning up a lightweight local cluster using Minikube or kind. Next, write declarative YAML configuration files defining a Deployment and a Service, then apply them to your cluster using the kubectl CLI. Finally, verify the rollout using inspection commands like get pods, describe, and logs to ensure your containers are healthy and serving traffic correctly.
Prerequisites
Before you begin running any workloads, you need to ensure your local workstation has the necessary tooling installed and configured correctly. Working with Kubernetes locally requires two core components: a local cluster runtime and the Kubernetes command-line interface tool.
First, you need a local cluster option. Running a multi-node production cluster on your laptop is impractical, so lightweight single-node developer distributions are ideal. Popular options include Minikube, which runs a virtual machine or container-based cluster, and kind (Kubernetes in Docker), which runs worker nodes as Docker containers. For this guide, ensure you have either Minikube or kind installed alongside Docker or a compatible container runtime.
Second, you must install kubectl, the command-line utility used to communicate with the Kubernetes API server. Without kubectl, you cannot inspect cluster state, apply manifests, or debug failing pods. Verify your installation by running version inspection commands in your terminal to ensure both the client and server components are communicating successfully. Always confirm that your chosen tools match the current stable release cycle of Kubernetes to avoid deprecated API versions or unexpected syntax errors.
Core Concepts
See also: Kubernetes networking fundamentals
To navigate this tutorial successfully, you must grasp several foundational architectural building blocks that define how Kubernetes operates under the hood.
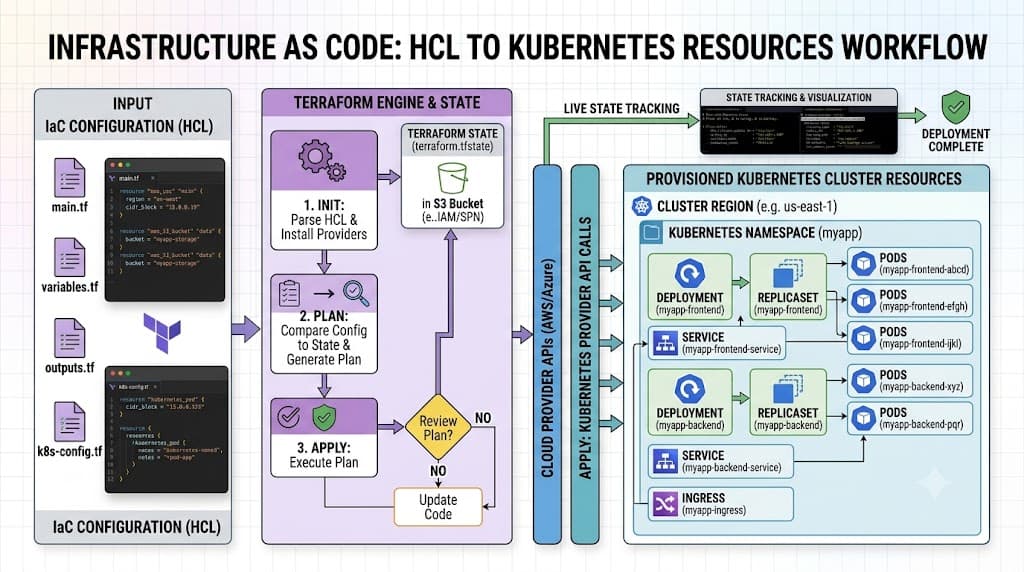
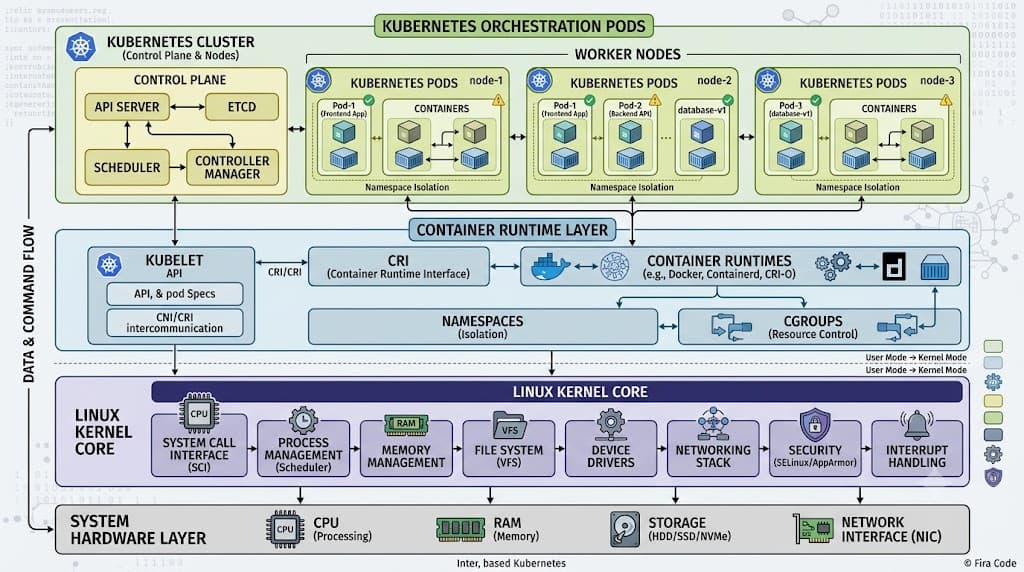
A Kubernetes cluster consists of a control plane—which manages the overall state of the cluster, scheduling decisions, and API requests—and one or more worker nodes that host your actual containerized applications. Within these nodes, the fundamental unit of deployment is the Pod. A Pod represents a single instance of a running process in your cluster and can contain one or more tightly coupled containers that share storage and network namespaces.
Directly managing individual Pods in production is rare because they are ephemeral by nature; if a node fails, the Pod dies with it. Instead, developers use higher-level controllers like Deployments to manage declarative desired states. A Deployment guarantees that a specified number of identical Pod replica instances are running at any given time, handling rolling updates and rollbacks automatically.
To allow these Pods to communicate with each other and accept external traffic, Kubernetes introduces Services. A Service provides a stable, abstract network endpoint—complete with an internal or external IP address and port—that routes traffic dynamically to a shifting set of underlying Pods selected via label matchers. All of these resources are typically defined as declarative Kubernetes YAML manifests, allowing you to version control your infrastructure and reproduce environments reliably.
Step-by-Step Tutorial
In this section, we will walk through a complete end-to-end deployment cycle for a sample web application, using modern tooling and declarative configuration files.
kubectl get pods
Once your local cluster is running, your first operational task is verifying cluster connectivity and checking the status of existing workloads. The primary command for this is kubectl get pods, which queries the API server and lists all pods currently running in your active namespace.
To use this command effectively, you should understand several essential flags. Running kubectl get pods on its own shows resources in the default namespace. To inspect pods across every namespace in your cluster, append the --all-namespaces or -A flag. For deeper diagnostic insights, add the wide output flag (-o wide) to reveal the specific worker node IP addresses assigned to each pod and their internal node placement. If you are troubleshooting a resource that takes time to initialize, use the watch flag (--watch or -w) to stream live state updates to your terminal in real time.
kubectl apply -f
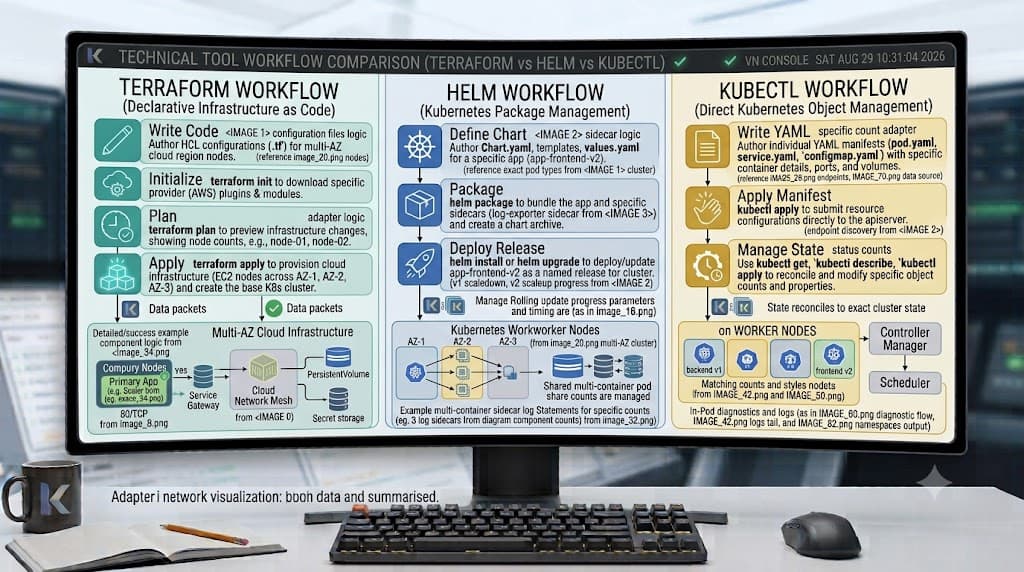
Instead of executing imperative command-line instructions that mutate cluster state directly, modern Kubernetes engineering relies on declarative configuration files. The kubectl apply -f command is the cornerstone of this workflow, reading a structured YAML manifest and enforcing the desired state on the cluster.
A standard deployment manifest specifies apiVersion, kind, metadata, and spec blocks. When you execute kubectl apply -f deployment.yaml, the Kubernetes control plane compares the manifest against the current cluster state and calculates the exact reconciliation steps required. If the resource does not exist, it gets created; if it already exists, its mutable fields are updated in place. Always validate your YAML syntax carefully before applying it, as indentation errors or incorrect API versions will cause validation failures at the API server boundary.
kubectl describe
When a newly applied resource fails to start or gets stuck in a Pending or CrashLoopBackOff state, simple list commands are insufficient. You need the kubectl describe command, which provides a comprehensive, human-readable summary of a resource's complete lifecycle and current status.
Executing kubectl describe pod <pod-name> retrieves both metadata and a detailed event log generated by the Kubernetes scheduler, kubelet, and container runtime. The output is divided into sections showing container image details, environment variables, restart counts, volume mounts, and a chronological event stream at the bottom. This event stream is invaluable for diagnosing scheduling bottlenecks, such as insufficient CPU or memory resources on your worker nodes, or image pull backoffs caused by invalid container registry credentials.
kubectl logs
Inspecting infrastructure state tells you where a Pod is running, but it does not tell you what is happening inside the application code itself. For application-level debugging, the kubectl logs command is your primary diagnostic weapon for retrieving stdout and stderr output from running containers.
Running kubectl logs <pod-name> streams the current container logs directly to your terminal. If your Pod contains multiple containers—such as a primary web server and a sidecar logging agent—you must specify which container you want to target using the -c <container-name> flag. For continuous monitoring during an active test or debugging session, combine it with the follow flag (-f), or restrict historical output using tail flags like --tail=50 to examine only the most recent log entries without flooding your terminal window.
kubectl scale
One of the greatest advantages of container orchestration is the ability to adjust capacity instantly in response to traffic fluctuations. The kubectl scale command allows you to modify the replica count of a Deployment, ReplicaSet, or StatefulSet imperatively without editing your source YAML files.
Executing kubectl scale deployment/my-app --replicas=3 instructs the deployment controller to immediately spin up two additional Pod instances or terminate excess ones to match your requested target. While imperative scaling is useful for quick testing, emergency load response, or local experimentation, production environments typically manage scaling declaratively via GitOps workflows or automated Horizontal Pod Autoscalers (HPAs) that monitor CPU utilization metrics continuously.
kubectl delete
Proper resource lifecycle management includes knowing how to clean up your environment safely when testing or workloads are complete. The kubectl delete command removes resources from the cluster, gracefully terminating running containers and freeing up associated compute resources.
You can target resources specifically by kind and name, such as kubectl delete pod <pod-name>, or purge entire collections of resources defined in a manifest by running kubectl delete -f deployment.yaml. To prevent accidental deletions of critical production workloads, many teams utilize deletion protection mechanisms, namespace constraints, or strict RBAC permissions. Always verify your active Kubernetes context before executing mass deletion commands to ensure you are not accidentally targeting a production cluster.
Verification and Troubleshooting
Even with well-crafted manifests, running distributed systems introduces variables that can cause unexpected behavior. A systematic troubleshooting methodology is essential for diagnosing and resolving issues quickly.
When an application behaves unexpectedly, follow a structured diagnostic ladder. First, check the overall health of the Pod and node infrastructure using kubectl get nodes and kubectl get pods. If a Pod is failing, inspect its recent status transitions using kubectl describe pod. Next, examine application-level error traces using kubectl logs. If network requests are timing out, verify that your Service selector labels match the exact key-value pairs defined in your Pod template metadata, and confirm that your target container ports align correctly.
Common failure modes include ImagePullBackOff errors caused by typos in image tags or private registry authentication failures, OOMKilled states triggered by container memory consumption exceeding assigned resource limits, and Pending states resulting from insufficient cluster CPU or memory capacity. Addressing these requires reviewing your resource requests and limits in your YAML configurations.
Common Mistakes
Beginners transitioning to container orchestration frequently encounter several classic pitfalls that can lead to deployment failures and security vulnerabilities.
A primary mistake is assuming a local cluster exists or using mismatched kubectl client and server versions, which can lead to unpredictable API rejection errors. Another frequent error is writing invalid YAML syntax or incorrect indentation, as Kubernetes manifests are extremely strict regarding structure. Developers also often forget to specify explicit resource requests and limits, allowing runaway processes to starve other workloads on shared nodes. Finally, relying solely on imperative commands rather than checking your configuration files into version control makes reproducible deployments nearly impossible in collaborative team environments.
📌 Recommended Next Guides & References
  <li>
    <a href="/article/docker-and-kubernetes-how-they-work-together-2" class="text-primary hover:underline font-semibold flex items-center gap-2">
      <span>→</span> <span>Docker and Kubernetes: How They Work Together</span>
    </a>
  </li>

  <li>
    <a href="/article/kubernetes-ingress-explained" class="text-primary hover:underline font-semibold flex items-center gap-2">
      <span>→</span> <span>Kubernetes Ingress Explained: Routing, Controllers, and TLS</span>
    </a>
  </li>

  <li>
    <a href="/article/kubernetes-ingress-controller-explained" class="text-primary hover:underline font-semibold flex items-center gap-2">
      <span>→</span> <span>Kubernetes Ingress Controller Explained: Architecture, Routing, and Implementation</span>
    </a>
  </li>